Showing posts with label green. Show all posts

Tuesday, April 16, 2019

Alcohol Ink Background - 2 Different Cards

Hello!  I am back with two new cards today. I had some trouble getting back into the swing of things, but I think I will be posting regularly again.  

I made this alcohol ink background a couple months ago, but like so many backgrounds, I often have trouble using it right away!  Especially when I am happy with the result!  So, yesterday, I was determined to make some cards with it.  


This background was made with green alcohol inks, silver mixitive over Yupo paper (which is really a thin sheet of smooth plastic.)  I also added some silver foil to the parts that were still sticky enough to transfer the foil. I cut my background in two and decided to make two very different cards.


This one is simple, I just stamped and colored some butterflies and folded their wings up to add dimension. This card I would like to add the ModSquadChallenge Three’s Company Challenge.

This second card I wanted to be for Christmas. I added birch tree and cardinal die cuts and embossed the red background with a Christmas Poinsettia folder.


Supplies: 
Card 1: Gina K Designs Whimsical Spring stamps set, Purple Onion Designs Sentiment, Memento and Versafine Black inks, Avery Elle Wonky Stitched Rectangles dies, Spectrum Noir alcohol markers.
Card 2: Impression Obsession Birch tree die set, Purple Onion sentiment, Versafine Onyx Black ink, Sizzix Poinsettia embossing folder, Spellbinders Fancy Edge Rectangle dies

Thanks for stopping by today! 

Sunday, March 17, 2019

Bad Luck!

Happy St Patrick’s Day!  I just sent out a few cards to select friends!  I hope they like this sentiment as much as I do!


Supplies:  Deep Red Rubber Stamps Superstitious, Memento Black ink, Avery Elle pigment inks, Hero Arts Tweed and Four Leaf Grid background stamps, Cuttlebug Swiss dots embossing folder, EK Success punch, other items from my stash.


Have a wonderful day!


Saturday, March 16, 2019

Have a Lucky Day!

I don’t make very many St Patrick’s day cards, but I did make a few this year.  This one is a Clean and Simple card.  Is it too clean?  


I would love to enter Simon Says Stamp’s Work it Wednesday Green & Gold, and Tuesday Throwdown’s Good Luck Challenge.

Thanks so much for visiting!

Monday, March 19, 2018

Spring Tulips Easter Card

Hello and Happy Monday!  It is sunny and a little warmer here.  I just took a nice, long walk.  I have a springy card to share today using some older stamps that have been favorites of mine.


I stamped the background stamp using three colors of ink.  I added the tulips in black right over top and then trimmed it out.

On the inside of the card, I used the same three colors of ink to stamp the eggs. I thought the polka dots there mimicked the dots in the berries on the card front.


Supplies:  Hero Art Newspaper Tulips, Berry Background Stamp, Clear Design April Stamp set, Hero Arts shadow inks in Green Hills, Mint Julep and Tide Pool, Versafine Onyx Black ink, My Mind’s Eye enamel dots, background die cut was a gifted item, Gina K Designs Jelly Bean green cardstock.

I would love to play along with A Blog Named Hero’s Use Your Favorite Hero Arts items, and SimonSaysStamp’s Wednesday Challenge which is Easter Inspired!  Also, I would like to play with Card In Envy’s No Patterned Paper challenge!  Thanks for running this challenges to help inspire us to use our stamps and paper!

Thank you for your visit today!  I hope you will leave a comment with your blog information in it so that I can come visit you too! 

You can find me on facebook or pinterest, too.

Friday, March 16, 2018

Superstitious Handmade Card - And a trimmer question

I hope everyone has a wonderful St. Patrick’s Day this weekend!  And stay safe!  Our local police has sent out safety warnings similar to New Year’s Eve, hoping that everyone will celebrate responsibly.


Supplies: Deep Red Stamps Superstitious, Versafine Onyx Black ink, Prismacolor colored pencils, Crate Paper Party Day 6x6 paper pad, Gina K Designs In the Navy cardstock.

I would love to enter the Cards in Envy Green Things challenge!

If you love your paper trimmer, I would love to know which one you have and why you picked it! I have been having a lot of frayed edges with mine, even when I change the blade.  

Thanks so much for stopping by!

You can find me on facebook or pinterest, too.

Sunday, February 18, 2018

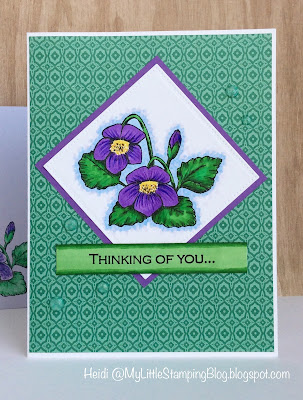
Flower of the Month - February Violet Card with Envelope

Hello!  We woke up to a gorgeous blanket of snow!  It is very pretty and didn’t cause any problem with the roads, and I know it won’t last long. I have to say, I am predicting an early spring, but we shall see!

Back to my Flower of the Month theme.  Each month, I am going to make at least one card using my floral stamps that correspond to birth flowers.  For February, I didn’t even need to look up what the flower is.  The violet is the favorite flower of both my mother and grandmother.  I colored these a traditional purple, but my favorites are the more rare yellow ones.


For this card, I colored with a base of purple marker, then used pencils to add the detail.  It was much easier to combine mediums to get the look I wanted.  I also made an envelope, but colored this more simply and just with pencils.


Supplies: Gina K Designs Stately Flowers 1 and Assorted Greetings stamp sets, Memento black ink, Spectrum Noir markers, Prismacolor pencils, Recollections Coastal Village 6x6 paper pad, Nuvo Crystal drops, MFT Pierced Squares dies

I would love to play along with these challenges:
StampTV February Challenge - Add the Envelope, please
SimonSaysStamp Wednesday Challenge - Add a Die Cut
WordArtWednesday Anything Goes 322-323

This is kind of a bold card for the delicate violet!  Not everyone’s style, but I do like to mix it up.  I do have other violet stamps, so I may have more than one card this month.  Do you have any?  Let me know if you use the flower of the month and I will link you in my next post.  

Thanks for stopping by!

All of my Flower of the Month posts can be found here.


You can find me on facebook or pinterest, too.

Sunday, March 12, 2017

Green Card

Hello! Thanks for stopping by my blog today to see the card I have to share.  I am so happy that you are taking the time to be here.


This card is very straightforward with the stamping. I stamped the white panel with green ink.  Then I die cut it into two pieces and popped the first one up with a thin piece of fun foam.  I was hesitant to try this, but I have found that it is a touch thinner than dimensional tape and is still easily mailed with one stamp.


"Take Good Care" is a sentiment I have can use for several types of notes I need to send, like the 50's song, "Take Good Care of my Baby," to Get well or Sympathy.  I find myself reaching for this sentiment often. (Plus I like the mix of type and script.)

Supplies: Power Poppy Simply Camellias, Gina K Applemint ink and cardstock, Versafine Black ink, Avery Elle Wonky Stitched dies, American Crafts Ribbon, Spellbinders Foliage dies.

I would love to play along in these challenges:
ModSquad challenge - Song Inspiration
Power Poppy Let's Go Green
Cards in Envy - Simple

Sunday, August 14, 2016

Sunflower "Thankful for You" card

Thank you for stopping by!  I have this clean and simple cards to share today that uses one of my favorite sentiments.  I really like this pretty font.

(Click photo to enlarge.)

I followed a sketch for this card, pretty much to the t.  I used alcohol markers to color my image, matted the image and then popped that up with foam adhesive.  

Supplies:  Gina K Thankful for you stamp set, Memento black ink, Spectrum Noir markers, Gina K Grass green? cardstock, Gina K Sending Love patterned paper pack.

Hope you have a  great day!

Friday, July 8, 2016

Cool Penguin Birthday Card

Hello and welcome!  Today, I decided to combine some challenges to make a card type that I sometimes struggle with -- Kid Birthdays!  I think this one turned out really cute!

(Click on photo for larger image.)

I colored the penguin dude with colored pencils.  As a beginner colorist, I enjoy doing the small images -- they aren't nearly as daunting for shading!


Supplies:  Imaginisce Penguin Dude, Mama Elephant Modern Borders, Gina K Happy Birthday to You, Versafine Onyx Black, Hero Arts Shadow ink Mint and Charcoal, Enamel dots, Derwent Coloursoft pencils

I would love to participate in the following challenges:


Thanks so much for stopping by!   I hope you will come back soon!

Friday, May 27, 2016

Nature Bird Card

Hello! I hope everyone will have a happy and safe holiday weekend!  It is Memorial Day weekend in the USA, and it should be good, hot weather for us.  

Today, I am using some new supplies and stamps that I picked up before life got real busy, and now have had a chance to try out.  I had lots of fun stamping with those tiny stamps to create my own customized background paper, and then lots of fun coloring the cute little bird with colored pencils!


I did want to leave my options open for this card, so I didn't add a sentiment. I *may* use it for a Father's Day card, and that is the reason I used the woodgrain embossing folder.  

I didn't realize that these small Dina Wakely birdie stamps (I got mine at Michaels) were acrylic and not photopolymer, but they are still so cute and I just use Versafine for the ink and they still stamp out perfectly.  

Supplies:  Rubber Stamp Tapestry Herbal Sachet stamp set, Dina Wakely Media Little Birdies Stamp and Stencil set, Versafine Onyx Black Ink, Avery Elle Pigment ink Lemongrass, Celery, Mint to Be, Kraft, Truffle, Gina K Jelly Bean Green cardstock, Kraft cardstock, Darice woodgrain embossing folder.

I would love to participate in the following challenges:

Sunday, April 24, 2016

100th Post and a Scenic Card

Thanks for stopping by today, especially.  I noticed that this is going to be my 100th post!  What a fun milestone!

Today I have made a card that is not my normal style.  Over at Artsy Inkers, there has been a challenge this month to make an arch with stamps. It has really taken me all month to figure out what to do.  

(Click on photos for detail.)

I decided to use an oval stamp as the basic shape of the arbor.  Then I stenciled on the outside of the oval with blue ink and below it with greens.  I used several of my peg stamps to change the oval into a flower arbor.  I also used one of the tiny flowers to add texture to the grass below. 

These little bunnies had never been inked before.  I fussy cut them and sponged ink to color them.  The ink is Distress Pumice Stone, which I knew was a brownish color of grey, but it really is much more brown than I realized. 


Art Impressions wants us to take a photo of the stamps we used in the project, and I mixed and matched so many for this project. 

Supplies:  Gina K Designs Warm Spring Wishes (Oval), Rubber Stamp Tapestry from Cherry Blossom and Herbal Sachet sets, Art Impressions Try-Folds Furries, Hero Arts sentiment, Avery Elle Pigment inks, Versafine Smokey Grey ink, Distress Inks Pumice Stone, Tumbled Glass, Bundled Sage, Peeled Paint, Heidi Swapp Stencil

I would love to participate in the following challenges:

Wednesday, March 30, 2016

Clean and Simple Card with Black

Thank you so much for coming by my blog.

I have been thinking about Clean and Simple cards, which is a style I use often, and wondering if I could get a truly clean and simple look using a black card base.  This is what I came up with.

(Click images to enlarge.)

I colored the image in with gel pens, mostly to challenge myself and see if I could. I was surprised that you could do some blending with them.  I used glue dots to adhere the fussy-cut image, using two layers of them for the buds to give that part of the image more dimension.


I also used the same stamps to complete the inside of the card.  This was fun!


Supplies: I Brake for Stamps Bubble Wrap, Lattice and Flowers Sheet, Gina K Designs Applemint Cardstock and Ink, Gina K Black Onyx cardstock, Versamark ink and Recollections White embossing powder.

I would love to participate in the following challenge:

Saturday, March 12, 2016

Cute as a Button Christmas Card!

Let's take a little break from Spring to make a dent in the needed Christmas cards!  I thought it would be so fun to combine some challenges today.  Christmas cards, buttons, green and a sketch!  

Here is what I came up with...


It is another easy card with simple stamping plus a bit of whimsy.  


Supplies:  Recollections Christmas stamp set, Cardmaking & Papercraft Sew Pretty stamp set (button), Inkadinkado sentiment stamp (background stamp with just a portion used for the sentiment), Hero Arts Red Royal ink, Versafine Onyx Black ink, Colorbox Fluid Chalk ink Olive Pastel, Crate Paper Peppermint 6x6 paper pack, bakers twine, Gina K Designs Jelly Bean Green cardstock

I would love to participate in the following challenges:


Thank you so much for stopping by!  I hope you will come again soon!

Friday, March 11, 2016

Textured Daffodil Card

Welcome and thanks for coming to visit my blog!

Today I want to share a card I made for Easter since the time to send out these cards is approaching quickly!


I have been wanting to use some textured paper on a card, so that is what I stamped on today and afterwards colored with chalks.  I fussy cut out the image.  I stamped the Easter sentiment on the inside. 


If you like this stamp, you may be interested in this card where I used the same stamp, but with oil pastels.

Supplies: I Brake For Stamps March Daffodil, Gina K Designs Dark Chocolate Ink, Pebbles Chalks Brights,  Tim Holtz/Sizzix Embossing Folder, Gina K Designs Jelly Bean Green cardstock

I would like to enter this into the following challenge:
SimonSaysStamp Wednesday Challenge - Bit o Green


Thursday, March 10, 2016

Gina K Heart Blooms + "Card Try-Outs"

Thanks so much for stopping by my little stamping blog!  

I want to share this pretty card today.  If you asked me how long it took to make, I could truthfully say it took 5 minutes, or I could say an hour. 


I stamped my flower repeatedly on the colored cardstock using Prima Watersoluble Oil Pastels.  This allowed me to get this pretty watercolory look!  I colored on the stamp first, then applied a little water with a waterbrush before stamping.  In the past, I have just sprayed the stamp with water, but since I am stamping on plain cardstock, I felt I needed the extra control over the water. 


Of course, the reason why this took only 5 minutes to make is because I played around first and did some stamping and card "try-outs."** You can see that in my mock-up,  I played with the arrangement and even did some different colors of ink for the sentiment and cut them out and tried them out in place to see which I liked best.  

**I don't know if this is how other people make their cards, but I thought I would just sortof show part of my process here.  My stamping friend, Daniel, posted a long time ago (I think when TwoPeas still existed with it's great stamping board) about stamp try-outs and I still think about it and use this idea.

Supplies: Gina K Designs Heart Blooms stamp set duo, Prima Watersoluble Oil Pastel yellow-green, Gina K Designs Jelly Bean Green cardstock, Versamark ink, Recollections White detail embossing powder, Vellum, Gina K Designs Made With Love stamp set (for the sentiment), Avery Elle Mermaid Ink

I would like to enter this card into the following challenges:


Saturday, February 20, 2016

Merry Monday - Berries prompt

Hello and thanks for stopping by.  Today I am playing with a new (to me) challenge blog - Merry Monday.  The prompt was Berries.  

This gave me a chance to use this PSX stamp that was given to me in a RAK.  It is so pretty.  In fact, I like it so much I have had it sitting out in my craft space for some time!


I decided to use my Prima Watersoluble Oil Pastels to color right on the stamp, then I sprayed water on it and stamped. It turned out a little different each time and I like the results so much I made two cards!


Supplies:
PSX Mistletoe stamp K-1596 (1995)
Prima Watersoluble Oil Pastels
Crate Paper Peppermint 6x6 Paper pad
Strathmore watercolor paper 5x7 cards

I am entering this project into the following challenge:

Thursday, February 11, 2016

Watercolor "Stencil Stamping" Technique Tutorial

Welcome! I would like to share a background technique I call Watercolor "Stencil Stamping."  It is a good way to get more mileage out of your stencils.  It is easy to do and because it is watercolor, you get a little bit different result each time.

Here is my completed card and a close up of the focal point.


(Click on photos to enlarge.)


Materials Needed:
You will need a dye ink, stencil, water spritzer and paper towels.  Distress inks work really well with this technique!  It is important to have everything out ahead of time.  I am showing watercolor paper here, but you can use regular cardstock if you want.  If you want a pearlized look, you can add a little perfect pearls into your water.


Directions:
Press your inkpad directly on the stencil to get a fairly even coverage. You can use more than one color if you wish.


Spritz the stencil with water as evenly as you can. You will want to experiment a little with how much works for you.  Have your piece of cardstock ready in a clean, dry area nearby.


This is where you want to be ready to work quickly.  You will now pick up the stencil, turn it over onto your cardstock (remember, this cardstock is already set out in a dry spot). Take a clean paper towel and immediately place over the entire work and press the watery ink in evenly.  Some of the extra ink will soak into the paper towel.


After a moment or two, pick up your paper towel and stencil to reveal the pattern. Let dry completely.  


Like I said earlier, you may need to practice just a little bit to see how much water to use and how to move the wet, inky stencil over to your cardstock.   You may prefer a really watery look.  There is no correct look, it depends on what you like. If you get a very, very blotchy result that does not look even, you probably needed to add a touch more water to the stencil.  Don't worry, you will get the hang of it!  And if the entire thing doesn't look how you want, cut half off and use it anyhow as patterned paper.

Here is a photo of some that I did on regular white cardstock.  It really looks good on either type of paper, but watercolor paper is just a bit more forgiving.  


I hope that you found this tutorial helpful and might want to try this technique out!  

Cleaning tips and variations:
When using a dark ink color, you could stain your stencil.  I had this happen with a deep pink and was easily able to remove the ink from the stencil with alcohol from the medicine cabinet.  

Yes, you could also do the same technique with some spray stains and skip the inkpad altogether!  Try whatever you have on hand.  

Supplies I used in this project: 
Colorbox Art Screens stencil - Lovely
Gina K Designs Ink - Applemint and Innocent pink
Gina K Designs Better With You stamp set
Versamark Ink and White detail powder
GKD AppleMint cardstock
Watercolor cardstock
Vellum paper
Spellbinders scalloped Labels One
GKD Patterned paper
Perfect pearls in water brushed over the flower

Thanks for stopping by and I appreciate your comments!

Sunday, April 26, 2015

Our Daily Bread Lily of the Valley

Thank you for stopping by my blog.  I wanted to take the chance to participate in this photo inspiration challenge. 


Supplies:

Our Daily Bread Lily of the Valley stamp
Gina K So Grateful sentiment
Archival ink
Tombow markers
Sakura stardust glitter pen
Echo Park Victoria Garden 6x6 paper pad

This project will be entered into the following challenge(s):


Thursday, March 20, 2014

Watercolor stamping with butterflies


Supplies:
Stamp: Gina K Wildflowers
Ink: Distress Ink Mowed Lawn
Paper: Canson Cold Press Watercolor 140 lb
Embossing folder: Cuttlebug Swiss Dots

Watercolor is such a fun look for cards and is easy to do.  All you need is paper (I like watercolor best for this, but use what you have), dye ink, a stamp and a spray bottle.


Just ink up your stamp and spray some water on it.  Alternatively, you can spray the water out into the air and waft your stamp through the resulting mist.  


Use a little, or a lot.  Your results will be different depending on your ink, paper and amount of water, but they likely all will be pretty.  I say, "embrace the results!" For another look, use multiple colors of ink on the same stamp.


This card was submitted to the following challenge:  StampTV MixItUpMonday - Going Green