Showing posts with label summer. Show all posts

Saturday, August 31, 2019

Retro Swimsuits - Summer Fun Card!

Hello!  I have one last card to share with Just for Fun Rubber stamps.  JFF has decided to discontinue the design team as of September.  The announcement was posted on their blog here.  It has been a pleasure working with their stamp designs, and I wish them much luck in future endeavors.  


I wanted to use this wonderful Vintage Swimsuit image.  I had some scraps from a summer patterned paper pad, and decided to paper piece the suits.  I added white gel pen to accent details.  I totally think I would wear these!


Have a wonderful weekend! I am having company this weekend but hope to come around visiting on Sunday evening and Monday.  

Wednesday, July 10, 2019

Summertime Fruit Thank you card

Hello!  Yesterday, I had a lot of fun playing with this cute fruit stamp set.  We have been eating wonderful cherries and watermelons, so it seems like the perfect time of year for this card.  


I colored the Fun Fruits, set of 4, with alcohol markers.  I did want to mention how I choose colors.  I colored just the fruits first and kept the markers that I was using out on my desk.  

Then, when I went to color the rest of the frames, I tried to pick only markers I already had out.  This is the easiest way, for me, to keep my cards harmonious and not too busy.  I think I only used 8 markers total.

The sentiment is from Florals Sheet. (As always, you can save 10% on these stamps using my code SAVE10HEIDI)

I’d love to enter the 30 Day Coloring Challenge,  Pixie’s Crafty Workshop’s Snippets Challenge (the yellow card was from my scrap box) and Word Art Wednesday’s Anything Goes challenge.

Have a great day!

Sunday, June 9, 2019

Ice Cream Cards - CTMH Balanced Diet stamp set

Hello!  I hope you are enjoying your weekend.  We have had really nice, mild summer weather!  I think it is supposed to start raining during the start of the week, but at this point, we probably need it.  

Today I would like to share another card I designed to make with friends who are beginners.  I thought the ice cream theme was fun, and suitable for all ages.  This card involves no coloring, and I went ahead and cut the card bases and did the die cutting of the circle element ahead.


The background was a lot of stamping for a beginner, and although I could do one in just a couple minutes, it took much longer than I thought for my friend.  The two-step stamping of the ice cream cone was a good lesson for a beginner, but the fussy cutting of the ice cream scoops is a bit time-consuming for someone not used to it!  


So, this card might have been just a touch too long for beginners, but it was doable.  I went with the matching sentiment for the inside (ombré stamping done with two inkpads, as I don’t have the multicolor ones), but my friend chose a simpler thank you sentiment in a single color.  

I did make a second card in pink and yellow!  This card was already given out to a little girl I know with a gift card to Dairy Queen enclosed.  


Supplies: Close to My Heart A Balanced Diet and Wordfetti stamp sets, Hero Arts Shadow inks and Gina K Designs inks in various colors, Versafine Onyx Black ink, Gina Marie X Stitched Circles dies, other items from my stash.

I would like to enter these projects into Crafting By Designs Anything Goes, Cute Card Thursday Anything Goes and WordArtWednesday Anything Goes. 

If you are on Instagram, you may be interested the SimonSaysStamp is now doing specific instagram challenges, and this month it is Summer Fun!  My instagram can be found here.

Sunday, June 2, 2019

A Cool Drink - Stamping on the Gelli Plate

I have a couple cards made with Just for Fun’s Cool Drink stamp and with a background made with a gel press and stamps. 

I am pretty new to the gel press (or gelli plate) but I found this stamping technique easy.  The backgrounds not only work for patterned paper, but since you are printing them with paint, they also have a nice texture.  


First the background.  I brayered craft paint onto my gelli plate, and then I used the citrus slice stamp to pick up the paint.  I stamped the paint off onto another piece of paper, and then repeated until I had filled the gel press with this negative image.  Then I placed a piece of cardstock over the gelli plate and rubbed all over to transfer the paint.  

Then I stamped and colored the Cool Drink stamp. I used Wink of Stella to add glitter over the glass. The two sentiments I used are A Vacation Is... and Happy Birthday from Sentiments 1 Unmounted Sheet.


Now I am in the mood for some lemonade, how about you?

I would love to enter SimonSaysStamp’s Wednesday Challenge - Anything Goes!


Sunday, January 6, 2019

Beach Cards - One Image/Two Occasions

Hello! I’d like to share a couple beach themed cards.  When the weather gets cold, I tend to use a lot of seasonal stamps, but it is fun to change it up and warm up by using summer stamps in winter weather.


The first card was has the beach scene stamped over patterned paper.  I added a cute pineapple charm to this card. That sentiment is the BEST!  I have been trying to be mindful to create some real vacations in my life, and not just trips that are more work than staying home.  We did a staycation last summer and I highly recommend them!

 I had decided to use this same image as an atypical Sympathy card.  I stamped over a watercolor wash ombré background. I paper pieced a yellow sun/moon (whichever one you are seeing is what it is!) and simply framed it and added a sentiment.  This was a card especially made for my mom, who lost a friend recently.  They had good memories of girls weekend beach vacations, so I thought this image was just the right thing.


Supplies: Just for Fun Rubber Stamps Pier Silhouette stamp, A Vacation is... sentiment stamp, ODBD Carried to Heaven sympathy stamp set, Versafine black ink,  Love Nicole Aquarelle 6x6 paper pad, other items from my stash.

Thanks for visiting today!!

Wednesday, July 18, 2018

Popsicle Cards

Thank you for visiting today!  I have been having a lot of fun with this popsicle stamp this summer.  It is easy to color and I like that I can color it in any color I feel like.


I loved adding some stickles glitter glue to the popsicles, but in the second card, I took it a step further and covered the whole thing with glossy accents.  It takes a long time to dry, but it really makes an impact.


Supplies: Just for Fun Rubber Stamps Ice Cream Pop, Sweet Birthday Wishes and You’re So Sweet stamps, Memento black ink, Spectrum Noir alcohol markers, Carta Bella Beach Day 6x6 paper pad, Stickles glitter glue, glossy accents, Gina Marie X Stitched circles dies.


I appreciate your visit today!  Please follow my blog using the Blogger tool on the side bar, or on facebook or pinterest, too.


Tuesday, July 17, 2018

Fish Cards with Paint Bubble Backgrounds Tutorial

I recently made a bunch of cards using a painted bubble background.  It was loads of fun, and I haven’t seen it done often in cardmaking, so I thought I would share a simple tutorial.

(This card is also is being entered into Tuesday Throwdown’s Stitching Challenge)

You will need acrylic paint, dish soap, water, a container to mix in, and a straw.  I used this pie dish, but you might want to try a disposable cup or bowl, or maybe a take-out container.


I mixed about 1 part paint to 5 parts water. I added a few drops of dish soap.  I didn’t measure, I just eyeballed it.  Your mileage will vary here depending on how pigmented your paint is.


Mix it together with the straw and then blow the bubbles till you have tons of bubbles.  I didn’t want to waste too much paint, so I tipped the pie pan to the side and pool the liquid in one spot before blowing the bubbles.


Place your cardstock right down into the bubbles.  Some have found that scooping the bubbles up with the paper, and popping them yourself, is another way to do it.


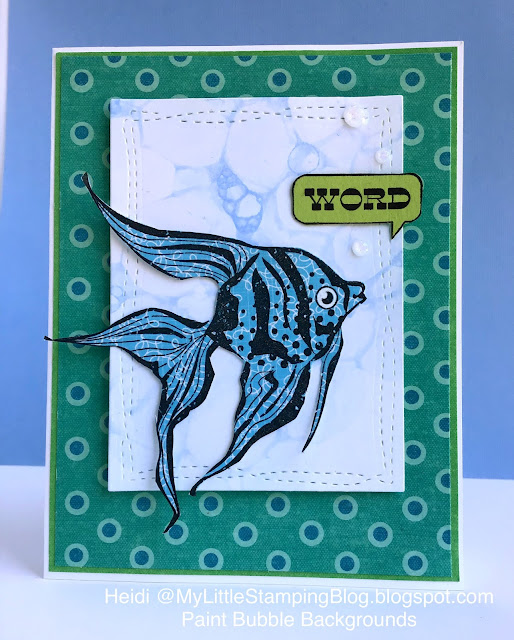
Here is one of my backgrounds!  Let me know if you give it a try!


For this background, I had tried using a disposable cup.  I got an outline of the cup, too, which is a fun look.

Tips:
1)  Don’t have acrylic paints, try any of your reinkers.  
2) Want a lighter color, add water.  Want a darker color, add more paint.  
3) This can be messy!  Don’t work around your beautiful, completed card projects!  Don’t wear your favorite shirt!  I worked in the kitchen.  
4) Be sure to only blow through the straw, resist sucking in at all costs!
5) These don’t just have to be blue water, I am going to be doing black for Halloween cards.  Layer different colors, too.

Supplies:  Inkadinkado Fish and Bizzaro Stamps fish, Hero Arts (with Basic Grey) Awesome sentiment stamps, Versafine Black ink, K&Co patterned papers, DCWV Citrus Stack, Avery Elle Wonky Stitched rectangles, Spellbinders Fancy Edged Rectangles dies


I always appreciate your visits and comments! Please consider following my blog using the Blogger tool on the side bar, or on facebook or pinterest, too.

Friday, June 1, 2018

Shaped Cards Challenge - Beachy!

Hello!  It is time for a new challenge at Just for Fun Rubber stamps and this month we have a fun theme — Shaped Cards!  This is not something I normally do, but it was so fun!  Hope you will play along too!


I stamped my beachy scene and colored it with alcohol markers, then I cut it in a circle.  The scalloped circle was cut from a folded card base, leaving just a little, tiny bit of the fold intact.  Fun, fun, fun!


Supplies: Just for Fun Rubber Stamps Relaxing in the Sand, Memento black ink, Spectrum Noir alcohol markers, Spellbinders Circle and Scalloped Circle dies.

I appreciate your visit today!  I hope you have many crafty moments this June!

You can find me on facebook or pinterest, too.

Monday, April 2, 2018

Charitable Cardmaking - Beach Cards for Domestic Abuse Survivors

Today, I am spotlighting a special project that cardmakers can help with.   Carole at From My Carolina Home is creating Summer Themed Gift bags for residents at her local domestic abuse shelter, Project Safelight.  She is accepting monetary donations, donated sewn goods and handmade cards!  See her detailed blog post HERE.  (Note that Carole has arranged for some random prizes for this project!)


Since there are special considerations regarding the sentiments for these cards (all contained in the blog post link above) I decided on this sentiment from Gina K Designs set I have.  I was formerly inclined to use it only with sympathy cards, but after emailing Carole about it, we both decided that it would work well for the people in the shelter.  

Plus, I had really wanted to do beachy cards to go with the summer theme, so the sentiment works great with these silhouette stamps from Just for Fun.  I went ahead and made some backgrounds using Distress Oxide inks on plain cardstock.  To get some control over the color placement, I picked the color up on a piece of acetate and then applied it to my card.


I used Distress Oxide Black soot to stamp out the images.  I find this always works perfectly for me with the solid stamps, so I am sticking with it!  The sentiments were stamped with Versafine.

Supplies: Just for Fun Rubber Stamps Dolphins-Palm Silhouette, Pier Silhouette stamp, Tiny Flying Birds stamp, Gina K Designs Inspiration Mosaic set, Versafine Onyx Black, Distress Oxide inks Abandoned Coral, Fosilized Amber, Salty Ocean, Broken China, Worn Lipstick, Black Soot, cardstocks from my stash, Cuttlebug Decorative Frames embossing folder.

If you have time, I hope you will send some cards, or a monetary donation to support this charitable drive!  Remember to sign them on the inside and send an envelope!  Cards are due April 30, 2018

You can find me on facebook or pinterest, too.