Showing posts with label Thank You. Show all posts

Tuesday, July 12, 2022

Clean and Simple Thank You Notes!

 I wanted to thank everyone for their recent kind comments!  Wow, I am really behind in returning the love, but it is so meaningful to me that you took the time to visit my blog!  

I mean to be making Christmas cards this month, but my son let me know that he needs more thank you cards for graduation gifts, so I make a couple quick ones today.  


I used old favorite stamps in my stash for these cards!  The first card was stamped on glossy cardstock which I had swiped inkpads over to get an abstract look.  The second card, I used Distress Oxide ink and then spritzed with water before stamping.  

Stamps Used:

Hero Arts Leafy Vines background Stamp

Hero Arts Newspaper Tulip stamp

Hero Arts Cursive Thank you

Anita’s Stamps Thank You

Wednesday, November 13, 2019

Cute Critter Thank You Notes

Hello, hope you are well!  We have wintery weather today, but it is sunny.

As promised, I stamped up a few more of the images from the Mostly Mice stamp set, which is one of the newest sets in the store, sold as an unmounted sheet.  I decided to start on a card set to give as a gift, to a music teacher.  I know that at the holiday, she will be getting a lot of teacher gifts and may need some thank you notes.  


I colored the images with alcohol markers.  For the first card, I made it look as if the critters were looking over a wall of patterned paper.  I stamped the Thank You from this Sentiment set onto yellow cardstock and trimmed it out.


The second card uses two of the images.  The little student mouse fits just right under the teacher bunny, but they are two separate images.  These are so sweet and fun to color.

As always, you can save 10% off this and your entire stamp order at the I Brake for Stamps store using my code SAVE10HEIDI.

Thanks for visiting!  Happy Stamping!


I would love to enter SimonSaysStamp’s Monday Challenge - Thanks/Thanksgiving, The Daily Marker’s 30 Day Coloring Challenge, Pixie’s Crafty Workshop’s Snippets Challenge (all my patterned and colored cardstock was scraps) and Cute Card Thursday’s Anything Goes challenge.

Tuesday, September 10, 2019

Bird Thank You - textured cardstock

Hello!  Today, I worked on a Thank You card.  First, I sponged light blue Distress ink over textured white cardstock.  I then stamped my bird image onto this, and a second time onto plain white cardstock.


I simply filled in the color with alcohol markers, then fussy cut out the plain bird and glued it over top of the textured paper.  I like the tiny bit of dimension this gives, as I would have lost a lot of the bird detail on the textured cardstock.  

Oh, and I almost forgot! I did add a touch of white gel pen to accent the eye.  I often find that makes a big difference!


The image is from I Brake for Stamps Sheet 141A Birds, and the sentiment is from Florals Sheet.  Ink is Gina K Dark Chocolate.  I am always happy to offer a coupon code that gives you 10% off your entire stamp purchase at I Brake for Stamps: SAVE10HEIDI.

Thank you for visiting today! Happy Stamping!

~~Heidi

Wednesday, August 21, 2019

Yellow Floral Thank You Cards

Hello!  Thank you for all the wonderful comments on my last post about Pinned It? Try It!  I have my next technique picked out and will be working on that soon.  We are in back-to-school mode, and have quite a lot on the to-do list!  I was able to make it to my craft group last night, and it was fun to talk to everyone about what they were making.  A couple gals will be going to a stamping convention this weekend. I wish I had time to join them!

Today I am sharing two thank you cards.  I started out wanting a sunny and bright, but clean looking card.  I wanted to use just stamps, ink and plain cardstock. 


I stamped my flower in yellow, and then used the second generation stamping to fill in the white areas. I know you cannot see that so well in the photos, but it makes a big difference.  


For the second card, I wanted a little more going on, so I used a frame of yellow flowers (still using that second generation) but then added an outer frame of black stamping. That was just the bit of drama I was looking for.  

Supplies: I Brake for Stamps  Floral Half Sheet set,  Thank You Flourish sentiment, Hero Arts Butter Bar ink, Versafine Onyx Black Ink, Cardstock from my stash.  (Save 10% on your stamp purchase at I Brake for Stamps with my code SAVE10HEIDI)

Happy Stamping!


Wednesday, August 7, 2019

August Flower of the Month Card - Gladiolus

Did you know that Gladiolus is one of August’s birth flowers?  This is a wonderful flower comes in so many colors. I often will look at images of flowers on the internet before I color my stamped image, and for this one, I found out I could have used almost any color.  


However, I went with a peachy orange color.  This was my absolute favorite color when I was a little girl.  I colored the stamens of the flowers with a fine tipped marker in magenta, so they stood out a little more, and added just a touch of white gel pen.  


My stamp is the Jumbo Version of August Gladiolus, but if your prefer that your stamp not take up the entire card front, there is a smaller version available too.

Supplies: I Brake for Stamps August GladiolusSentiment from Florals Sheet, Avery Elle Wonky Stitched Rectangles, American Crafts Twine, Spectrum Noir alcohol markers.  Save 10% on your order at I Brake for Stamps with my code SAVE10HEIDI.

Thank you for visiting!  Have a wonderful day!


Wednesday, July 10, 2019

Summertime Fruit Thank you card

Hello!  Yesterday, I had a lot of fun playing with this cute fruit stamp set.  We have been eating wonderful cherries and watermelons, so it seems like the perfect time of year for this card.  


I colored the Fun Fruits, set of 4, with alcohol markers.  I did want to mention how I choose colors.  I colored just the fruits first and kept the markers that I was using out on my desk.  

Then, when I went to color the rest of the frames, I tried to pick only markers I already had out.  This is the easiest way, for me, to keep my cards harmonious and not too busy.  I think I only used 8 markers total.

The sentiment is from Florals Sheet. (As always, you can save 10% on these stamps using my code SAVE10HEIDI)

I’d love to enter the 30 Day Coloring Challenge,  Pixie’s Crafty Workshop’s Snippets Challenge (the yellow card was from my scrap box) and Word Art Wednesday’s Anything Goes challenge.

Have a great day!

Saturday, July 6, 2019

Tropical Card

Hello everyone!  This is my first post since I got back from vacation.  I have gone through the blog list and returned comments, but I was itching to actually get back in the craft room, so that is what I did!


I had these flowers already stamped and die cut out.  I did that one time at my craft group. I used Distress Oxide inks, but did not keep a record of what colors.  I paired this with a purple scrap from my scrap box, embossed with a new embossing folder, and then sanded down.  I celebrated my birthday fairly recently, so I added a sentiment that I could use for thank you cards.  

Supplies: Hero Arts Color Layering Hibiscus, Distress Oxide Inks, Versafine Black ink, Close to My Heart Wordfetti sentiment set, Gina Marie X stitched Circle dies, Darice Embossing folder.

I would love to enter some challenges!
Double D Challenge - Tropical
Inspirational Challenge - 3 or 5 of something (3 flowers)
Tuesday Throwdown - Anything Goes
WordArtWednesday - Anything Goes


Thank you for your kind comments!  It means so much to me that you take time to visit and encourage me!

Sunday, May 26, 2019

Swan Thank You Card

Hello cardmakers!  I hope you are having a nice weekend.  For those of you in the USA, I hope you are able to visit family and friends during this holiday weekend.  We are going to be busy with family obligations all weekend, so this post is actually pre-scheduled.  (Right now, I am probably making a pasta salad for a family cook-out.)


I made this card a couple weeks ago, and haven’t had a chance to share it yet.  I used a sketch and this very pretty stamp set from Hero Arts.  I think they have a stamp artist who does lovely storybook style  drawings, and I would like to own many more of these! I actually wish they would tell us who the stamp artist was for all the stamps. I know some companies do and some don’t, and I’m not sure why and why not.

I stamped, colored and die cut out a bunch of these images.  I then created the main sketch using embossed cardstock and patterned paper.  Over top of the elements, I created my scene.  I am hoping to make a bunch more cards with this set! 


Supplies: Hero Arts Swans and Cattails stamps and dies, Memento Black ink, Spectrum Noir alcohol markers, Bo Bunny Early Bird 6x6 patterned paper, EK Success square punch, Elizabeth Crafts Embossing folder.  

Thanks for your visit today!  I will be so happy to read each and every comment, and visit all your blogs when I am finished with the family obligations!  Have a great day!

Friday, May 3, 2019

Tea Time Thank You card - Using Peg stamps!


Hello!  Today, I am playing in the Coffee Lover’s Blog hop for Spring and Summer! This is always such a fun blogging event and I have been looking forward to it.  In fact, ALL my coffee and tea related stamp sets are sitting out on my desk as I write this. 😁


My first card is actually a tea card.  You can participate if you make a coffee, tea (or, I think, even hot chocolate) themed project.  I got out my peg stamps for this, and had so much fun stamping the background.

I then just used a pretty ‘Thank You’ sentiment and die cut that as a layer.  I dug through my embellishments and found this fun butterfly sent by a stamping friend, and thought it finished the card perfectly. I kept this card flat for easy mailing.

Supplies: Rubber Stamp Tapestry A Spot of Tea stamp set, Anita’s Stamps Thank You, Versafine Onyx Black ink, Avery Elle Pigment inks in Sugar Plum, Raspberry, Sapphire, Lemon Grass, Jungle and Mermaid, Gina K/Thermoweb Double Stitched Rectangle dies, other items from my stash.

I would also like to enter the Inkpirational Challenge Tea Photo.  This is why I did a tea card today!


Thanks for visiting!  If you are new to my blog, I hope you will consider leaving a comment, or even subscribing to my blog.  I appreciate this so much, and always try to visit your blogs as well.  

Have a wonderful day!

Sunday, October 7, 2018

World Cardmaking Day - More Florals!

Yesterday was World Cardmaking Day! I hope you were able to do some crafting!  Luckily, the challenge goes through today, so if you are a touch late, like me, you still have time.  We were doing stuff around the house, and by the time I got to blogging last night, Blogger was really acting up for me, so I went to bed!


If I only ever made cards for myself, I think they would all be florals!  This is a lovely retired stamp I have used before by Heartfelt Creations. I heat embossed it and added watercolors, then wink of Stella glittery over the whole thing.  When I added it to the panel, I just popped up portions of it and glued down others.  I kind of like it that way!


Supplies:  Heartfelt Creations Flirty Fleurs stamp set, Versafine black ink, Recollections Clear embossing powder, watercolor paper, My Mind’s Eye Bramble Rose 6x6 paper pad, Spellbinders Fancy Edge Rectangles dies, Our Daily Bread Designs sentiment, Tim Holtz tag dies, other items from my stash


I would love to play in SimonSaysStamp’s WCMD challenge, the Flower Challenge - Add Some Sparkle and Die R Us Anything Goes (with brands they carry)

Thank you for your visit today!  I appreciate it so much when you have time to leave a comment or follow my blog.  Hope to be visiting your blogs soon, too!


Friday, September 28, 2018

Fall Sunflower Card

Hello and Happy Friday!  I’m glad you are here for a visit!  I have a fall-inspired card to share today.


I first used a gold texture paste and put that through a stencil onto orange cardstock.  After that dried, I die cut the panel.  I colored my sunflower image, then carefully fussy cut it out. I popped it up over the stenciling and added Nuvo drops to add texture.

Supplies: Gina K Designs Thankful for You, Painted Autumn stamp sets, Memento and Versafine black inks, Heidi Swapp Gold Texture paste, Recollections stencil, Avery Elle Wonky Stitched rectangles dies, Gina K Tomato Soup cardstock, Nuvo Blizzard glitter drops.


I would love to enter Word Art Wednesday’s Anything Goes Challenge and Cute Card Thursday’s Autumn Challenge

Thanks so much for your visit!  I invite you to leave a comment to let me know you were here, and also consider following my blog.  Have a crafty day!

Sunday, September 23, 2018

Camping Themed Thank You card (Purple Onion Designs)

Hello again!  Glad you are here!


I needed to make a thank you card, and it had to be camping-themed.  So I got out some of the Purple Onion stamps I have been collecting and made this scene.  I did use my trusty stampamajig AND masking, but it was pretty straightforward.

I then colored the image with markers, using some stippling to get texture.  I did color the sky, but was unhappy with it (it was my first attempt at a night sky) so I trimmed out the scene and placed it over this background that was in my stash.  (It was made with light blue cardstock, mopping up some excess distress and distress oxide inks from my work surface.) This worked out well!  I just had to paper piece on the moon.


Supplies:  Purple Onion Designs stamps from the A Sweet Summer collection, Memento and Versafine Black inks, Spectrum Noir alcohol markers, other items from my stash.

I would love to enter this card into Back to Basics Inky Backgrounds challenge.  

Thanks so much for visiting, and a big double thanks to those of you who comment and subscribe!  

Monday, August 13, 2018

Watercolored Cosmos

I recently joined a local papercraft group.  I had never really traveled with my stamping supplies before, so I had some trouble figuring out what to bring without bringing too much.  The last meeting, I decided to bring watercolor paper, a few water-based markers and my stamping platform.


I then was able to try the stamping technique that Tim Holtz showed when he released his stamping platform.  Basically, it allows you to color your stamp in just one area with a marker -  stamp - then color another area, etc.  I spritzed with water in between and slowly built up color till I got the depth I wanted.  I originally thought that this stamp was poppies, so that is why I chose these colors, however, I looked it up and it is supposed to be cosmos.  Oh well, still turned out pretty!


When I was satisfied, I let it dry and then stamped a sentiment over top. This is where I really like having a stamping platform, because when stamping on watercolor paper, it took three times to get good coverage with the sentiment.  

Supplies:  Impression Obsession Cosmos, Hero Arts CL325 Paris stamp set, Versafine Black ink, Tombow water-based markers, Crate Paper DIY shop 6x6 paper pad, Elizabeth Crafts embossing folder, Nuvo glitter drops, other items from my stash.


I truly appreciate your visits and enjoy reading your comments! Please consider following my blog using the Blogger tool on the side bar, or on facebook or pinterest, too.

Thursday, August 2, 2018

Little Birdie Thank You Notes

Hello! I don’t know about you, but my most-needed card type is Thank Yous!


I stamped my sentiment and die cut it out.  I then stamped my little tiny chickadee all over the background with a grey-brown pigment ink.  I also colored a bird and cut him out to perch right there on the sentiment.  

When making one card, why not make two?  I used patterned paper, more stamps from the bird set and the same basic layout and now I have two cards for my stash. I’m sure they won’t last long since I was very short on Thank Yous.  


All the stamps I used can be found the in I Brake for Stamps store! Save 10% by using my coupon code, SAVE10HEIDI.

Happy Stamping!

Supplies: I Brake for Stamps Bird Sheet 141A, Thank You Flourish stamps, Versafine Black and Brown inks, Avery Elle Grey pigment ink, My Mind’s Eye paper, Gina Marie x stitched rectangles dies. 


I truly appreciate your visits and enjoy reading your comments! Please consider following my blog using the Blogger tool on the side bar, or on facebook or pinterest, too.

Monday, January 1, 2018

Color Challenge at Just for Fun’s January Card Challenge!

I want to wish you a very Happy New Year!  December just flew by.  I hope you had a lovely holiday season.  This is one of the many times of year that I need Thank You cards.  Just for Fun’s January challenge is a fun color challenge!


As most of you know, I am a happy member of Just for Fun Rubber Stamp’s design team.  I do like their original-styled stamps (and that they come in unmounted, mounted and wood-mount - my favorite type of stamp is rubber on cling foam), but want you to know that you do not have to use their stamps in order to participate in the challenges.  So if you are looking for some fun ways to help you get more cards made this coming year, I hope you will do our challenges! The prize winner is random, which I think is a great way to encourage crafters to join in!


For my card, I first scribbled blue and purple water-based markers onto watercolor paper.  I sprayed it heavily with water to soften the color.  After that dried, I then colored onto my snowflake stamp with the same blue and purple markers, sprayed that with water and stamped it.  The differences between the purple and blue are a bit more obvious in real life.  

Supplies:  Just for Fun Rubber Stamps Framed Snowflake, Tombow Water-Based markers, watercolor paper, Cheery Lynn Designs Thank You die, Darice Snowflake Folder, White Pigment ink (which I pounced on top of the purple paper to bring out the embossing)

Thanks for stopping by!  Hope to see you again soon!

Tuesday, July 18, 2017

Partial Stamping

In my stamping group, we were trying out this technique for partial stamping of your background stamp.  You can see another card on my friend, Connie's blog.


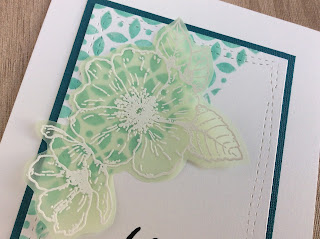
I used a slightly neglected background stamp for this and two colors of teal ink.  It was very easy and took no time to try it out.


The flower was stamped on green vellum and heat embossed.  I added a sentiment from another slightly neglected set. I believe I used up all my thank you cards last week, so it will be a priority to build up a new stash.  

Supplies:  Hero Arts Four Leaf Grid stamp, Hero Arts CL325 Paris stamps set, Gina K Designs Heart Blooms stamp, Hero Arts Mint Julep & Tide Pool inks, Versafine black ink, Versamark ink, White detail embossing powder, Avery Elle Wonky Stitched rectangles dies

I would love to participate in these challenges:
A Blog Named Hero Florals
Flower Challenge - Embossing (Heat or Dry)


Saturday, April 22, 2017

Sepia Silhouette Flowers

Hello again, stamping friends!  It is a drizzly and dreary day today and I have been stamping quite a bit. This is one of the cards that I finished.


I wanted to use this beautiful silhouette stamp from Purple Onion.  I wish I knew what flower it was supposed to be, but it is definitely pretty.** I used sepia ink to stamp on patterned paper.

Then I noticed the bit of pink in the patterned paper, so I got out a sheet of pink cardstock. The damask stamp was already out with my other Purple Onion stamps, so I naturally reached for it.


Just a few more details till it was finished.  My card recipient won't know about this, but I thought I would tell you.  Instead of stamping on another sheet of cardstock, I just cut my little circle right out of the middle of my background.  :) This probably stemmed from laziness more than frugality.

Supplies: Purple Onion Designs Flower Cluster, Damask Background, Technique Tuesday Little Sentiments, Versafine Sepia ink, Hero Arts Soft Sand shadow ink, Prima Nature Garden 6x6 Paper pad; Spellbinders circle dies, Gina K Designs Innocent Pink and Dark Chocolate cardstocks

I would love to participate in this challenge:
Double D - Silhouettes
Mojo Monday Sketch #493

** (Did you know that stamp is only $2!!? I saw the price when I was looking up the name for my supply list. They have a few that are cheap like that! Wow!)

Sunday, July 10, 2016

Tea Time Thank You card

Hello! Thanks for stopping by today.  I am continuing to add thank you cards to my stash.   This one was easy and fun to make.

(Click for larger photo.)

The process was simple.  I first stamped the large teacup with black ink onto my card, and to a post-it note. I cut out the post-it note to make a mask.

I then stamped with my peg stamps all over the panel to create patterned paper.  I did use distress ink to color around the edges of the panel.  I tried to choose my colors to be analogous, meaning that they are side by side on the color wheel.  This creates a harmonious color scheme.

Supplies:  Mama Elephant Cup of Wishes, Rubber Stamp Tapestry A Spot of Tea peg stamp set, Technique Tuesday Tiny Sentiments, Versafine Onyx Black ink, Avery Elle Pigment inks in Sapphire, Mermaid, Sugar Plum and Celery, Distress Ink Tumbled Glass, cardstock from my stash.

Thanks for your visit and for the kind comments!  

Saturday, July 9, 2016

Artsy Flowers Thank You card with Gina K stamps

Hello!  Hope you are doing well today. I have a quick thank you card to share today as I am rebuilding my stash.


Supplies: Gina K Art from the Heart Stamps set, Gina K sentiment from Made with Love stamp set, Versafine Onyx black, Derwent Colorsoft pencils, grey cardstock from my stash.

Thanks for stopping by!  I hope to see you again real soon!

Tuesday, March 29, 2016

Stately Sunflower Thank You Card

Welcome and I hope you are doing well today!

:)

Today I have a fun card to share!  I did more coloring with chalks onto textured paper.  It is so fun and easy to do.  If you still have some chalks lying around, I hope you will try it. I did a very similar card here.

(Click on photos to enlarge.)

I do like to fussy cut these out since you cannot really stay in the lines when using chalk.  


The white panel was done by using a die, but not cutting with the die, instead using the sandwich for embossing.  

Supplies: Gina K Designs Stately Flowers 5, GKD Dark Chocolate ink, Kraft, white, textured and yellow cardstock from my stash, Spellbinders Lattice Rectangles, Pebbles Chalks

Thanks so much for stopping by!