Showing posts with label heat embossing. Show all posts

Monday, July 18, 2022

Stained Glass Look with Stamps

  Hi Everyone!

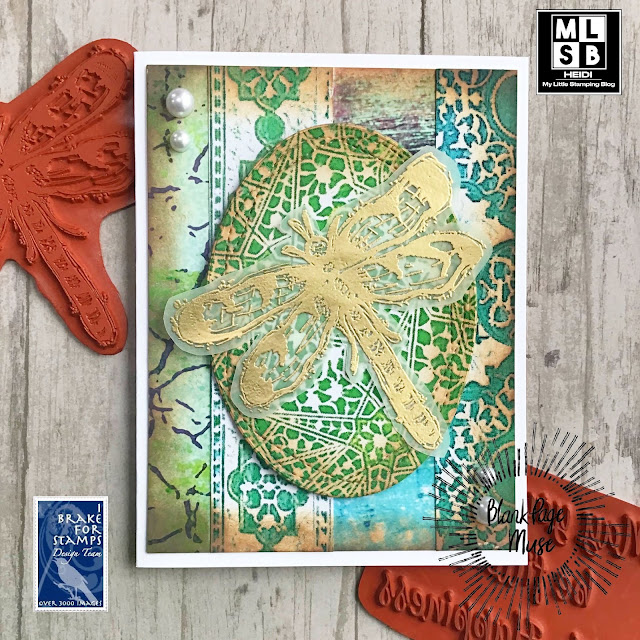
 The I Brake for Stamps shop has a wonderful selection of Stained Glass stamps.  I decided to use this one today because the diamond shape really caught my eye!


I heat embossed the stamp with white powder on watercolor paper.  I then colored in the sections with Tombow water-based markers.  I then blended the color, section by section, with a paintbrush dipped in water that I had mixed with Perfect Pearls.  It is really obvious in person, but only the close-up photo shows the lovely shimmer!  

I was in a bit of a traditional mood, so I finished off the card with old patterned papers from my stash and some gems.  

This stamp is part of MS89 Full Plate, along with 8 other images, in the I Brake for Stamps shop.  The sentiment is from Quarter Sheet Dahlia.  You can always use my affiliate code BPMHeidi to save 15% off your order!

Thanks for visiting today and have a wonderful day!

You can also find more inspiration at the links below:

The Blank Page Muse- https://blankpagemuse.com/

FB Fan Page- https://www.facebook.com/groups/blankpagemuse/

Instagram Shop- https://www.instagram.com/blankpagemuse/

Instagram Blog- https://www.instagram.com/blankpagemuseblog/

Twitter- https://twitter.com/BlankPageMuse

Pintrest- https://www.pinterest.com/blankpagemuse/boards/

Saturday, January 8, 2022

Dragonfly with Faux Mixed Media background

  Hello stamping friends!  I don’t know about you, but I tend to hoard beautiful patterned papers, but I am trying to reform myself!


Today I have a card design that uses a lot of patterned paper to give the look of mixed media, without the work. I used Pam Bray’s Cyan Consortium papers.  Basically, I used a lot of scraps cut off from making A2 card fronts.  I then just glued them together in a card base and sponged tan ink around the edge. I cut an oval die from another card scrap.  

I simply heat embossed the lovely dragonfly stamp from the Fall Rubber Stamp set, also by Pam Bray, over a very light green vellum.  On the inside, I stamped the same dragonfly in light tan ink, and stamped the sentiment over top.

I hope you are inspired to use more patterned paper!  Have a wonderful day!

If you like these papers or stamps, use my code BPMHeidi to save 15% at both the Blank Page Muse AND I Brake for Stamps stores.  

You can also find more inspiration at the links below:

The Blank Page Muse- https://blankpagemuse.com/

FB Fan Page- https://www.facebook.com/groups/blankpagemuse/

Instagram Shop- https://www.instagram.com/blankpagemuse/

Instagram Blog- https://www.instagram.com/blankpagemuseblog/

Twitter- https://twitter.com/BlankPageMuse

Pintrest- https://www.pinterest.com/blankpagemuse/boards/


Thursday, June 11, 2020

Polar Pals Christmas Cards

I am really far behind in Christmas card goals this year.  Now that it is summer, I think I will have more time to catch up.  I will start catching up with these two cards.


The first background was made with heat embossing on watercolor paper. I then used a square acrylic block to apply distress inks (spritzed with water) to specific areas.  I ended up liking the controlled, but not totally controlled look of this!

The second background was a technique I tried with stencil resist.  It didn’t work, but I liked the background anyhow.

Thanks for visiting!

Christmas Card Goal to Date: 30
Christmas Cards completed to Date: 18

Wednesday, April 29, 2020

Clean and Simple Spring Floral Card

Hello! I have really been enjoying the flowers this spring.  It has been rather cool and all the blooms have lasted so much longer than usual.  


For my card today, I decided to use some bright spring colors and flowers. I heat embossed this image on plain cardstock, then sponged over top with Distress Oxide inks in Tumbled Glass and Twisted citron. I really liked the color the blended in between.  

Here is a quick view of the stamp set I used, I Brake for Stamps Half Sheet 138B. (As always, save 10% on your order with my code SAVE10HEIDI)


Thank you for visiting today and happy stamping!

Wednesday, March 11, 2020

Fashion Lady Mixed Media Card

Hello everyone! I hope you are doing well.  I know this is an uneasy time for many due to the Coronavirus.  It has come to my area and we are having some school closings for cleanings, and everyone is taking precautions.  

I did want to take just a second to urge you to get your information from a reputable source. I have seen email forwards, memes and videos that have half-truths that could be dangerous.  I want to do my part to protect the elderly and infirm as much as possible.  Both in my family and in yours.  

The one great thing is that crafting at home is as safe as ever! LOL!

Today, I finished up this card using a couple mediums and stamp sets.  It was fun to make.


First, I heat embossed the doily image with white powder on watercolor paper. I used Brusho Powders to create this bright background! (I liked it so much I almost didn’t use it on a card.)

Second, I heat embossed the fashion lady on grey cardstock.  I took some purple Perfect Pearls and added a bit of water to them to make a paint. I painted this on the flowers using a fine liner brush.  It looks so shiny in person!


Stamp sets used:
Save 10% on your order at I Brake for Stamps using my code SAVE10HEIDI 

Thanks for visiting!


Thursday, February 27, 2020

Christmas Cards with the Double Point Fancy Fold

I’m not much into making fancy folds, I frequently make mistakes in measuring, so it is actually a little bit odd that I fell so in love with this fold and made 6 cards!  

I first saw the fold last week on Carol’s blog here.  There are MULTIPLE video tutorials out there (one of which is here) and I found it impossible to figure out who the original designer was.  


As I was making one, I figured out that I could easily get 6 cards worth using just 2 sheets of 12x12 patterned paper, so that is what I did!

The hardest part was figuring out which focal point to use.  These sat on my desk for days before I decided on heat embossing the poinsettia on another coordinating patterned paper.  I was set on using some label dies for the focal points, mostly because I have only rarely used them in the past and I thought they looked nice.  


Anyhow, this was super fun for me, and if I am doing a fancy fold, you have got to know that it must be a pretty easy one!

I’d love to enter the February Rudolph Days challenge and SimonSaysStamp’s Wednesday Anything Goes challenge.


Cut directions for 6 cards from 2 pieces of 12x12 patterned paper:
1) Sheet one: Cut into three 4 inch by 12 inch pieces.  Take each of those and cut into four 4 by 3 inches pieces.  You will have 12 4x3 inch pieces.
2) Sheet 2.  Cut into three 4 inch by 12 inch pieces.  Take each of those and cut into 4 x 5.25 inch pieces.  You will get 6 of those and then an 3 little pieces of scraps.

You will also need a 4 1/8 by 5 3/8 matting for each card, a 4.5 by 5.5 card base, and whatever type of focal point you choose.  Follow the directions in the video tutorial I linked to above.

Thanks for visiting!!


Christmas Card 2020 goal to date: 10
Christmas cards made: 12

Monday, February 17, 2020

Floral Card with Perfect Pearls and Brusho Powders

Hello!  I have a very pretty card to share today, and I used an older medium, Perfect Pearls! I am convinced that they are making a comeback, and I think that this detailed stamp set is the perfect style for them.

I stamped my flower on the background with Versamark ink and then used Gold Perfect Pearls.  After brushing off the excess, I spritzed the card with water to set the medium.  


For the focal point, I heat embossed the same flowers with gold embossing powder on watercolor cardstock. I wet the cardstock and then sprinkled Cobalt Brusho Powders over top.  I let this dry naturally so I would get variations in the colors.  

I left a spot in the upper left of the focal area for my sentiment. I wasn’t sure if I would use this for a birthday card or maybe even a Sympathy card, if a need arises.  I also did a bunch of Perfect Pearl backgrounds with the different flowers from this sheet so I have more cards to create in the future.


Supplies:

I Brake for Stamps Floral Half Sheet, Versamark Ink, Perfect Pearls Gold, Brusho Colbalt, Detail Embossing Powder Gold, Stardream Antique Gold cardstock, Spellbinders Fancy Rectangle Dies
(Save 10% on your order at I Brake for Stamps with my code SAVE10HEIDI)

I would love to enter Mod Squad’s Mica Powders challenge, SimonSaysStamp’s Monday Challenge Frame It, and WordArtWednesday’s Anything Goes Challenge.

Thanks for visiting!  What are you working on?

Wednesday, January 15, 2020

Valentine’s Hugs and Kisses Card

Hello!  I have a very traditional looking Valentine to share today.  I thought that the grungy look of the sentiments in I Brake for Stamps Old and New stamp sheet would look good with the Chalkboard technique.  That was my starting point for this card.


I heat embossed the sentiment, then smudged white ink around the edge of the panel.  After framing this out with another red die cut, I used some neat foiled patterned paper for the background.  My embellishment, the stamped lips,  is also from the stamp set!  I thought this turned out nicely, and definitely, the photos don’t do this one justice.


Supplies: I Brake for Stamps Old and New stamp sheet, Recollections White Detail Embossing powder, Spellbinders Fancy Edge Rectangles dies, Hero Arts Red Royal dye ink, Versamark embossing ink, Avery Elle white pigment ink.
Save 10% on this stamp set, or anything you order at the I Brake for Stamps store using my code SAVE10HEIDI.

Thanks for visiting today!


Friday, June 14, 2019

Sailboat Father’s Day Card - Stamp Kissing Technique

Hello everyone! Today, I’d like to do a quick share.


I have a solid sailboat stamp that I inked up with light blue ink.  I then inked up a tweed background stamp with navy ink.  I kissed the sailboat onto the tweed background to pick up the navy ink, and then stamped it down onto my card panel.  I was really pleased with how this turned out!

Supplies: Just for Fun Rubber Stamps Sailboat Silhouette, Father’s Day, Hero Arts Tweed Background Stamps, Hero Arts Shadow inks in Cornflower and Navy, Versamark Embossing ink and White detail embossing powder, The Paper Studio embossing folder

I’d love to enter this into the ModSquad Challenge Nautical Masculine challenge and CASology’s CALM challenge.

Thanks for your visit!!

Sunday, May 5, 2019

Coffee Lover’s Blog Hop - What’s Brewing?


Hello again!  I am still having fun making coffee themed cards for the Blog Hop.  Today, I have one with a couple nice stamps from Just for Fun Rubber Stamps.  For those of you who are new, this is one of the design teams I am on.  


This stamp is called Latte Love and it is one of my favorites.  The sentiment is What’s Brewing.  They also have a whole section of coffee, tea and wine stamps that are a bit different than you see elsewhere.  

I colored my stamp with alcohol markers, using colors from this patterned paper I wanted to use.  I then added Wink of Stella to the coffee, and Nuvo Drops glitter glue to the heart.

The background is Distress Oxides.  I nearly always coat my cardstock first with a light layer of gesso before I make this type of Distress Oxide smooshed background. I feel like I get better layers when I do this.  

Then I just finished the card with the sentiment heat embossed on vellum.


Thank you so much for visiting today!  For new visitors, I hope you will consider following my blog and leaving a comment. 

Have a great day!  Stay caffeinated and crafty!


Wednesday, February 20, 2019

Watercolor Wedding Card

Hello, cardmakers! Since Valentine’s Day just passed, I decided to make a wedding card when all these Love stamps are already out.  I always like to have a Wedding card in the stash.


I first stamped the heart stamp on watercolor paper and heat embossed it with White Detail Embossing powder.  I then used pink watercolor paint over top in a very loose wash.  I die cut out the panel.  Then, I stamped and colored the bells.  I used alcohol markers and some glitter pens to accent the ribbon and the design on the bell.  I popped this up on the card with foam tape.


I would love to enter Tuesday Throwdown’s Falling Hearts challenge, and WordArtWednedsay’s Anything Goes challenge!

I Brake for Stamps Wedding Sheet stamp set, Versamark ink, Versafine and Memento Black inks, Spectrum Noir alcohol markers, Koi pan watercolors, Close To My Heart silver glitter gems, other items from my stash.
(Save 10% on your order at I Brake for Stamps with my code SAVE10HEIDI)

Thanks for visiting today!!!!


Wednesday, January 30, 2019

Ornate Floral Valentine Card

Hello! Thanks for coming by today.  I am working away on Valentines to send to family.  I try to send to my parents, grandparents and all my nieces and nephews, and of course DH and my own kids. For this card, I combined two different stamps sets and some pretty patterned papers.

I heat embossed the word LOVE and several of the flower stamps with Gold Detail Embossing powder over some patterned paper. I then used water-based markers to color some of the details in the LOVE stamp.  I trimmed all the pieces out.


Then, I used a coordinating piece of patterned paper for my background, and arranged the stamps over top.  The LOVE and two of the little flowers are popped up on foam tape.  I then finished the card by adding some clear glitter Nuvo drops around the card, for embellishment.

I also used the scrap of patterned paper, and some more stamped flowers to finish the inside of the card.  


Supplies: I Brake for Stamps Floral Love -single stamp, Wedding Sheet stamp set, Floral Half Sheet stamp set, Love Nicole Aquarelle 6x6 paper pad, Recollections Gold Detail Embossing powder, Nuvo Crystal Drops Blizzard, purple cardstock from my stash.
(Save 10% on your order at I Brake for Stamps with my code SAVE10HEIDI)

Thank you for all your kind comments. They make my day!

Heidi


Thursday, December 6, 2018

Snowball Glittered Christmas Card

Hello stamping friends.  I would love to share some Christmas Wishes with you today.


 I stamped these “snowball” stamps using the Rock N Roll technique with Distress Oxide Inks.  I then used my favorite embossing powder (as is quite obvious as it is the only one that is nearly empty) Sparkle!  


I fussy cut the images out and arranged them over some patterned paper, popping up the center snowmen on foam tape. sentiment, I stamped the sentiment directly on the patterned paper.

Supplies:   I Brake for Stamps Bold Christmas Wishes,  Snowball set of 4 stamps, Distress Oxide inks Salty Ocean and Faded Jeans, Versafine Onyx Black ink, Recollections Sparkle Embossing Powder, Bo Bunny Altitude 6x6 Paper pad.
(Save 10% on your order at I Brake for Stamps with code SAVE10HEIDI)


I would like to enter this card in Cute Card Thursday’s Anything Goes Challenge and Inkspirational Anything Goes Christmas challenge.

I hope you are having a lovely December.  Take some time to stamp and relax!

Thursday, November 15, 2018

Northern Lights Background

Hello everyone! Hope you’re doing well today!  It is supposed to snow a little bit here today, so these polar bears will feel right at home.


I heat embossed the trees onto watercolor paper with white embossing powder. I wanted the sky to mimic the aurora borealis, or Northern Lights.  I used sponges to add Distress inks in mint green, purple and dark blue.  I sprayed the panel with water to allow the colors to blend.  Once dry, I used a glitter gel pen to add some stars, and gems just to be festive.

I simply stamped the Polar bears, added a few shadows with a grey copic marker and trimmed them out to add under the sky.  I think they are enjoying the view!

Supplies: I Brake for Stamps Trees Background stamp, Mama and Baby Polar Bears stamp, Versamark ink, Recollections White detail embossing powder, Memento Black ink, Distress ink in Chipped Sapphire and Dusty Concord, Distress Oxide ink Cracked Pistachio, Sakura glitter pen, other items from my stash
(Save 10% on your order at I Brake for Stamps with code SAVE10HEIDI)

I would love to enter Cute Card Thursday’s Stars challenge

Wednesday, November 7, 2018

Clean & Simple Stamptangle Oak Leaf

Hello!  Hope you are all well today.  The sun is finally shining again and I can better appreciate the gorgeous fall color.  Our autumn color is a few weeks late this year, so it is really colorful outside, although I fear that when all the leaves fall and it is time to rake, it will be very cold.  We shall see!


I have a clean and simple design to share today. I heat embossed my Stamptangle Leaf in gold, and then sponged over Distress inks.  I first tried Distress Oxides, but the color was not bright enough with the oxidation clouding over it, so I went with regular Distress Inks.  


I used a wood grain embossing folder on my white card and then cut a circle in some textured brown cardstock in my stash.  The greeting (which is so cute, don’t you think?) and a little twine bow and my card was done.  This design was one of my quicker cards to make!  Bonus!

I’d love to enter Cute Card Thursday’s Anything Goes challenge as well as Word Art Wednesday’s Anything Goes Challenge.


Supplies:  Just for Fun Rubber Stamps Stamptangle Oak leaf, Happy Autumn, Versamark ink, Recollections Gold Detail Embossing powder, Distress Inks in Barn Door, Spiced Marmalade, Fossilized Amber and Peeled Paint, Versafine Vintage Sepia (for sentiment), Darice Woodgrain embossing folder, circle die and other items from my stash.

Thank you for your visit today! Special thanks to those of you that comment and follow my blog. I have a sick kid at home, but hope to be around to visit you all later on today.  

Thursday, October 18, 2018

Add One More Flower...

Hello!  I would like to share a card today using a combination of stamps from different sets.  I started out knowing that I wanted to make a card using a dark card base and I knew what basic layout I was going to use.


I first stamped the lattice stamp from the Bubble Wrap, Lattice and Flowers sheet on kraft cardstock and used gold embossing powder.  This stamp is about ATC sized, so it is a nice starting point for a card layout.  I then stamped and colored flowers from the Floral Half Sheet set.  I started with two, and then kept stamping “just one more” and adding it to the card until I had five flowers total.  I added a few little sequins to add some extra shine to the card.  The Hello sentiment was also heat embossed in gold.


Save 10% on your order at I Brake for Stamps store with my code SAVE10HEIDI.


Thanks for visiting today!  Have a great day!

Thursday, September 6, 2018

Golden Roses

I have been hanging onto this card to share for a couple months. I LOVE this color combo of eggplant and golden yellow with gold heat embossing.  I feel like it is a great autumn color combo.  It is hard to photograph that eggplant purple though, I think it comes through... anyhow, it is a great alternative to navy or black.


I stamped the June Rose stamp four times onto yellow cardstock.  I heat embossed them with gold embossing powder.  I trimmed the panel down to size to fit over my die cut.  The sentiment and card base are actually a very lovely color of eggplant purple. 


Thanks for stopping by today!  Happy Crafting!


Use code SAVE10HEIDI to save 10% at the I Brake for Stamps store.

Wednesday, June 13, 2018

Father’s Day Card with Gold Tweed background

Hello!  I am slowly photographing the pile of cards I made in the last week so I can share them with you.  This masculine card is pretty simple, but the background technique is really fun and easy, and would be fun with many styles of stamps.


First, I stamped the Tweed background stamp over Chocolate Brown cardstock and clear embossed it.    I know it is hard to tell it is brown in the photo.  I then rubbed my gold metallic inkpad all over the background.  I built up color by letting it dry and applying it again.  The brown part is shiny from the embossing, and it resists the gold ink for a crisp look.


I then kept the focal image pretty simple by just paper piecing the shirt with blue cardstock.  I would love to enter this in the Back to Basics Heat Embossing Challenge.

Supplies: Hero Arts Tweed Background stamp, Studio G shirt stamp, Hero Arts Celebrate Everyday Sentiment set, Versamark clear embossing ink and Recollections Clear detail powder, Gina K Designs Dark Chocolate ink and cardstock, Brilliance Galaxy Gold ink, MFT Die Namics Pierced Square die

As I was finishing this card, I realized that all the supplies I used were pretty old. I would say at least 5 years old - but the Brilliance ink I have had for at least 8.  It was one of the first ink lines I bought when I started stamping more seriously.  Most of the supplies are also still available, which is cool!

This card will be for my husband for Father’s Day.  He is very supportive of my hobby, but luckily, rarely reads my blog.

Have a great day!

You can find me on facebook or pinterest, too.

Wednesday, April 18, 2018

Flower of the Month Card Series - April Daisies

Hello! I’m back with another post for my Flower of the Month series.  This is where I am trying to use more of my flowers stamps by making as many cards each month as I can with the stamps I already have.  The second flower for April is the Daisy!  This is a fun and versatile flower to stamp with, so today I have a card using my stamp two ways!


My first card is very clean and simple, using bright colors, a bold design and heat embossing.  

My second card is more organic, I created this daisy chain out of colored and fussy cut flowers and put it over a tattered screen background stamp.


Supplies: Just for Fun Rubber Stamps Flora and Fauna sheet, Tattered screen background, Sentiment Word Block, Memento and Versafine black inks, Hero Arts Soft Sand ink, Versamark ink, White detail embossing powder, all cardstock was in my scrap box, Cuttlebug Daisy embossing folder

Thank you SO MUCH for your visit! I hope you will have time to comment or subscribe to my blog.  

You can find all my flower of the month posts HERE!

You can find me on facebook or pinterest, too.