Showing posts with label fussy cutting. Show all posts

Sunday, June 9, 2019

Ice Cream Cards - CTMH Balanced Diet stamp set

Hello!  I hope you are enjoying your weekend.  We have had really nice, mild summer weather!  I think it is supposed to start raining during the start of the week, but at this point, we probably need it.  

Today I would like to share another card I designed to make with friends who are beginners.  I thought the ice cream theme was fun, and suitable for all ages.  This card involves no coloring, and I went ahead and cut the card bases and did the die cutting of the circle element ahead.


The background was a lot of stamping for a beginner, and although I could do one in just a couple minutes, it took much longer than I thought for my friend.  The two-step stamping of the ice cream cone was a good lesson for a beginner, but the fussy cutting of the ice cream scoops is a bit time-consuming for someone not used to it!  


So, this card might have been just a touch too long for beginners, but it was doable.  I went with the matching sentiment for the inside (ombré stamping done with two inkpads, as I don’t have the multicolor ones), but my friend chose a simpler thank you sentiment in a single color.  

I did make a second card in pink and yellow!  This card was already given out to a little girl I know with a gift card to Dairy Queen enclosed.  


Supplies: Close to My Heart A Balanced Diet and Wordfetti stamp sets, Hero Arts Shadow inks and Gina K Designs inks in various colors, Versafine Onyx Black ink, Gina Marie X Stitched Circles dies, other items from my stash.

I would like to enter these projects into Crafting By Designs Anything Goes, Cute Card Thursday Anything Goes and WordArtWednesday Anything Goes. 

If you are on Instagram, you may be interested the SimonSaysStamp is now doing specific instagram challenges, and this month it is Summer Fun!  My instagram can be found here.

Tuesday, February 12, 2019

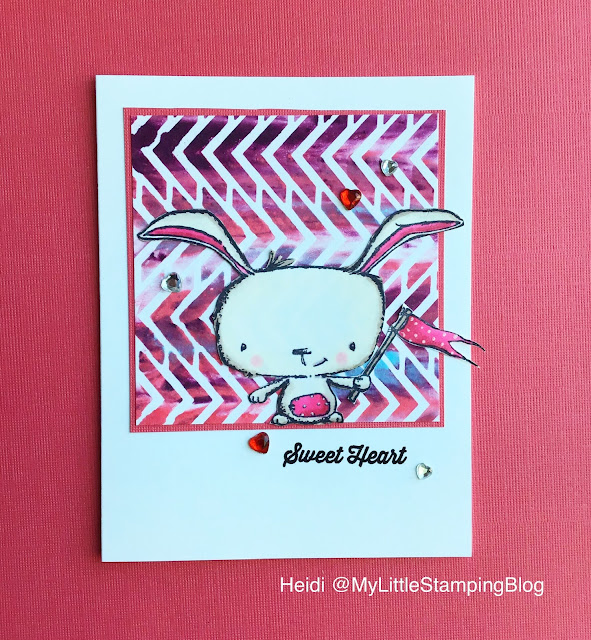
Shaving Cream Stencil Technique - Valentine Card

A couple weeks ago, in my stamping group, we were challenged to use the Shaving Cream Stencil Technique by UnderstandBlue, blog and video is here. I made several backgrounds because it was really fun!


This background was made with Distress reinkers, I think in Tumbled Glass, Worn Lipstick and Dusty Concord. I was surprised how deep the colors were, I could have used less reinker!  I paired this with a cute bunny image.

I would love to enter this in Word Art Wednesday’s Anything Goes challenge.

Supplies: Purple Onion Poppy stamp, Jillibean Soup Sweet Treat stamp set, Memento and Versafine Onyx Black ink, Distress Reinkers Tumbled Glass, Worn Lipstick, Dusty concord, Balzer Designs Mini Chevron stencil, Spectrum Noir alcohol markers, other items from my stash

Thank you so much for visiting today!

Thursday, October 18, 2018

Add One More Flower...

Hello!  I would like to share a card today using a combination of stamps from different sets.  I started out knowing that I wanted to make a card using a dark card base and I knew what basic layout I was going to use.


I first stamped the lattice stamp from the Bubble Wrap, Lattice and Flowers sheet on kraft cardstock and used gold embossing powder.  This stamp is about ATC sized, so it is a nice starting point for a card layout.  I then stamped and colored flowers from the Floral Half Sheet set.  I started with two, and then kept stamping “just one more” and adding it to the card until I had five flowers total.  I added a few little sequins to add some extra shine to the card.  The Hello sentiment was also heat embossed in gold.


Save 10% on your order at I Brake for Stamps store with my code SAVE10HEIDI.


Thanks for visiting today!  Have a great day!

Saturday, February 18, 2017

Distress Oxide Ink background experiment

Hello and Happy Saturday!  I am back with a fun background made with my new Tim Holtz Distress Oxide inks.  After my learning experience with these inks yesterday, I had an idea about what would probably work for me.


This background was made by smooshing the paper into the ink/water mix on my craft sheet, and drying. Then I used a large brush to pick up individual colors of inky water and tapped the brush so that large drops of the ink fell onto the paper.  I do really like the this background so I just added a little bit of a sentiment and left it alone.


The matte look of the background is pretty cool. I really feel like these new inkpads give a look of paint, but with some dye added that allows for effects.  So far, I am pretty happy with my purchase, although I don't have any place to store them yet!

Supplies: Distress Oxide inks Cracked Pistachio, Faded Jeans and Broken China, Verve Stamps Brighter Days, Versafine black ink, Hero Arts Soft Pool ink, Spellbinders Scalloped labels one.

I would love to participate in this challenge:
Tuesday Throwdown Say it with Words

Thanks for coming by to look at my experiments!

To see all my posts using Distress Oxide inks, click here.

To see my tutorial for a Faux Bleaching look using Distress Oxides, click here.

Friday, January 27, 2017

Thanks Sew Much "Quilt" Card

In my stamping group, there was a challenge to make a quilt square card, and this is what I came up with.

Click on photos to enlarge.
I used a 1.25 inch square punch on some scraps of paper and then arranged them how it looked like it should from other examples of this style.  It really was pretty easy to do.  Then I placed my square over a die cut square of ivory card and embossed the entire thing with a folder I thought might look a bit like a stitching pattern.  


I did rub a little distress ink over top of the embossing just to cover any areas that might have looked a bit white.  Boy, oh boy! I really enjoy fun ways to use up scraps!  The result definitely made me smile, too.


The sewing notions were stamped and fussy cut from more scraps.  Fun!

Supplies: Cardmaking and Papercraft magazine freebie Sew Pretty stamp set, Versafine Ink, My Mind's Eye Stella&Rose Tangerine paper pad and matching brad, MFT Die-namics Pierced Square die, Antique Linen distress ink.

I would LOVE to participate in the following challenges -- they are worth checking out!
Word Art Wednesday - Anything Goes!
Cute Card Thursday - Something FUN
SimonSaysStamp Wednesday Challenge - Anything Goes!
Pixie's Snippets Playground - Weeks 265 and 266

Saturday, January 14, 2017

Spring Florals card

Something fun occurred while I was making this card. I was finishing it up and started to put my supplies away.  That is when I happened to find a clear sentiment stamp that was missing since June!  Back when I noticed the stamp had vanished, I had to laugh, since the sentiment is, "I miss you."  

It was stuck to the back of a patterned paper pack and I realize now that it must have stuck there when I was making this card.  That is the same paper pack as I used today and I think I originally was going to make that a miss you card instead of hello friend.

Good times!


I based my card on a sketch from this old blog.

Supplies: Gina K Designs Made With Love and Assorted Greetings stamp sets, Hero Arts Butter Bar, Fresh Peach and Soft Canteloupe inks, Versafine Smokey Grey ink, My Mind's Eye the Sweetest Thing Tangerine 6x6 paper pack, Spellbinders Foliage dies, Distress ink Bundled Sage, Nuvo Drops Pearl, Darice textured cardstock, other cardstocks from my stash.

I would love to play along with this challenge:
Crafty Hazelnut's Patterned Paper Challenge - January 2017
Thank you so much for stopping by!


Sunday, January 1, 2017

Happy New Year - Ballerina Best Wishes Card (and a sale!)

🎈 Happy New Year!🎈 

Welcome 2017 and I have the pleasure of announcing the new theme for the Just for Fun Rubber Stamps Janaury Challenge!  
(Also, read till the end of the post for a big sale announcement!)


I think you are going to love that is is a "Free For All."  Even better, there is a gift certificate up for grabs and while you get an extra entry if you use JFF stamps, you do NOT have to use them to enter the prize drawing.  I really hope you will hop on over and enter the challenge!

Here is my inspiration project for this challenge.


I truly love this image. I have colored her up a bunch of times in my sketchbook and I think you will be seeing her in future projects too.  This time, I stamped the ballerina on watercolor cardstock and colored with watercolor pencils and blended.  I wanted more texture and more intense color, so I added regular colored pencil over top.


The background is two simple steps.  Just sponge color on, put a stencil over top and sponge a different color on. It always turns out pretty.


Supplies: Just for Fun Rubber Stamps Degas Fluffing the Tutu, Just a Note Word Block, Versafine Onyx black ink, Dewent watercolor and Coloursoft pencils, Heidi Swapp stencil, Distress inks Bundled Sage and Tumbled Glass

Remember I said there was a sale announcement? Here it is, a really big sale! No code needed! JFFstamps.com

Friday, December 23, 2016

Butterfly and Flowers Card

Edited to add: 12/28/16. I was so pleased that my card was chosen as a Top 3 pick at the ModSquad Challenge blog this week! Thank you!


Recently, I took some time to clean up my craft area, and I decided to make a little pile of the half-done cards so I could complete them. This project is from that pile.


Although it is nearly Christmas, we have now passed the Winter Solstice, so each day is getting a little longer and you can think of Spring!


The butterfly was made from a piece of glossy cardstock done with the mother of pearl technique.  I had also stamped it onto the kraft cardstock before embossing that part, so you can see the antennae.

Supplies: Butterfly stamp is an unknown one, Sentiment is Just for Fun, Archival Ink, Cuttlebug embossing folder, K&Co Susan Winget paper pad

I would love to participate in the ModSquad A Little Bit of Spring challenge and Word Art Wednesday Anything Goes!

I do not think I will be blogging again until after Christmas, so I want to thank you for reading my blog and wish you and yours a very Merry Christmas and Holiday Season!  See you again soon!

Saturday, August 13, 2016

Cheerful Flowers card

I had a lot of fun this morning putting together this card with a new to me stamp and an old patterned paper pack.  It is a little fussy, but sometimes fussy is fun!

(Click on photo to enlarge.)

I colored the image with alcohol markers. My first thought is that this is a cornflower, but I wanted it to be sunny and yellow.  This stamp is part of a RAK I received from Cheryl, who is so generous with her encouragement, too!

Supplies:  Our Daily Bread Designs Don't Worry and Home Sweet Home stamp sets, Memento black ink, alcohol markers, Spellbinders circles and scalloped circles dies, DCWV Citrus mat stack, Fiskars scalloped border punch, EK Success corner punch, Fiskars tag punch, bakers twine

I would love to participate in the following challenges:
Our Daily Bread Designs Sketch Challenge
Inkspirational #115 - Patterned Paper

Thank you so much for stopping by today! 

Saturday, July 30, 2016

Christmas in July

Hi, how are you doing today?  I have still been working on Christmas cards this month.  So much fun when there is no time pressure.  These cards fit a couple challenges, too!


These were so easy, I just stamped and colored in the background.  The partridge was heat embossed with Sparkle embossing powder.  I filled in the colored parts on this card with Gelly Roll stardust gel pen.  


To illustrate (further) how I cannot just make a multiple of a card, here is a variation.  I didn't add as much sparkle to this card, either, but I like the variation of putting the panel on the dark grey cardstock.  


Supplies: Gina K Designs Stately Flowers 5, Holiday Cheer, and the banner is from an unknown set, Versafine Ink, Memento Ink, various markers, Gelly Roll stardust pen, black self adhesive dots.

I would love to participate in the following challenge:
Gina K Designs Release Challenge
ModSquad Challenge - Christmas in July
CAS(E) This Sketch #183

Thursday, July 21, 2016

Mistletoe - Christmas In July

Hello! I am continuing to focus on Christmas in July this month.  Although the temperatures are soaring, I feel like I am getting ready for the winter season.

(Click on image for larger photo.)

This mistletoe image was fun and pretty easy to color with alcohol markers.  I added glossy accents to the berries.  


I did double up my vellum layer to make less transparent.  I also sponged green around the edges of the tag to make it stand out more.  The card base and sentiment tag are a pretty color of dark grey.  I have been enjoying that lately as an alternative to black.

I think it is pretty clear that one of my favorite embellishments are the self adhesive gems and enamel dots.  Nothing easier than that, and they fill in those spaces that just need a little something.

Supplies: Gina K Stately Flowers 5, Memento Jet Black ink, Versamark ink, Recollections White detail powder, Heidi Swapp patterned paper, Tim Holtz tag die, Spellbinders circle die, cardstock, vellum and embellishments from my stash

I would love to participate in the following challenge:


Thursday, July 14, 2016

Recycled Tickets on a Vintage Style Card

Hello and I hope you are doing well today.  

I have been holding onto a few basket raffle tickets in order to use them on a card.  At least one of them was lucky, since I won a basket. :)  The tickets were getting a little wrinkled, and they are blue, so I thought of this blue vintage card.


There were quite a few steps on this card, but no one part was difficult.  For the flowers, I stamped them and fussy cut them out.  I then used cream chalks to color them, afterwards distressing with brown.  

The rectangle stamped on ivory is a frame stamp.  I stamped the same flower in a light colored ink inside, and then distressed it.  


I didn't want to tickets to be plain, and I know that in order to have harmony on a busy card, one can use the same image over and over.  So, I did stamp the leaves from that same flower on to the tickets and distressed them with brown too.

All that was left was the distressing of the background papers, and assembling the card.

Supplies:  Gina K Designs Frame and Filler, Heart Blooms stamp sets, Gina K Dark Chocolate Ink, Hero Arts Soft Sand ink, Pebbles Metallic Cream chalks, Hampton Art Doilies paper pad, Distress ink Tea Dye, Gina K Ocean Mist Cardstock,  Ivory cardstock, WeRMemoryKeepers Corner Chomper

I would love to participate in the following challenge:
SimonSaysStamp Monday Challenge - Flora and Fauna

I really want to thank you for stopping by today!  

Friday, July 8, 2016

Cool Penguin Birthday Card

Hello and welcome!  Today, I decided to combine some challenges to make a card type that I sometimes struggle with -- Kid Birthdays!  I think this one turned out really cute!

(Click on photo for larger image.)

I colored the penguin dude with colored pencils.  As a beginner colorist, I enjoy doing the small images -- they aren't nearly as daunting for shading!


Supplies:  Imaginisce Penguin Dude, Mama Elephant Modern Borders, Gina K Happy Birthday to You, Versafine Onyx Black, Hero Arts Shadow ink Mint and Charcoal, Enamel dots, Derwent Coloursoft pencils

I would love to participate in the following challenges:


Thanks so much for stopping by!   I hope you will come back soon!

Monday, June 13, 2016

Butterfly CASE

Welcome! 

Today I have a CASED card.  Here is a direct link to the card I CASED from my long-time stamping friend, Stampwilly.  

Here is my rendition.


I just really loved her layout and overall design elements.  I used materials and stamps I had on hand.  (Most of the items I have had a long time! In fact, I think the butterfly/moth? is part of a wood mount stamp  set that was one of my first stamp purchases ever .)  I think it turned out so pretty and traditional!

Supplies:  Butterfly stamp is an old one from my stash, no manufacturer mark, QuicKutz Dainty Doily Die, DCWV Linen Closet paper pad, Memento Ink, Spectrum Noir markers

Thanks for stopping by today!

Sunday, April 24, 2016

100th Post and a Scenic Card

Thanks for stopping by today, especially.  I noticed that this is going to be my 100th post!  What a fun milestone!

Today I have made a card that is not my normal style.  Over at Artsy Inkers, there has been a challenge this month to make an arch with stamps. It has really taken me all month to figure out what to do.  

(Click on photos for detail.)

I decided to use an oval stamp as the basic shape of the arbor.  Then I stenciled on the outside of the oval with blue ink and below it with greens.  I used several of my peg stamps to change the oval into a flower arbor.  I also used one of the tiny flowers to add texture to the grass below. 

These little bunnies had never been inked before.  I fussy cut them and sponged ink to color them.  The ink is Distress Pumice Stone, which I knew was a brownish color of grey, but it really is much more brown than I realized. 


Art Impressions wants us to take a photo of the stamps we used in the project, and I mixed and matched so many for this project. 

Supplies:  Gina K Designs Warm Spring Wishes (Oval), Rubber Stamp Tapestry from Cherry Blossom and Herbal Sachet sets, Art Impressions Try-Folds Furries, Hero Arts sentiment, Avery Elle Pigment inks, Versafine Smokey Grey ink, Distress Inks Pumice Stone, Tumbled Glass, Bundled Sage, Peeled Paint, Heidi Swapp Stencil

I would love to participate in the following challenges:

Monday, April 18, 2016

Waxed Paper Embossed Resist

Hello and thank you for being here.

Today I have a card to share using a waxed paper resist background. I had not done this in a long time, so when I saw this recent video by Gina K, I wanted to try it again.  I made 8 backgrounds total, so I still have more to use.

(Click image to enlarge.)

I didn't want to cover up too much of my background, so I stamped a lot of butterflies which I watercolored with distress ink pads and fussy cut.  True to my style of creating, arranging the butterflies took just as long as the rest of the work for this card!  

Supplies: Gina K Designs Whimsical Spring and Birthday Label stamp sets, Versafine Onyx black Ink, Tim Holtz by Sizzix embossing folder, Distress inks Tumbled Glass, Broken China and Peacock Feathers

I would love to participate in the following challenge:

Tuesday, March 29, 2016

Stately Sunflower Thank You Card

Welcome and I hope you are doing well today!

:)

Today I have a fun card to share!  I did more coloring with chalks onto textured paper.  It is so fun and easy to do.  If you still have some chalks lying around, I hope you will try it. I did a very similar card here.

(Click on photos to enlarge.)

I do like to fussy cut these out since you cannot really stay in the lines when using chalk.  


The white panel was done by using a die, but not cutting with the die, instead using the sandwich for embossing.  

Supplies: Gina K Designs Stately Flowers 5, GKD Dark Chocolate ink, Kraft, white, textured and yellow cardstock from my stash, Spellbinders Lattice Rectangles, Pebbles Chalks

Thanks so much for stopping by!

Wednesday, March 16, 2016

Easter Flowers Cards - Minimal Coloring

Thanks so much for stopping by.

Today I have two cards to share, both Easter cards that use the same sketch.  Neither card uses much coloring at all and I finished both just this morning.  I like how they each are the same, but a little different style.


You have already seen me use this stamp for other Easter cards here using chalks and here using Oil Pastels.  I stamped the daffodil in black ink, and then paper pieced the flowers.  I used just one green marker to color in the stems and a yellow to accent the flowers.

Supplies: I Brake for Stamps March Daffodil, Versafine Onyx Black Ink, Echo Park Victoria Garden paper pad, Fiskars edge punch, sentiment is from a Canadian Maple stamp I got from the craft store ages ago.


I stamped the Lily of the Valley multiple times in two colors of green ink to get a patterned paper.  I also distressed the edge with green ink.  

Supplies: Our Daily Bread Lily of the Valley, Avery Elle Lemongrass, Truffle and Jungle inkpads, Bundled Sage Distress ink, Echo Park Victoria Garden paper pad, Hero Arts CL051 Sentiment, Fiskars edge punch

Thanks again for your visit!   I would love to hear from you in the comments!

Thursday, March 10, 2016

Gina K Heart Blooms + "Card Try-Outs"

Thanks so much for stopping by my little stamping blog!  

I want to share this pretty card today.  If you asked me how long it took to make, I could truthfully say it took 5 minutes, or I could say an hour. 


I stamped my flower repeatedly on the colored cardstock using Prima Watersoluble Oil Pastels.  This allowed me to get this pretty watercolory look!  I colored on the stamp first, then applied a little water with a waterbrush before stamping.  In the past, I have just sprayed the stamp with water, but since I am stamping on plain cardstock, I felt I needed the extra control over the water. 


Of course, the reason why this took only 5 minutes to make is because I played around first and did some stamping and card "try-outs."** You can see that in my mock-up,  I played with the arrangement and even did some different colors of ink for the sentiment and cut them out and tried them out in place to see which I liked best.  

**I don't know if this is how other people make their cards, but I thought I would just sortof show part of my process here.  My stamping friend, Daniel, posted a long time ago (I think when TwoPeas still existed with it's great stamping board) about stamp try-outs and I still think about it and use this idea.

Supplies: Gina K Designs Heart Blooms stamp set duo, Prima Watersoluble Oil Pastel yellow-green, Gina K Designs Jelly Bean Green cardstock, Versamark ink, Recollections White detail embossing powder, Vellum, Gina K Designs Made With Love stamp set (for the sentiment), Avery Elle Mermaid Ink

I would like to enter this card into the following challenges:


Tuesday, February 23, 2016

Spring Butterfly on Bisque Pottery Background

Hello!  I hope you are doing well today.  It is a bit rainy and glum here today, so I spent some time combining challenges.  


The first challenge was to make your own background.  I did this by using the Bisque Pottery technique.  Basically, you ink up one side of your embossing folder with a  light colored pigment ink and run it through your die cutting machine very slowly to transfer the ink.  In the past, I decided that a lesser quality white paper actually works a little better to transfer the ink, but your mileage may vary.


The second challenge was to make a spring card using no black at all.  I immediately reached for my Gina K Warm Spring Wishes stamp set to get appropriate stamps and then I used white embossing and grey ink.  

The third challenge is to make a card to a song.  This one is for Butterfly Wishes.  This song brings out funny memories, because someone in college played it too much, so it gets stuck in your head years later.

It was so much fun to figure out how to combine challenges!

Supplies:
Gina K Designs Warm Spring Wishes stamp set
Gina K Designs Delicate Essentials patterned paper
Versafine Smokey Grey ink
Versamark Ink
Recollections White Detail Embossing Powder
Elizabeth Craft Embossing Folder
Vellum
Avery Elle Silver Fox Pigment ink
Gina K Designs Ocean Mist cardstock

I would like to enter this project into the following challenges:

Thank you so much for taking the time to stop by!