Showing posts with label nature. Show all posts

Friday, November 12, 2021

Be One With Nature

 Hello!  I have another design team post for sister stores Blank Page Muse and I Brake for Stamps.

Today I would like to share a nature themed card. 

This card using stamps and a stencil from the Woodlands Stamp and Stencil bundle designed by Donna Gray.  You can use my affiliate code BPMHeidi to save 15% at both stores.


I first stenciled over top of some patterned paper using brown Distress inks.  This piece of 12x12 patterned paper is super duper duper old.  I recently cut it up into card size pieces in an effort to use it up.  

Then I stamped my tree right over top. I used all Versafine inks for the stamping here.  I stamped, color and fussy cut out the owl and placed him near the tree. I really like the sentiments in this set. I think a walk in the woods is really great therapy.

I hope you have a wonderful day, less stress, craft more…

Thursday, August 16, 2018

Serene Canoe Scene

Hi and thanks for stopping by today!  I am adding this to my stash of camping cards.  I like this pretty scene stamp that would be good for anyone who loves boating or the outdoors.  


I colored the stamp with alcohol markers.  I added some glitter pen horizontally to some parts of the water to make it shine.  I added a detail photo where you might be able to see it, but in real life, it is very pretty!  I have this fun canoe paper to pair my image with, as well as wood-grain embossed card and wooden arrow shape.


You can save 10% at I Brake for Stamps with my coupon code, SAVE10HEIDI>


I even finished the inside of this card with a verse, there is still room to sign it, too.


Supplies:  I Brake for Stamps Canoe Scene, Rising of the Sun text stamp, Memento Black Ink, Pink Paislee Outfitters 6x6 paper pad, wooden embellishment from my stash, Copic and Spectrum Noir alcohol markers, Sakura stardust glitter pen

I truly appreciate your visits and enjoy reading your comments! Please consider following my blog using the Blogger tool on the side bar, or on facebook or pinterest, too.

Thursday, July 19, 2018

Joy Comes from Simple Things....

Hello!  I hope you are having a great day. I am going on with my theme of cards appropriate to send a camper.


I love the quote in this scene stamp.  You can’t see it in the photos, but I did add some glitter gel pen to the water in places to make it look like the sun (or moon) was shining down on it.  I kept this masculine-friendly card simple, just adding a frame to the stamped image and putting it over some understated paper.

Supplies: I Brake for Stamps Joy Comes from, Memento Black ink, Spectrum Noir alcohol markers, Sakura Stardust gel pen, DCWV Linen Closet patterned paper.

I am pleased to be able to offer you a 10% off coupon code at I Brake for Stamps Store!

SAVE10HEIDI


Thank you for your visit!  I hope you have time for simple things - like stamping - this week!!

I always appreciate your visits and comments! Please consider following my blog using the Blogger tool on the side bar, or on facebook or pinterest, too.

Wednesday, March 14, 2018

Camping Themed Card

I was so happy to have gotten to go to the stamp show last weekend.  I had never even been to a real stamp store, so to be able to be in a room with 17 stamping vendors was really neat.  I also bought a few things, including the stamp set I am using today.  It is a new stamping brand to me, and they had so many tempting sets.


But, there is nothing like a camping set with cute sayings!  I am a sucker for these because I send lots of cards to my son when he is at summer camp, and there are plently of other outdoorsy types in my family to whom I can send these cards.

I definitely recommend sending funny cards if you send them to kids at camp because you want them to be encouraged to have fun at camp and not be homesick.  These sayings would also be good if you send to hospitalized kids.  


Card details:  I did some masking for a little scene and colored with markers.  It took me a couple tries to get the fox color right.  Then I just grabbed my campy paper and scraps in my scrap box.

Supplies: Darcie’s LLC Forest Be with You stamp set, Memento and Versfine black inks, Spectrum Noir alcohol markers, My Mind’s Eye Happy Camper 6x6 paper pad, other supplies from my stash

I would love to enter this into the Library Challenge: The Hobbit.  I was inspired by the fox in the book and the muted colors in the cover.  

Thanks for stopping by!

You can find me on facebook or pinterest, too.

Friday, February 23, 2018

Bunny with Recycled Cardboard

I was asked to provide a sample card today for the SplitCoastStampers Free for All Challenge.  The theme is Recycling!  Well, I apparently have no imagination because the first thing I did was go to the recycling bin and pull out the first thing I saw - a box!  I tore it up so I could die cut it.


My bunny was colored with alcohol markers.  The card is an OLD (like, really old) prefolded notecard.  I matted the bunny in dark purple to bring out the color in the flowers.

Supplies: I Brake for Stamps Wild Bunny stamp, Just for Fun Rubber Stamps Happy Easter, Anna Griffin Notecard, Spectrum Noir alcohol markers, Spellbinders Foliage dies

I would love to enter this project into Cute Card Thursday’s Cute Critters challenge!

Thanks so much for stopping by!

You can find me on facebook or pinterest, too.

Sunday, February 18, 2018

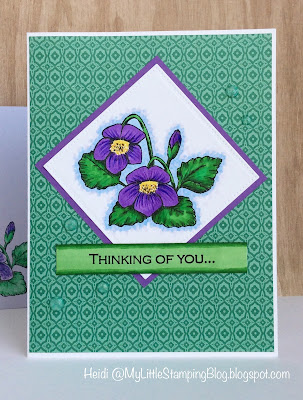
Flower of the Month - February Violet Card with Envelope

Hello!  We woke up to a gorgeous blanket of snow!  It is very pretty and didn’t cause any problem with the roads, and I know it won’t last long. I have to say, I am predicting an early spring, but we shall see!

Back to my Flower of the Month theme.  Each month, I am going to make at least one card using my floral stamps that correspond to birth flowers.  For February, I didn’t even need to look up what the flower is.  The violet is the favorite flower of both my mother and grandmother.  I colored these a traditional purple, but my favorites are the more rare yellow ones.


For this card, I colored with a base of purple marker, then used pencils to add the detail.  It was much easier to combine mediums to get the look I wanted.  I also made an envelope, but colored this more simply and just with pencils.


Supplies: Gina K Designs Stately Flowers 1 and Assorted Greetings stamp sets, Memento black ink, Spectrum Noir markers, Prismacolor pencils, Recollections Coastal Village 6x6 paper pad, Nuvo Crystal drops, MFT Pierced Squares dies

I would love to play along with these challenges:
StampTV February Challenge - Add the Envelope, please
SimonSaysStamp Wednesday Challenge - Add a Die Cut
WordArtWednesday Anything Goes 322-323

This is kind of a bold card for the delicate violet!  Not everyone’s style, but I do like to mix it up.  I do have other violet stamps, so I may have more than one card this month.  Do you have any?  Let me know if you use the flower of the month and I will link you in my next post.  

Thanks for stopping by!

All of my Flower of the Month posts can be found here.


You can find me on facebook or pinterest, too.

Thursday, February 1, 2018

Silhouette Challenge - Heron At Sunset Card

I recently had some time to make some inky backgrounds with Distress Oxides.  This is one that I made with Abandoned Coral, Fosilized Amber, Spiced Marmalade, Picked Raspberry and a touch of Salty Ocean.  I have been stamping over oxide backgrounds with oxide ink, so I stamped my Great Heron Silhouette in the Black Soot.  It is a very dark grey, but it looks black and does the job nicely.


Please play along with Just for Fun’s Silhouette challenge this month!  They are so fun to play with!  There is a prize up for grabs, as always, and you do not need to use a particular brand of stamps to be in the running.


Thanks for stopping by!

Saturday, September 23, 2017

Watercolor Birdhouse Card

Edited to add: I was so happy to be chosen as the TOP SPOT at Art Impressions Flowers and Foliage challenge.  Thanks so much!


Hello and happy Saturday!  I hope you are doing well today.  Last night, I got out my Art Impressions watercolor stamps and got working.  It usually takes me a little practice to get back into the technique, but it does not take a long time, and luckily, watercolor paper is very forgiving because you can stamp on both sides.


I used stamps from several sets, and then added two straight lines to make the pole for the birdhouse to sit on.  I like to use dry embossing, using my scoreboard, to create a frame on my mats.


I am including a little photo of my practice attempts, too.  I wanted to share a tip and tell you how I went wrong in these.  First off, I was adding too much marker and too much water.  I learned  to be careful with the marker (or stamp off once) and to really keep the brush dry.  My tip is to use a fine liner brush when working with the little animals. (You can see how many times I practiced the bird to get it right!) That way, you do not lose the detail.  Also, I used a black marker to emphasize the bird's eye.  It makes a difference.


If you have some AI stamps and have any trouble at all, I hope these tips might help.  But definitely watch their YouTube channel and then go practice!  

Supplies:  Art Impressions Bird Bath set, Flowers and Foliage set, Tombow water-based markers, Pebbles Family Ties 6x6 paper pad, Spellbinders Labels 4 dies

I would love to play along with the Art Impressions Flowers and Foliage challenge and The Flower Challenge Tic Tac Toe Challenge (I used embossing, watercolor and blue).  

Thanks for stopping by! 


Wednesday, July 12, 2017

Card Drive - One Layer Distress Oxide Floral

Hello stamping friends!  Today I am asking for your help with a card drive organized by my blogging friend, Carole from My Carolina Home.  You will want to visit her blog to see her amazing quilting projects, tablescapes and cards.  She has a need for encouragement cards AND monetary sponsors to complete care packages for women in a domestic abuse shelter.  

Here is the link to her blog post with all the details.  There will be a really great prize for one lucky donor and donations are needed by August 1st.

Here is a card I created and will send in.

(Click to enlarge photos.)

It is a one-layer card on a light blue cardstock with a tiny bit of speckles.  I inked up my stamp with Distress Oxide inks, adding a touch of darker pink and green marker to portions.  Then I sprayed the stamp with water and stamped onto my blue card base.  I love the variation of color where the ink oxidized and then other areas where you can see the marker.  Finally, I added Nuvo drops for embellishment.


I used an uplifting sentiment and then matted that with navy cardstock.  I will write a little note inside.  Carole asked that we not write anything religious because we won't know who our recipient is.  When I have trouble figuring out the right words to write inside, I often do a little internet search. There are lots of ideas out there that are simple or complex, depending on what you are going for.

I do hope you will consider sending a card or supporting this drive monetarily!  I am so glad Carole asked me to be a part of this drive, it feels good to do good.

Thanks for stopping by today!

Supplies: Inkadinkado Flower Blossom by Brenda Walton, Gina K Designs Inspiration Mosaic stamp set (sentiment), Distress Oxide ink Worn Lipstick and Peeled Paint, Tombow markers, Versafine Onyx Black ink, cardstock from my stash, Nuvo Crystal drops

I would love to enter this challenge:
Tuesday Throwdown - One Layer

Wednesday, July 5, 2017

Beachy Collage - Masking Background stamps

Hello! I hope my US stamping friends had a lovely 4th of July!  It is certainly up there with Christmas for my favorite holiday!  I have a beachy card to share with you today.


I made a mask with a sheet of copy paper and tore a random looking shape to create the "net" in my collage.


I stamped and fussy cut the shell and colored it with irridescent chalks.  They are an oldie but a goodie for coloring - they blend really easily and I thought it added to the beachy look.  I stamped more images on the background, added a sentiment, and finally added some Nuvo Pearl drops.


Supplies: Just for Fun Rubber Stamps Beach Unmounted Sheet, Voice of the Sea sentiment, Tattered Screen background stamp, Hero Arts Soft Sand Ink, Versafine Vintage Sepia and Toffee inks, Pebbles Irridescent Chalks, Nuvo Drops in Pearl


Thanks so much for stopping by today!  I appreciate it very much!

Thursday, February 23, 2017

Tutorial - Faux Bleaching (or Watercolor Stamping) with Distress Oxide Inks

My craft area is a disaster -- and that is a good thing. I have been having so much fun playing with a technique I think I discovered (I certainly haven't seen anyone else posting it) for my new Distress Oxide inks.  I am not one to jump on the bandwagon, but this is SO. MUCH. FUN. I just have to share it.


Watercolor stamping is an awesome technique and I am using the same steps with the Distress Oxides to get a Faux Bleached look, or a Ghost-Stamping look -- you decide.

For this I used my ink, a mini mister, a chunky or silhouette style stamp and some darker colored cardstock.  Lots of combos to play with there.  (Please click on the photos to enlarge them for detail.)

Ink up the stamp with Distress Oxide ink.

Using a spray bottle that applies a mist, spray with water 3-4 times, until the stamp looks like this.  This step is variable, you can decide to add more or less to get a more of less flowing image.

Stamp onto your cardstock.

This is the result right after you stamp.  You will be able to see the color of the dye part of the ink prominently -- but that will not last as it dries.

Here is the result when it is almost dry.  Most of that dark halo of dye ink will eventually completely disappear, depending on how much water you added.

Every time I did this, I said, "ooOOOoo!"  Lol.

Now, I found this worked with nearly every color of the inks BUT I did have trouble with the blues.  I also found that you get a better result on darker cardstocks, so it if doesn't look right, see if you can go darker with your cardstock color.  

Tim Holtz did show in a CHA Demo video that you can stamp your image and then spray the whole cardstock with water to get other effects, however, this Faux Bleaching look with Distress Oxides really is much much cleaner looking AND the water you stamped with moves in a controlled manner  after you stamp to give that lovely watercolory image that I find really awesome.

Here are two projects I made with the technique.

This was Worn Lipstick Distress Oxide Ink on Gina K Passionate Pink cardstock.


And this is one of the FUN surprises - Fossilized Amber on Gina K Wild Dandelion Cardstock.  The yellow ink turned a lovely pink!  I have no idea how, but that is so cool!


Supplies:  Distress Oxide Inks by Ranger/Tim Holtz, Just for Fun Rubber Stamps Flora and Fauna sheet, Just a Note sentiment, Crate Paper DIY Shop patterned paper, KI Doilies patterned paper, Versafine Smokey Grey ink (for sentiment), Spellbinders Oval and Scalloped Oval dies, Avery Elle Wonky Rectangles Dies, Vellum and Embellishments from my stash.

I have a few other cards I have already made with this technique I will probably share tomorrow, along with my experiments for this technique on all colors of cardstock.

Thank you SO MUCH for stopping by! I hope you will leave a comment so I know you were here.

I would love to enter these cards into the following challenges:
Cute Card Thursday - Florals
SimonSaysStamp Wednesday Challenge - Anything Goes

Friday, December 23, 2016

Butterfly and Flowers Card

Edited to add: 12/28/16. I was so pleased that my card was chosen as a Top 3 pick at the ModSquad Challenge blog this week! Thank you!


Recently, I took some time to clean up my craft area, and I decided to make a little pile of the half-done cards so I could complete them. This project is from that pile.


Although it is nearly Christmas, we have now passed the Winter Solstice, so each day is getting a little longer and you can think of Spring!


The butterfly was made from a piece of glossy cardstock done with the mother of pearl technique.  I had also stamped it onto the kraft cardstock before embossing that part, so you can see the antennae.

Supplies: Butterfly stamp is an unknown one, Sentiment is Just for Fun, Archival Ink, Cuttlebug embossing folder, K&Co Susan Winget paper pad

I would love to participate in the ModSquad A Little Bit of Spring challenge and Word Art Wednesday Anything Goes!

I do not think I will be blogging again until after Christmas, so I want to thank you for reading my blog and wish you and yours a very Merry Christmas and Holiday Season!  See you again soon!

Monday, August 1, 2016

Gold Leaf with metallic embossing powders

Last week, at SplitCoastStampers, there was a challenge to create a faux gold leaf with gold embossing powder on tin foil. I decided to try it using both gold and copper embossing powders.

(Click on photos for larger view.)

This is how you do it.

1.  Crumple up some aluminum foil lightly to get some texture and then open it back up. 
2.  Die cut the foil.
3.  Apply Versamark ink to the foil pieces and the cover in metallic embossing powder.
4. Heat to melt the powder.  Repeat process if necessary to cover die cut.

I found that you could also get the job done by just using paper or cardstock.  Can you tell which one is paper in my finished card?


I found that the paper was much less fragile and a little easier to die cut.  With the foil, in the really recessed areas, you can see the foil peeking out, and that is a nice look.  But overall, I think you get a very similar result either way.


(PS. the copper leaf is paper.)

Supplies:  Spellbinders Shapeablilities Foliage, Hero Arts Woodgrain background stamp, Gina K Birthday Blessings (Bird stamp and die), Gina K Sending Love set (flower), GKD Dark Chocolate Ink, patterned paper from my stash, Frayed Burlap distress ink, Gold and Copper Embossing powders from Recollections

I would love to participate in the following challenges:

Thursday, July 28, 2016

One-Layer Stamped Floral card

Welcome and thanks for stopping by.

Today I am sharing this easy one-layer card!  It really came together quickly - about 10 minutes.  

First, I stamped the sentiment.  Then I used my ruler to draw a line on either side.  Post-it notes were used to mask off the sentiment strip, and then I just used some pretty flower stamps from Gina K to fill in most of the card.  


I did use the rock-n-roll stamping technique on the leaves and the blue flowers.

I did make a second card, too, but it refused to play along with the photographing process. I liked the colors in it, though.


Supplies: Gina K Designs Made with Love and Massive Messages stamp sets, Gina K Wild Lilac ink, Hero Arts Shadow ink Butter Bar, Orange Soda, Pool, Cornflower, Green Hills, Field Greens, Versafine Onyx Black ink, black marker, Stickles

I would love to participate in the following challenges: 
SimonSaysStamp Wednesday - Anything Goes!
Tuesday Throwdown #304 - Happy Birthday

Thursday, May 19, 2016

Maculine Birthday Card with peg stamps

Hello and thank you for coming by my blog today.  

I needed a masculine birthday card today, so I remembered the little stamp set I recently purchased and paired this with some patterned paper.  I have mentioned before that I am a big fan of using patterned paper to make cards for men.


I die cut the label first, and then did the copper heat embossing of the leaf, which is labeled as a poinsettia bract.  I went over with green pigment inks, sometimes using generation stamping to get further depth in the leaves.  In addition to the leaf and owl images, there is a tiny branch.

I distressed the edge of the label and colored in the owl with a light brown marker.

Supplies: Rubber Stamp Tapestry Deep Winter Morning, Avery Elle Pigment inks Celery, Lemongrass, Kraft, Versamark Ink, Recollections Copper Embossing powder, patterned papers from my stash, Technique Tuesday Little Sentiments, Memento Ink, Spectrum Noir marker

Thanks so much for taking a look at my card today!

Sunday, April 24, 2016

100th Post and a Scenic Card

Thanks for stopping by today, especially.  I noticed that this is going to be my 100th post!  What a fun milestone!

Today I have made a card that is not my normal style.  Over at Artsy Inkers, there has been a challenge this month to make an arch with stamps. It has really taken me all month to figure out what to do.  

(Click on photos for detail.)

I decided to use an oval stamp as the basic shape of the arbor.  Then I stenciled on the outside of the oval with blue ink and below it with greens.  I used several of my peg stamps to change the oval into a flower arbor.  I also used one of the tiny flowers to add texture to the grass below. 

These little bunnies had never been inked before.  I fussy cut them and sponged ink to color them.  The ink is Distress Pumice Stone, which I knew was a brownish color of grey, but it really is much more brown than I realized. 


Art Impressions wants us to take a photo of the stamps we used in the project, and I mixed and matched so many for this project. 

Supplies:  Gina K Designs Warm Spring Wishes (Oval), Rubber Stamp Tapestry from Cherry Blossom and Herbal Sachet sets, Art Impressions Try-Folds Furries, Hero Arts sentiment, Avery Elle Pigment inks, Versafine Smokey Grey ink, Distress Inks Pumice Stone, Tumbled Glass, Bundled Sage, Peeled Paint, Heidi Swapp Stencil

I would love to participate in the following challenges: