Wednesday, February 27, 2019

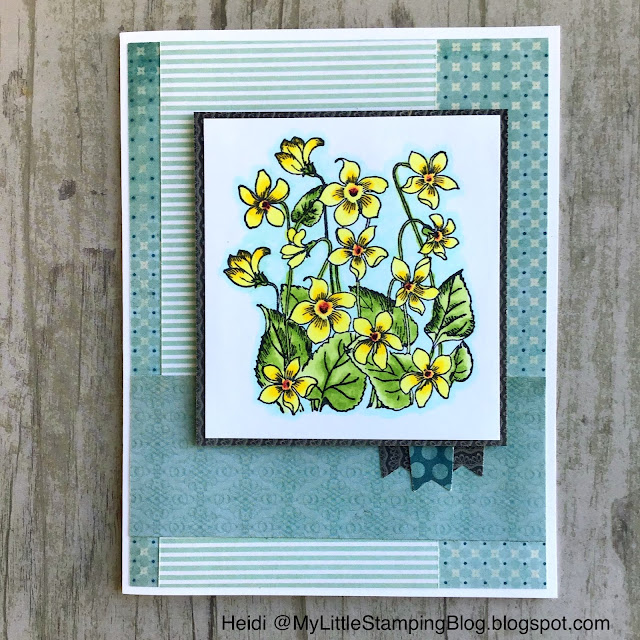
February Flower of the Month Card - Violets

The flower of the month of February is the Violet.  If you follow my instagram or facebook pages, you may have seen, last week, I started auditioning colors for this stamp.  Well, I ended up choosing the yellow.  I really like yellow violets, and they are hard to find!


After coloring my stamp, I rooted through some of my really old paper pads to find enough scraps to finish the card.  I used a tiny banner punch to make the little pieces I placed under the image.  

Supplies: I Brake for Stamps Violet Flowers, Memento Black ink, Spectrum Noir alcohol markers, scraps of patterned paper from old My Mind’s Eye 6x6 paper pads, EK Success banner punch.
Save 10% on your order at I Brake for Stamps with my code, SAVE10HEIDI.


Thanks so much for visiting me today, and for all your kind comments!


Monday, February 25, 2019

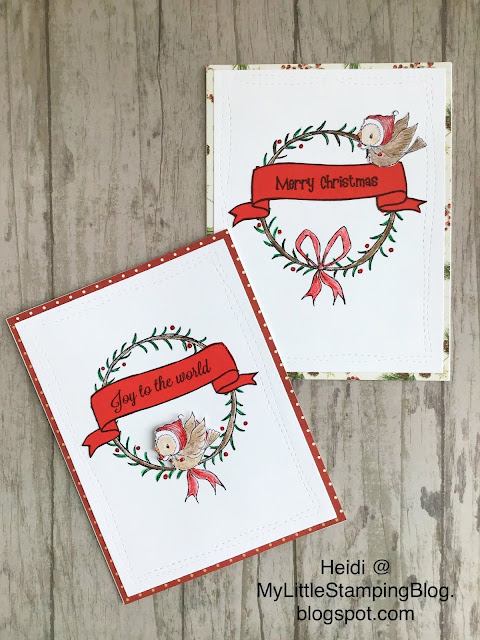
Christmas Cards for Rudolph Days - February

Hello!  Most of you know that I made Christmas cards year round.  This month, I was able to make 5 cards for the Rudolph Days challenge.  February is short, so there are only a few days to post the Rudolph Day challenge.


I used stamps from Purple Onion designs mixed with a banner stamp from Lawn Fawn Bannerific set.  I cut the banner out of red cardstock scraps.  The little bird was fussy cut and popped up if different places.  I made 4 of this card.

The second card is a bit different, but I still used that little bird.  It feels good to have these cards ready early!


Thanks for visiting!  I hope to visit you back soon!  Please leave a comment with a link to your blog so I know where to find you!


Sunday, February 24, 2019

Fairy Garden Card

ETA (2/28/19) I am so pleased that Art Impressions chose my card for an Honorable Mention for their challenge! Thank you!

_________________________

Let me start out by saying that this was not the card I sat down to create last night.  I had planned to work on a cute little watercolor scene using the Art Impressions watercolor stamps.  While I did use their little house stamp, other supplies that were out on my desk inspired an idea for an imaginary little fairy garden.


That is really what I like best about making card, just getting to be creative and let my mind run with an idea.  

So the background is a stamp that I colored with markers, and then spritzed with water and stamped out onto watercolor paper.  I then stamped and watercolored the house, cut it out and popped it into my scene. I did add some of the little grasses to ground it.  I do not know where the die cut leaves came from, but I cut them up and added them to my card base.  

Supplies: Art Impressions Watercolor Series structures, Grass from the foliage set, Just for Fun Rubber Stamps Floral Silhouette,  Tombow Water based markers, Versafine Onyx black ink, other items from my stash.

I would love to play along with Art Impressions Challenge 250 Cottage or House.  

Thanks very much for visiting today!  Hope you have time for papercraft today or soon!

Thursday, February 21, 2019

Silhouette City Scene

ETA 3/2/19:  I was so pleased to be selected as one of the Librarian’s Choice for this challenge.  Thank you!


Hello!  We are coming off a very snowy day here.  Although we haven’t had the “big one” blizzard yet this winter, I am about ready to be done with all the school delays and cancellations.  Actually, I think the kids would like to be back on a regular schedule too!

Anywhooooo, I have a card to share today that is a little clean & simple, but I think it is a lot of fun.  I might use this for a graduation card this year, but I also might use it for a friend who is often going off on trips and adventures!


I stamped my Just for Fun Skyline stamp with two colors of pigment ink for my background.  I like  the bit of texture I get when using pigment ink, so after I stamped my Mama Elephant bridge with Versafine, I also did the little bus with two shades of red pigment ink.  I popped that bus up on foam tape and then finished the scene off with the little hearts in the sky.  

Hey, does anyone know of a good foam tape that is thinner than the standard tapes? I think it would be cheaper and easier to mail things if I had something with dimension, but thinner!

I would love to play with the Library Challenge: The Note the ModSquad Challenge blog’s Brand Name Stamp challenge, and SimonSaysStamp’s Monday Challenge: Things with Wheels.

Supplies: Just for Fun Rubber Stamps Skyline Silhouette, Mama Elephant Sightseeing stamps set, Avery Elle pigment inks in Fizz, Strawberry, Cherry and Mimosa, Versafine Onyx Black ink.

Thanks so much for visiting today!  I appreciate each subscriber and comment!  


Wednesday, February 20, 2019

Watercolor Wedding Card

Hello, cardmakers! Since Valentine’s Day just passed, I decided to make a wedding card when all these Love stamps are already out.  I always like to have a Wedding card in the stash.


I first stamped the heart stamp on watercolor paper and heat embossed it with White Detail Embossing powder.  I then used pink watercolor paint over top in a very loose wash.  I die cut out the panel.  Then, I stamped and colored the bells.  I used alcohol markers and some glitter pens to accent the ribbon and the design on the bell.  I popped this up on the card with foam tape.


I would love to enter Tuesday Throwdown’s Falling Hearts challenge, and WordArtWednedsay’s Anything Goes challenge!

I Brake for Stamps Wedding Sheet stamp set, Versamark ink, Versafine and Memento Black inks, Spectrum Noir alcohol markers, Koi pan watercolors, Close To My Heart silver glitter gems, other items from my stash.
(Save 10% on your order at I Brake for Stamps with my code SAVE10HEIDI)

Thanks for visiting today!!!!


Sunday, February 17, 2019

Faux Postage Winter Cardinal

Hello!  Hope you are well today!

Do you know about Just for Fun’s Faux Postage stamps and stencils?  They are made to work together to make some unique stamping projects.  I love any kind of tool that helps me do something different with the stamps I already have, and this definitely is fun and different!


First, I stamped the grid stamp, then I placed the coordinating stencil over top. I sponged light blue distress ink over the stencil and then, with the stencil still in place, stamped a pine branch all around.  The final step for the background was flicking some Perfect Pearls mixed with water over top to add some shine and the idea of snow.

 I decided to use the grid as a representation of a window reflection, and popped my fussy cut cardinal over top.  


Supplies: Just for Fun Rubber Stamps 3 + 1 Faux Post Stamp3 + 1 Faux Post StencilLarge Cardinal StampPine Branch Sketch Stamp, Distress Ink Tumbled Glass, Green Pigment ink, Perfect Pearls, Versafine Black Ink, Darice Snowflake Embossing folder, Prismacolor Colored Pencils.

Thank you for your visit! I hope you have a wonderful day!


Wednesday, February 13, 2019

Heart Quilt Valentine Card

 Hello, stamping friends!  Today I am sharing with you a Valentine card that is my most favorite of this year!  


I stamped the quaint Heart Quilt stamp on some pink cardstock. I then used alcohol markers in a few shades of red to color it in, and added white gel pen and glitter pen for accents.  I mounted it with fun foam over some white, textured cardstock.  The Love sentiment is from the Wedding Sheet stamp set.


Supplies: I Brake for Stamps Heart Quilt and Wedding Sheet, Memento and Versafine Onyx Black inks, Spectrum Noir alcohol markers, Textured and Lumiere papers from my stash, Cardmaking and Papercraft Sewing stamp set, other items from my stash.
Use code SAVE10HEIDI to save 10% at the IBFS Store.

I finished off the inside of my card with this cute heart die cut and saying.  


Hope you all have a lovely Valentine’s Day!

Tuesday, February 12, 2019

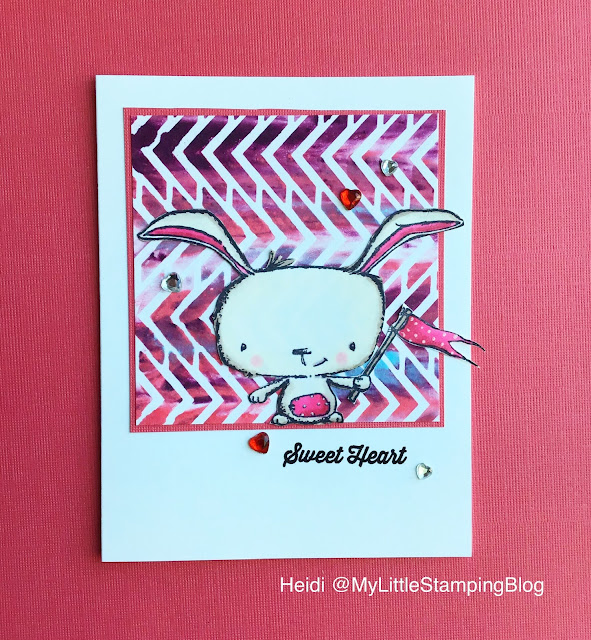
Shaving Cream Stencil Technique - Valentine Card

A couple weeks ago, in my stamping group, we were challenged to use the Shaving Cream Stencil Technique by UnderstandBlue, blog and video is here. I made several backgrounds because it was really fun!


This background was made with Distress reinkers, I think in Tumbled Glass, Worn Lipstick and Dusty Concord. I was surprised how deep the colors were, I could have used less reinker!  I paired this with a cute bunny image.

I would love to enter this in Word Art Wednesday’s Anything Goes challenge.

Supplies: Purple Onion Poppy stamp, Jillibean Soup Sweet Treat stamp set, Memento and Versafine Onyx Black ink, Distress Reinkers Tumbled Glass, Worn Lipstick, Dusty concord, Balzer Designs Mini Chevron stencil, Spectrum Noir alcohol markers, other items from my stash

Thank you so much for visiting today!

Monday, February 11, 2019

Dinosaur Card - Non-traditional Valentine!

Hello!  I want to share a bit of a non-traditional Valentine today.  In fact, if you take off the hearts, I think you could use this card for a birthday card.

The background is an interesting technique I learned from my stamping friend, Stampwilly Designs.  Basically, you crinkle up your cardstock, then run different colors of Distress Oxide inks over it.  After each color, you can make a print of this onto a fresh sheet of cardstock, but what I am sharing today is the direct to paper part.


I then created a grassy part for my dinosaur to stand on by tearing a scrap of green cardstock.  The heart gems and that fun sentiment were added to make it a Valentine, and I think this is going to be great for a nephew of mine.

I would like to enter this in Word Art Wednesday’s Anything Goes Challenge.

Supplies: Hero Arts 1989 dinosaur, Memento and Versafine Black inks, Stampendous Changito Wild about You stamp set, Distress Oxide inks in Lucky Clover, Squeezed Lemonade and Blueprint Sketch, everything else from my stash.

Thank you for your visit!!!

Sunday, February 10, 2019

Making Multiple Valentines! Same, but Different!

Hello!  I find I have made lots of Valentines this year.  In addition to the regular cards I need each year, my craft group is making them for the residents at a local Assisted Living.  So, I did need to mass-produce, and make a bunch of cards that were the same, but different.


I decided to use both a cute elephant image and a skunk image.  I colored these simply with alcohol markers and cut them all out.  I then decided on a basic sketch.  I was able to change up the patterned papers, the embossing folders, and used both textured and lumiere cardstocks from my stash.


I then went through my stamps and found some fun sentiments to use both on the outsides and insides of the cards.  I was thinking of the recipients (whether it be a young family member, or a boy classmate, etc) when I was doing this so I had a suitable sentiment for each one.


I feel like I have now gotten a ton of use out of these stamp sets, both today and for some previous cards.  Next year, I think I am going to need new Valentine stamps so that I am not sending the same types of cards out again.  Here are some photos of all the cards I made, 11 in total!


Supplies:  Avery Elle Ellie stamp set, Lawn Fawn Stinkin’ Cute stamp set, Jillibean Soup JB0837 Sweet Treat stamp set, Hero Arts Celebrate Everyday sentiment set, Firefly Heart dies, Foil 6x6 Paper pad from Target, various other supplies from my stash

Thank you for your kind visit today!

I’d like to enter these challenges:
DieCutDiva’s Love is in the Air Challenge
Cute Card Thursday’s Anything Goes Challenge

Saturday, February 9, 2019

JFF February Challenge - Color Combo Green, Purple and Gold - Add Music

Hello! Just for Fun has a really different and exciting challenge this month!


While the obvious card would be to make something fun for Mardi Gras, I really wanted to use this musical background and make a Christmas card.


Hope you will play along!  Here is a link to the challenge page, where the entire design team has shared card ideas!

Friday, February 8, 2019

A “Wild” Valentine

Hello!  I am sharing a card for some challenges today.  The Free4All challenge at SplitCoastStampers is to use a Wild Animal, and of course, it is Valentine season, so I naturally made the connection between these two.  


I stamped my Lion with brown ink on a scrap of yellow cardstock.  In fact, all the materials for my card were either in the scrap box, or half-done projects pile.  I matted it with red cardstock.  The embossed background was previously done on black cardstock, and then I rubbed a gold inkpad all over it.

I have this sentiment, from an old set, that I stamped on a die cut heart.  I think this makes a fun, masculine Valentine!

Supplies: I Brake for Stamps Lion Face, Stampendous Changito Wild About You stamp set, Versafine black and Vintage Sepia ink, Darice embossing folder, Brilliance Galaxy gold inkpad, Stickles gold glitter glue, all other supplies from my stash.  

I would love to play along with these challenges:
Lost Coast Portal to Creativity - Love and Hearts Challenge
SimonSaysStamp Monday Challenge Blog - Add some Red Challenge
Tuesday Throwdown - Anything Goes
Pixie’s Snippets Playground - Anything Goes with snippets

Thanks for visiting today!  I appreciate every follower and every single comment! Have a great day!

Thursday, February 7, 2019

Distress Oxides Smooshing over Gesso Technique

Hello everyone!  I hope you are doing well.  

I have been working on the administrative side of my blog.  I continue to investigate commenting issues, and I think I have a fix as I have been able to comment on more blogger blogs today.  Yay!

Also, you might know that Google+ is closing up shop, and so many of us that use Blogger have widgets and things that are connected to Google+.  So I went ahead and removed those.  

The rub is that people who have been following me via Google+ and won’t find me anymore.  However, I have gone through and tried to find all those blogs that I followed on Google+ and added them to my regular reader.  I now follow about 120 blogs!  


Anyhow, I have shared this tip before, but I have an easy hack for doing the smooshing technique with Distress Oxide inks.  The trick to getting lovely layering (I think) is to first coat your cardstock with gesso and letting it dry.  Then do the smooshing as you usually do, drying in between colors.  This background was done using Wilted Violet, Seedless Preserves and Salty Ocean Distress oxide inks.  

I then stamped and colored my snowman.  I added glitter pen in certain spots.  I cut out the snowman just on top, creating a hill below.  


Supplies: Power Poppy Snow Kissed Stamp set, Memento and Versafine Black inks, Distress Oxide Wilted Violet, Seedless Preserves, Salty ocean inks, Sakura Stardust gel pen, Spectrum Noir alcohol markers

Thanks for visiting today!  If you aren’t already, consider becoming a follower!


Wednesday, February 6, 2019

Vintage Rose Valentine

Hello!  I want to thank you for visiting today, and for all the lovely comments you leave.  I enjoy reading each one, and it means a lot that you take the time!  Today I would like to share a Valentine I made with a bit of a vintage feel.  


I first stamped the background using June’s Rose stamp in gold ink.  I stamped it several times to fill in the entire panel.  I then sponged Antique Linen distress ink to add a vintage feel.  

I then stamped my sentiment from the Wedding Sheet with hot pink ink onto some light pink kraft cardstock.  I stamped the heart in a very light pink.  I die cut the sentiment, and with the die still in place, traced the inside of the die with gold gel pen.  I also added Wink of Stella outside the gold line.    I stamped a second heart in the hot pink and trimmed it out, for an embellishment.


Supplies:  I Brake for Stamps Wedding Sheet stamp set, June’s Rose stamp, Brilliance Galaxy Gold ink, Gina K Passionate Pink and Innocent Pink inks, Nuvo Drops, Gold Gel pen and Wink of Stella Glitter pen, Pink kraft cardstock from Hobby Lobby.
(Save 10% on your order at I Brake for Stamps with my code SAVE10HEIDI)

Hope you have time for stamping today!


Sunday, February 3, 2019

More Credit Card Swipe Technique for a Valentine Card

Hello!  I have been making some more cards using the Credit Card Swipe Technique.  If you need a reminder how to do this, you just use Distress Oxide (or any ink that you can mix water with) and smoosh them on your craft sheet.  Spritz with water and then pick up the ink with an old credit card, and swipe across your paper.  I used regular cardstock here and three colors of Distress Oxide inks (Spun Sugar, Picked Raspberry and Wilted Violet).


I then die cut my background and simply stamped a bold Just for Fun silhouette Bicycle image over top with black Versafine Ink.  I added the die cut LOVE sentiment to make a sort of non-traditional Valentine. I like how it turned out!

Have a wonderful day!