Showing posts with label flowers. Show all posts

Wednesday, February 14, 2024

Happy Valentine’s Day!

 Happy Valentine’s Day to all!

I have a few cards to share that fit the theme a little.  What I have been doing when creating is making a card, and then kindof going with a variation on that theme for a few cards.  So I either make a card set, or just use some of the same supplies that are out, or the same colors, etc.  It has helped me to start rebuilding my card stash. 


The pinky red cardstock is lumiere shimmer cardstock.  
Hero Arts Protea Flowers
Hero Arts Eucalyptus Bold Prints background stamp
Technique Junkies Owls
Owl Sentiment is from a very old Club Scrap rubber stamp set, some Scandinavian themed one…

*The Owl Card is getting entered in the Cardz 4 Guys Challenge - Love 
That card went out to a boy!
*The Sympathy Card will be entered in the Blog Named Hero Do You Believe In  Love challenge
*And the first LOVE card with the Swiss Dots embossing
Will be entered into the Unicorn Challenge - Dots and Stripes

Hope you have a wonderful day!
Heidi

Wednesday, February 16, 2022

Garden Of Birthday Wishes with Peg stamps

 Thank you for all your recent comments!  I appreciate every one!

Just a quick share today of a card I made with peg stamps and some old pigment inks. (I’m not sure my pigment inkpads are going to last much longer, I noticed the pads are sortof compressing or degrading or something…)

Supplies used:

Rubber Stamp Tapestry A Spot of Tea stamp set, Cherry Blossom stamp set

Close To My Heart Daisy Meadows Stamp set

Darice Embossing folder

Avery Elle Pigment inks

Monday, November 1, 2021

Floral Birthday Card - Coloring on Vellum

 Hello everyone!  

I’m back with another design team post for the I Brake for Stamps/Blank Page Muse sister stores!  Don’t forget you can use my affiliate code to get 15% off, and it works at BOTH stores!  

BPMHeidi

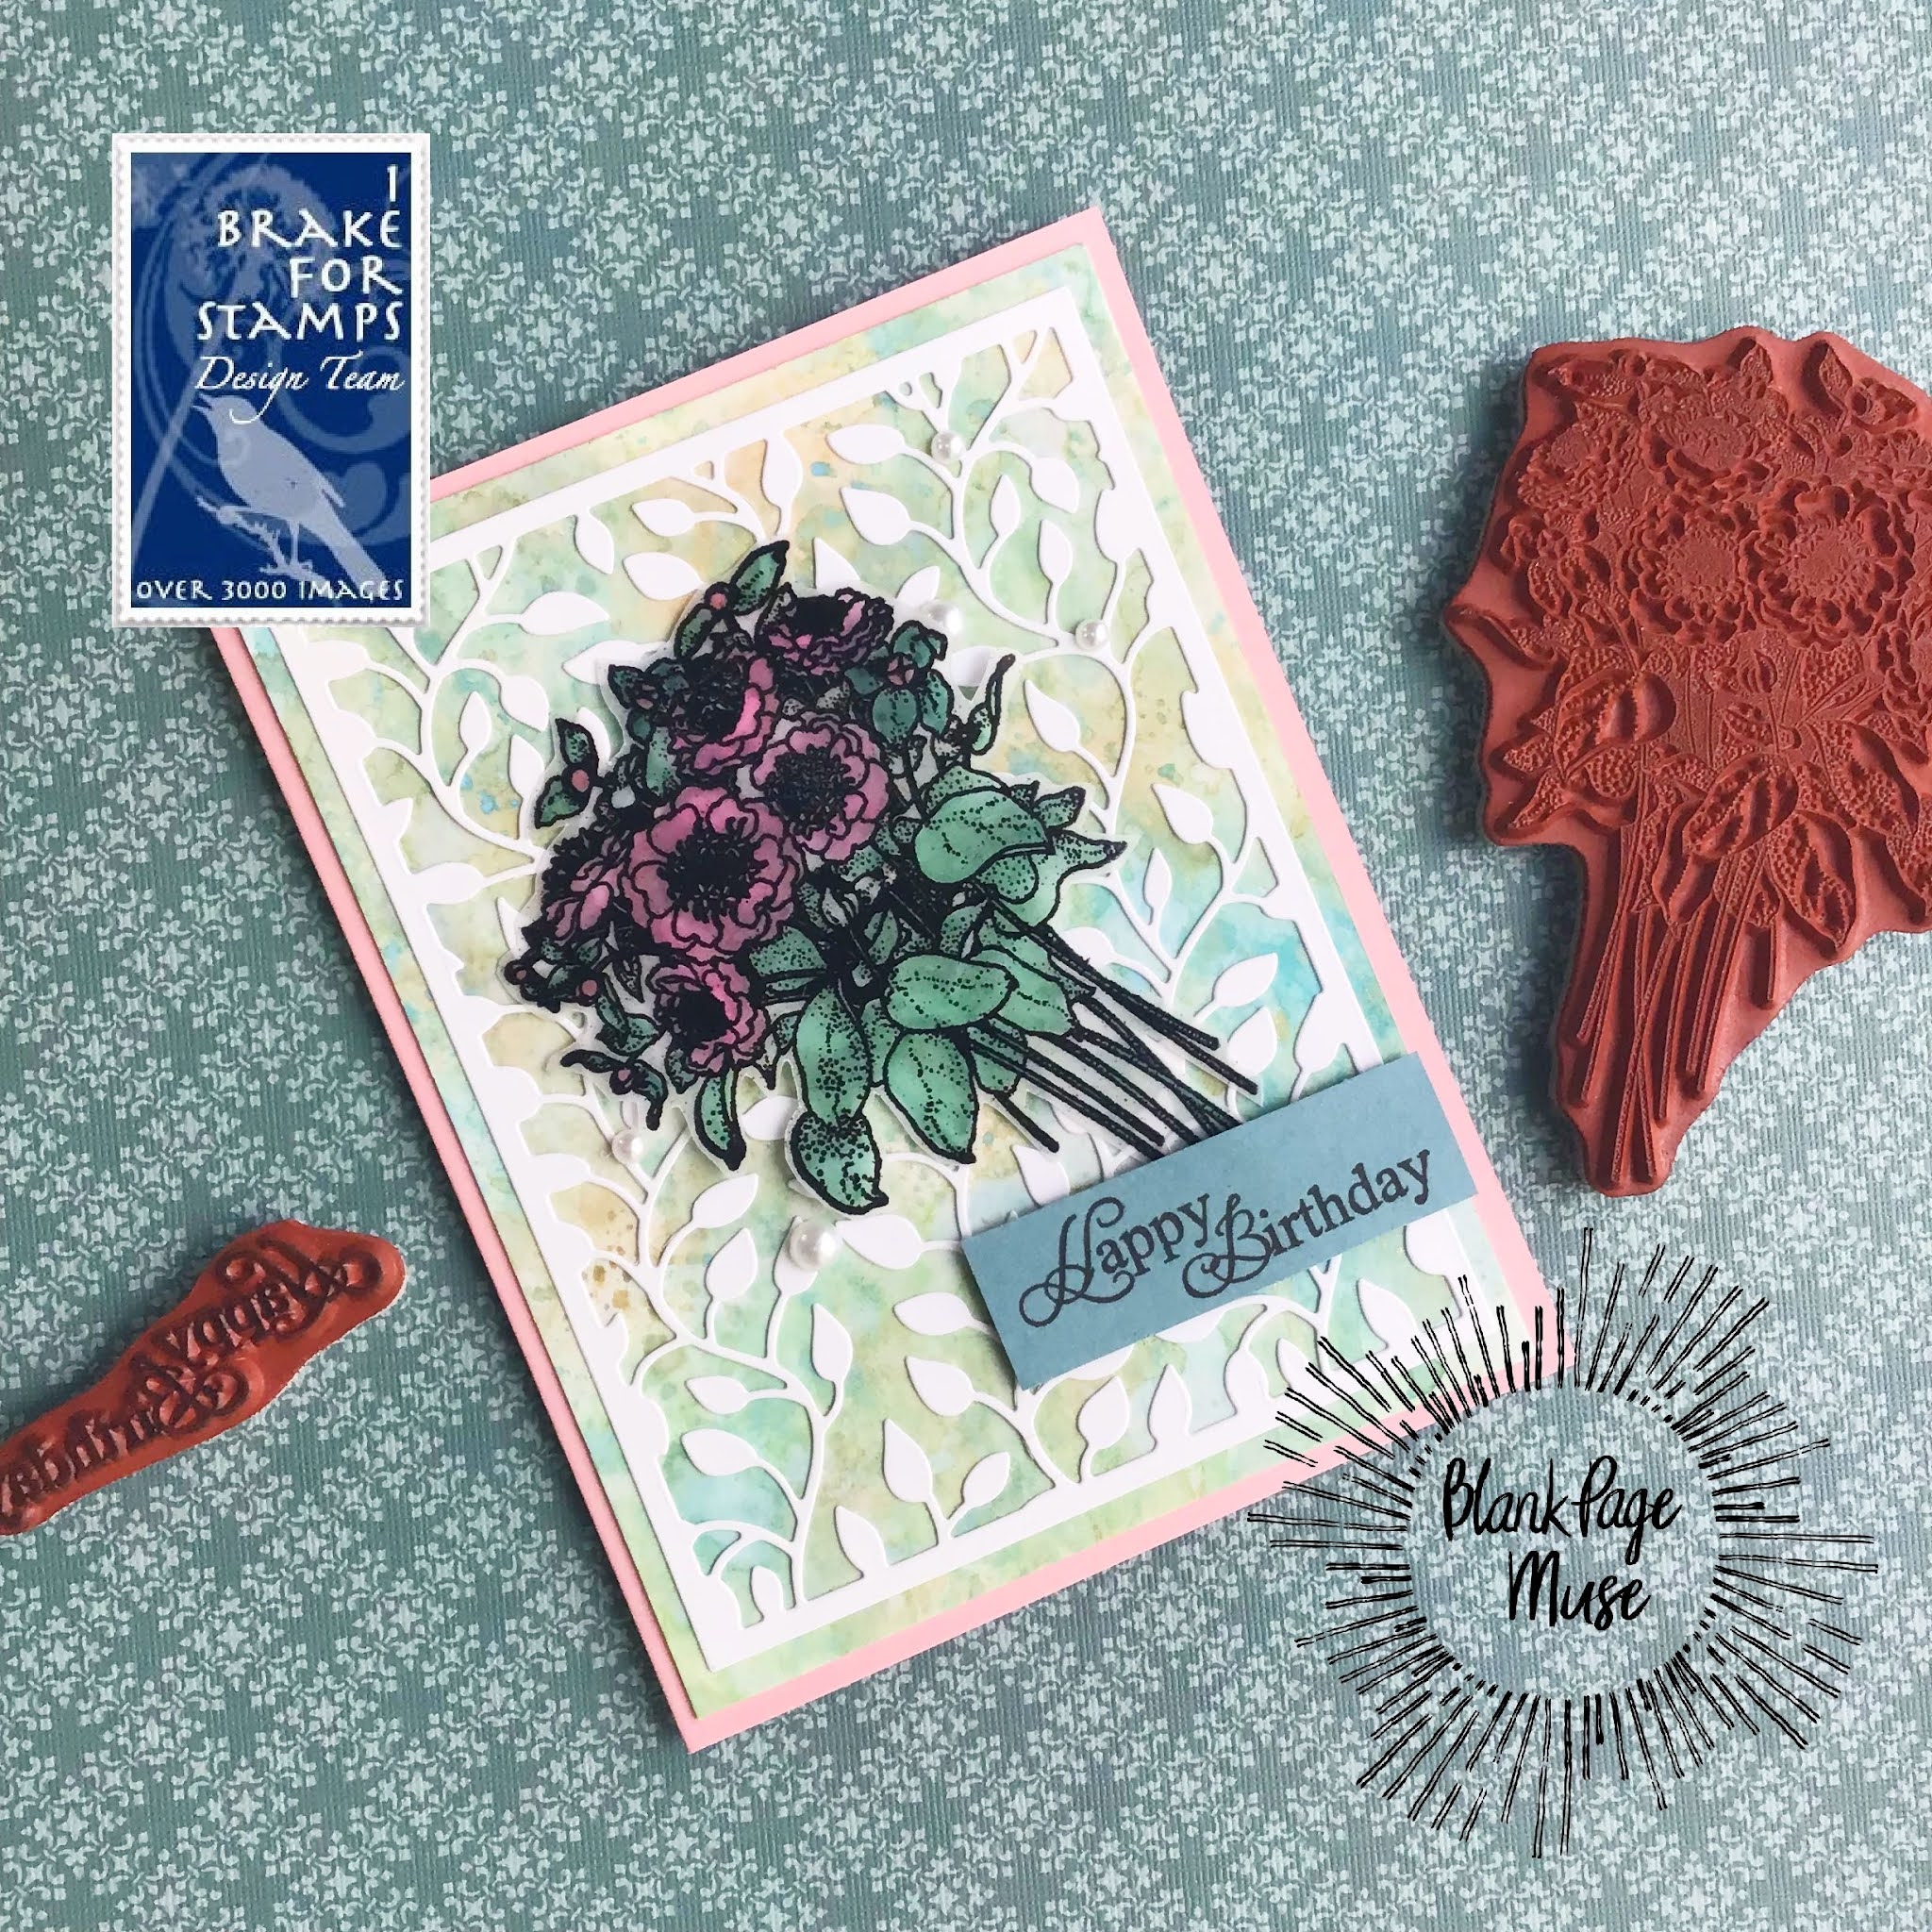
My card today uses all stamps from IBFS.  I stamped the bouquet on white vellum and then used black embossing powder.  I colored on the back with alcohol markers.  Some well placed little pieces of foam tape were completely invisible to the eye.

The inside of the card was finished with another stamp from the set in a darker pink ink.  I stamped over top with a sentiment.  I gave this card to a good friend for her birthday recently and she really liked it.  And I am happy to report we had both sunshine AND laughter on her special day!

The stamps I used today are Florals Sheet and Inspirational Plate #2.  


The background die is from Impression Obsession.  This was placed over a piece of watercolor cardstock with distress inks and gold perfect pearls. 

Thank you for visiting today!

Saturday, September 18, 2021

Paper Scrap Background

 The other day, I was determined to use up this certain patterned paper pack. There were no whole sheets left, most were just 2 inch strips.  I thought of a card I received from my stamping friend April. She blogged about it in March 2019.  If you go to her post Here, you will see I commented there that I was going to try it.  Well, two and a half years later, I have!


The pansy stamp is sadly retired from I Brake for Stamps (but great news, their store has reopened, more on that soon) called Three Pansies. The sentiment is  from Close to my Heart Birthday Parade, paper is Recollections Backyard Table, Distress ink for edging was Picked Raspberry. 

Wednesday, October 7, 2020

Aster Friendship Card

Hello and Happy Wednesday!  We are having lovely fall weather here.  How about you? I have a friendship card to share with you today.  


I first colored the September Aster stamp with markers.  I cut it out with scissors.  I put this over top of a pastel vellum circle and then popped it up over the card front.  The background paper is actually one I made using the Faux Linen technique.  It is hard to see the texture in the photo, but you first sand glossy paper in both directions and then just add ink over top.  

On the inside, I stamped the same image again in light tan ink, and stamped my message from Inspirational Plate #2 over top.  I know just the friend I want to send this to! (As always, save 10% off your order at the I Brake for Stamps store by using my code SAVE10HEIDI.)


Thanks for visiting today and keep on stamping!

Thursday, September 10, 2020

Gelli Plate with Background Stamps

Hello everyone! I hope you are doing well today!

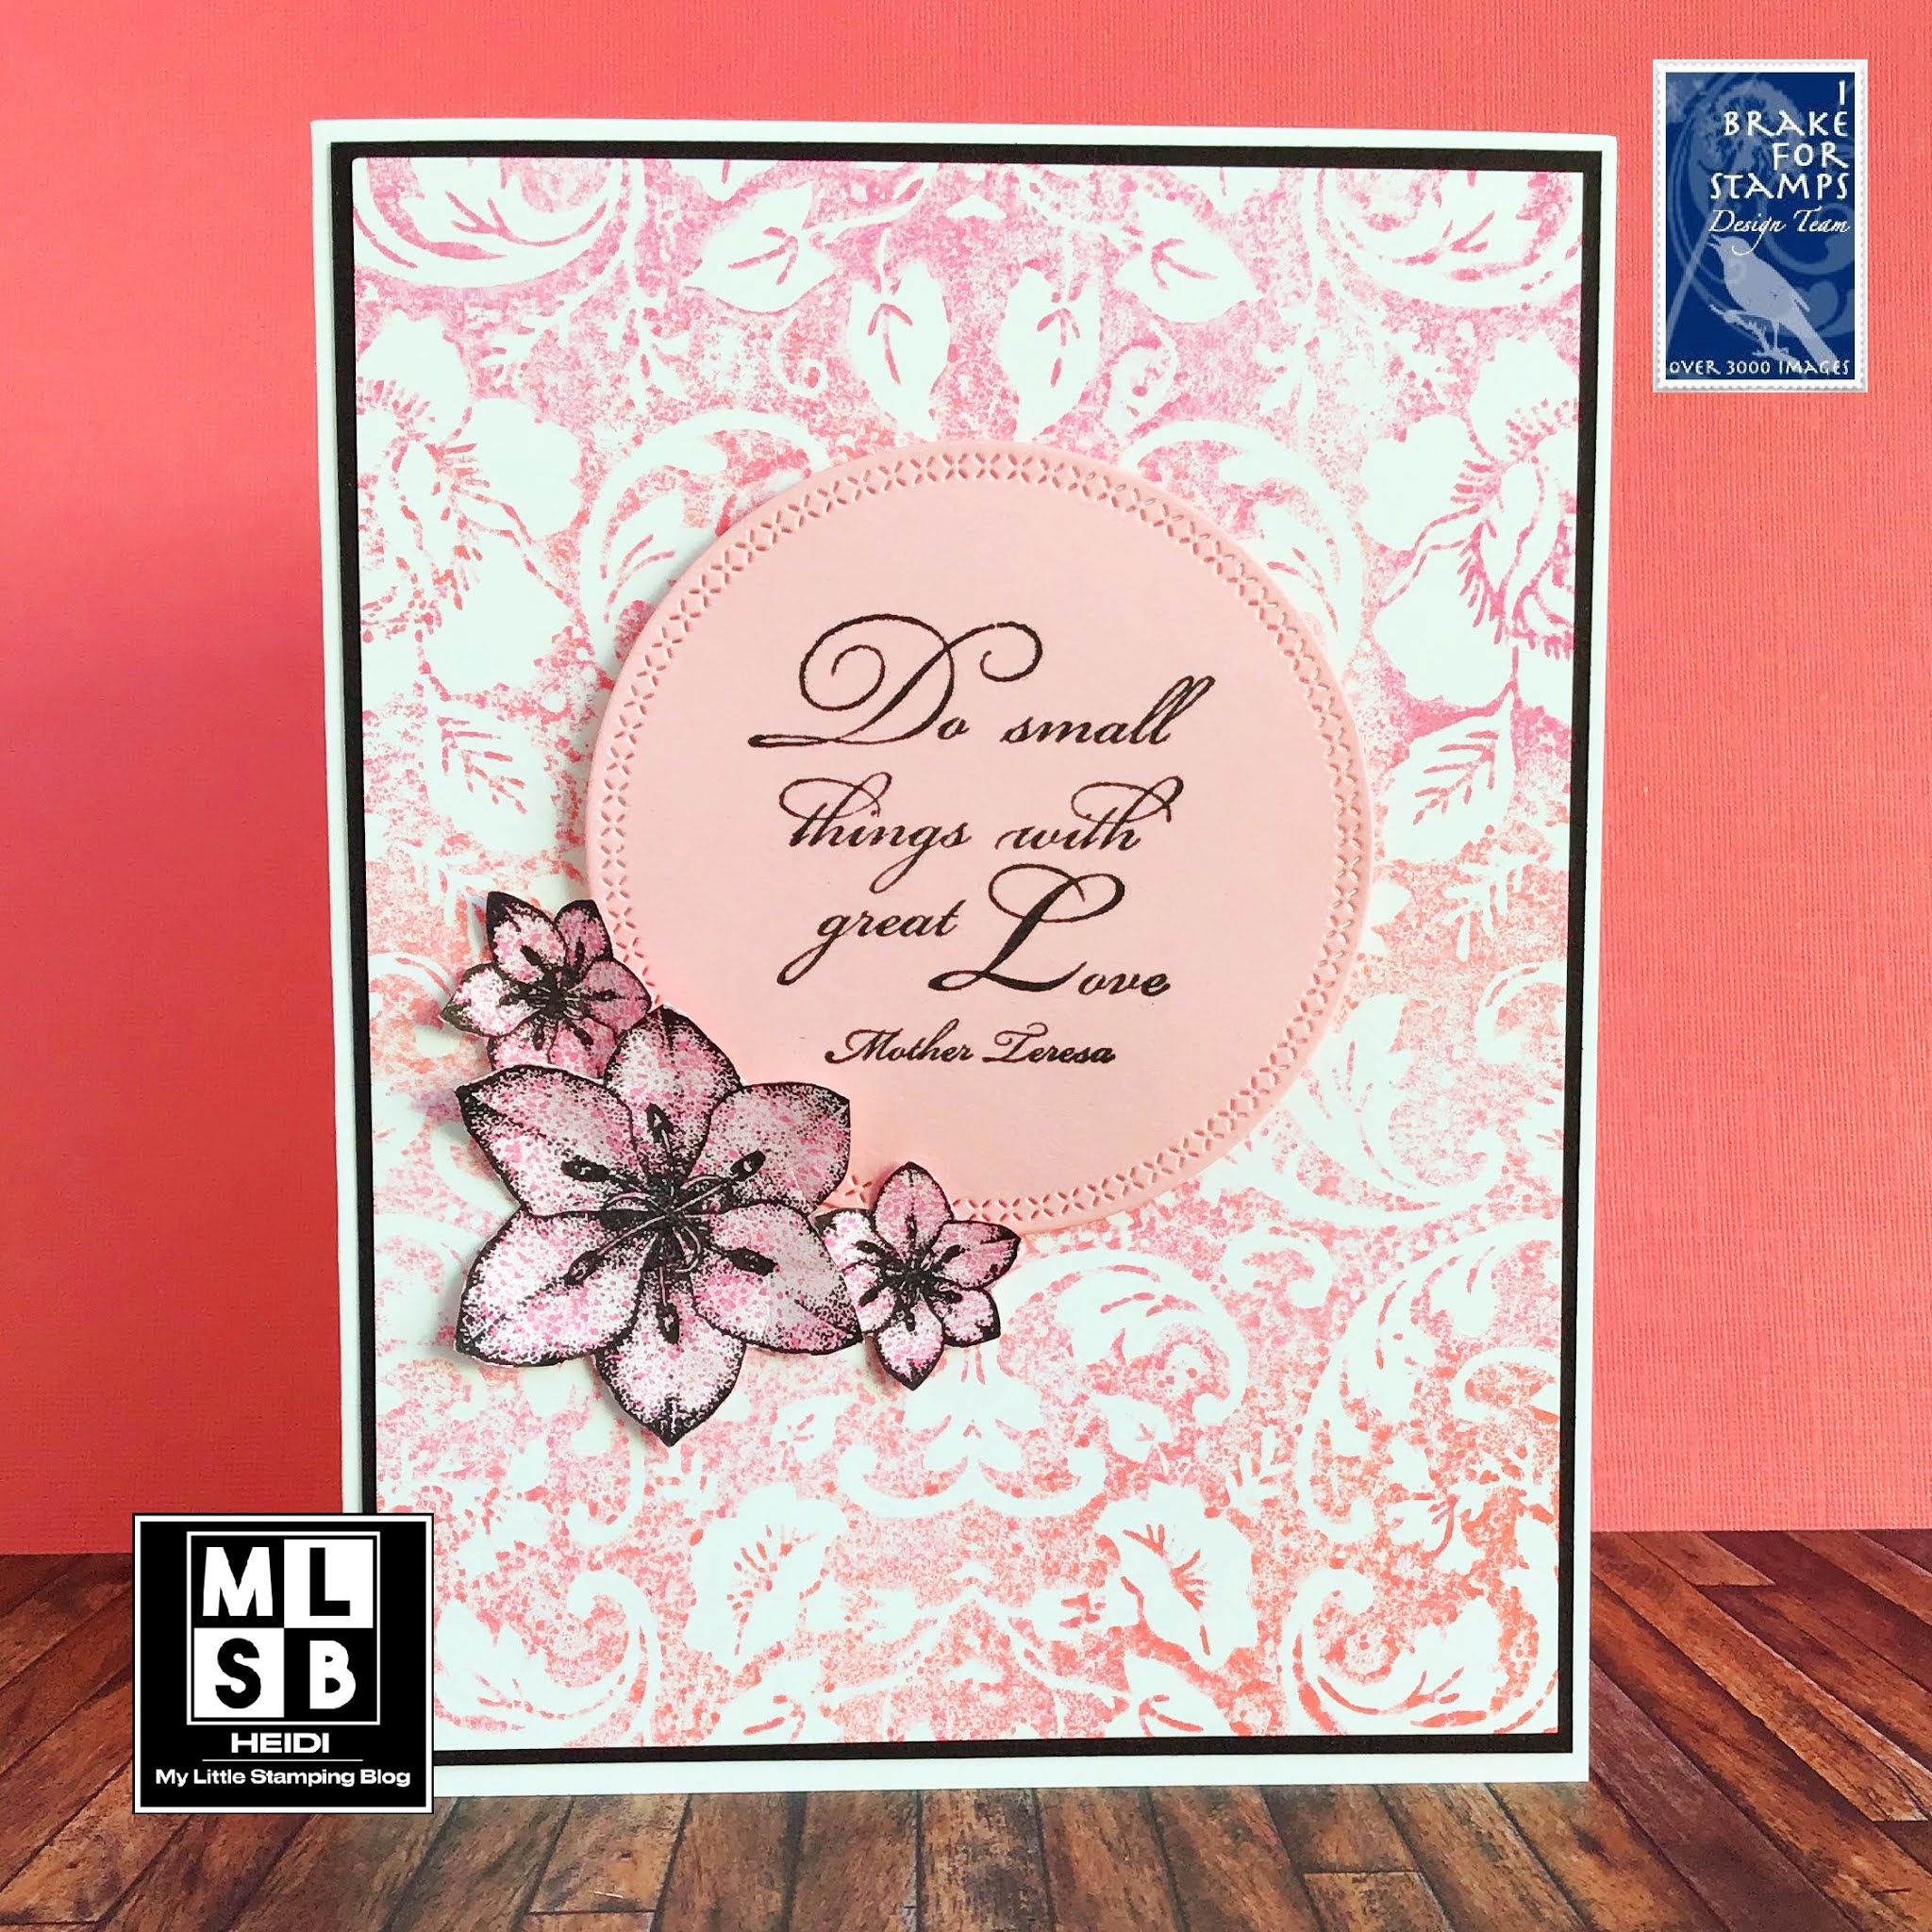
I would like to show you the results of a simple stamping technique using a gelli plate.  I will first just tell you my process. I applied Distress Oxide ink in a few colors of pink and orange to a gelli plate. I used a brayer, just to even out the ink.  


Then, I pressed this large background (5x7 inches) stamp over the gelli plate and removed it.  I made a print of what was left on the gelli plate (center), and then also stamped what remained on the stamp to make another print (right).

This is really fun and fast to do!  The gelli plate not only allows you to make two prints with every stamp, but it also adds a lot of texture you wouldn’t get if you just stamped the traditional way. I also like how you can stamp easily with multiple colors of ink.

So, I made a bunch of prints and then made several cards out of them.  Some of the prints I didn’t like as well, so I either cut them down and used the area I liked.  Or, I stamped flowers over the print and cut them out like it was patterned paper. 


The background stamp I used is Huge Floral Background, but you could use any of the great background stamps the I Brake for Stamps carries. The sentiments all came from Inspirational Plate #2.  The flowers are from Floral Half Sheet. (As always, save 10% off your entire order at I Brake for Stamps using my code SAVE10HEIDI.)

I really enjoyed trying something new.  Have you tried any new techniques lately?  

Wednesday, April 29, 2020

Clean and Simple Spring Floral Card

Hello! I have really been enjoying the flowers this spring.  It has been rather cool and all the blooms have lasted so much longer than usual.  


For my card today, I decided to use some bright spring colors and flowers. I heat embossed this image on plain cardstock, then sponged over top with Distress Oxide inks in Tumbled Glass and Twisted citron. I really liked the color the blended in between.  

Here is a quick view of the stamp set I used, I Brake for Stamps Half Sheet 138B. (As always, save 10% on your order with my code SAVE10HEIDI)


Thank you for visiting today and happy stamping!

Tuesday, March 24, 2020

Rub-On Watercoloring - Handmade Card

Hello!  In my online stamping group, there is a challenge this week to try a technique called Rub-On Watercoloring.  This isn’t something I had tried before.  The video is here. 


If you aren’t sure if you want to watch the video, I will try to explain the process.  You stamp your image, and then use the clear index sheet from the stamp set to color your watercolor onto, then when you line it up, you can get the watercolor just in the right spot.  I used pink, peach, yellow for the flowers, and two colors of green for the leaves.

I also added some glitter glue to the centers, and I used a marker to fill in the berries.  This was really fun to try!  My stamp sets are both from Close to My Heart.  


I’d love to enter the Flower Challenge - Anything Goes and Double D Challenge - Spring.  


Thank you for visiting and keep on stamping!

Monday, February 17, 2020

Floral Card with Perfect Pearls and Brusho Powders

Hello!  I have a very pretty card to share today, and I used an older medium, Perfect Pearls! I am convinced that they are making a comeback, and I think that this detailed stamp set is the perfect style for them.

I stamped my flower on the background with Versamark ink and then used Gold Perfect Pearls.  After brushing off the excess, I spritzed the card with water to set the medium.  


For the focal point, I heat embossed the same flowers with gold embossing powder on watercolor cardstock. I wet the cardstock and then sprinkled Cobalt Brusho Powders over top.  I let this dry naturally so I would get variations in the colors.  

I left a spot in the upper left of the focal area for my sentiment. I wasn’t sure if I would use this for a birthday card or maybe even a Sympathy card, if a need arises.  I also did a bunch of Perfect Pearl backgrounds with the different flowers from this sheet so I have more cards to create in the future.


Supplies:

I Brake for Stamps Floral Half Sheet, Versamark Ink, Perfect Pearls Gold, Brusho Colbalt, Detail Embossing Powder Gold, Stardream Antique Gold cardstock, Spellbinders Fancy Rectangle Dies
(Save 10% on your order at I Brake for Stamps with my code SAVE10HEIDI)

I would love to enter Mod Squad’s Mica Powders challenge, SimonSaysStamp’s Monday Challenge Frame It, and WordArtWednesday’s Anything Goes Challenge.

Thanks for visiting!  What are you working on?

Monday, January 6, 2020

New Sympathy Card Series: January

Hello and happy Monday!  

One of my personal goals this year is to create more Sympathy cards.  I feel this is a very important card to send at such a sad time, but they are difficult to make in a hurry.  My goal is to make at least one per month this year.  


I was very lucky to win this stamp set from Joy Clair, which is a new company to me.  There are several lovely phrases, and some sentiments useful for the inside too. (I neglected to photograph the inside of my card this time, whoops!)

Supplies: Joy Clair Heartfelt Sympanthy stamp set, Anna Griffin Embossing folder, Gina Marie Wonky Stitched Ovals dies, Recollections White Embossing Powder, Versamark ink, Memento Black ink.

I would love to enter SimonSaysStamp’s Monday Challenge - Anything Goes, WordArtWednesday’s Anything Goes challenge and Double Trouble’s Hot or Cold (Embossing) challenge

Wednesday, October 23, 2019

Pretty Floral Thank You

Hello everyone!  As expected, I did have another busy week!  I am still waiting for my permanent dental crown to be ready, but the temporary one doesn’t feel too bad anymore.  The kids have been busy as ever, and I have been like a professional chauffeur!  Well, maybe not!

I did have some time to make a couple cards yesterday, and plan to work on some more today.  So I will be sharing again soon, instead of leaving a week go by without posting anything new. I know I won’t be able to read every post I missed, but I will be making an effort!

Today’s card was designed using flowers from a couple different stamp sets.  

I first stamped the silhouette flower by inking it up with two colors of blue ink.  I do not have any fancy ombré ink pads, so this is an easy way to get a similar look.  I cut this into a tag and edged it with green ink.


For my embellishment, I stamped an outline flower onto some scrap teal cardstock and I cut it out. I used glitter glue on the center.  Then I placed this over a bow on my card to create a hand done embellishment.  


Supplies: I Brake for Stamps Half Sheet 138B, Florals Sheet (Save 10% on your order using my code SAVE10HEIDI) Hero Arts Cornflower and Soft Pool inks, Gina K Applemint Ink, Versafine Black Ink, Recollections Backyard Table 6x6 paper pad, Frantic Stamper edge dies, other items from my stash.

As always, I thank you all for visiting and commenting.  It really does brighten one’s spirits and encourage me to make more cards!  I hope you are having a good day!

Wednesday, October 9, 2019

Fall Bouquet Thank You

I hope you are having a great Autumn so far.  Today, I am sharing a card with a bouquet of flowers that I colored for this season.  


I decided to stamp my sentiment right over top of the card front.  I used my stamping platform so that I could stamp it repeatedly, and get a nice bold look.  Then, I thought I would use a bit of white pencil to highlight the right side of the words to make sure it stood out well.  I thought that did the trick, and my card is nice and flat for mailing!

Supplies: I Brake for Stamps Florals Sheet, Thank You sentiment HERE, Memento and Versafine Black inks, Spectrum Noir alcohol markers, Gina Marie Wonky Stitched Oval dies, Avery Elle Wonky Stitched Rectangle dies, My Mind’s Eye Darling Deer 6x6 paper pad.
(Save 10% on your order at I Brake for Stamps with my coupon code SAVE10HEIDI)


Thank you for visiting the blog today!  Come back again soon!


I’d love to enter Inkspirational Fall Photo challenge and SimonSaysStamp’s Monday Challenge - Fall.


Wednesday, September 18, 2019

Flower of the Month: September Aster

Hello!  Did you know that September’s Birth Flower is the Aster?  That isn’t a big surprise as you may see them for sale all over during the early fall.  I made this card for my friend, whose birthday is in just a couple days!  


I tried to color the image in what I think is the quintessential color for an Aster, a pretty periwinkle. I used a blue and a purple alcohol marker to get this look.  I die cut the image, and then with the die in place, sponged light blue distress ink over top, to get the delicate white frame.  

I like to decorate the inside by stamping the flower in a very light ink with the sentiment over top.


Supplies: I Brake for Stamps September Asters, Sentiment from Half Sheet 138B, Versafine and Memento Black inks, Hero Arts Soft Sky shadow ink, Spectrum Noir Alcohol markers, Spellbinders Labels 18 dies, Bo Bunny Early Bird 6x6 Patterned paper pad, other items from my stash. 

I sure appreciate your visiting the blog today!  Happy Stamping!


Friday, August 30, 2019

Pinned It? Try it! Week 3: Make Your Own Multicolor Inkpad

Hello everyone! I am back again with another episode of Pinned It? Try It!  This time, I have a pin that is probably 8 years old that was a photo on Flickr, but has since been deleted.  This is where Pinterest really shines, I think, in preserving that for us.

The Pin is HERE.  You will want to take a look at the photo.  The text on the Pin says, “Inks added to acrylic block, spritz with water, lay stamp over it and then stamp onto watercolor paper.”  Basically, it is making your own multicolor stamp pad.  

I bet I pinned this because I really like that stamp, which I recall is a Hero Arts stamp. I don’t have it, but I do have another in the same style and era.  I naturally grabbed that stamp to try this technique.  It is Hero Arts Silhouette Bells.

So, I followed the directions, as written... I decided to use Distress Inks, as I figured any dye ink ought to work (and probably many other inks, too.) Not so good results!!!


However, my experience told me to first apply Versamark clear embossing ink to the stamp, and then the homemade inkpad.  Much better!


Here is the card I made using this image. I finished it off with an embossing folder and a sentiment from Close to My Heart’s Wordfetti stamp set.  


This is not an exact technique and the results do vary.  The nice thing about watercolor paper is that you can just turn the paper over and use the other side, no problem.  In addition, for this next card, I got a good result for much of it, and then a blank spot on one part of the image, that I just cut off.  It helped stretch my stamp, too!


Of course, you don’t have to use an acrylic block for your surface, your craft mat might work just as well.  And you can probably use watercolor markers, distress Oxide inks, etc.  I think many people have expanded on this technique over the years.  That is the funny thing about stamping techniques, as the first person to post it on the internet might have learned it at a stamping party first, so we often don’t know who thought them up in the first place.  ANYHOW... I’m going on and on today!

Thank you for visiting!!
If you want to catch up on previous episodes, find all my Pinned It? Try It posts HERE.

I would love to enter this in A Blog Named Hero’s Stretch Your Stamps challenge, and CASology’s Water Challenge.


Wednesday, August 7, 2019

August Flower of the Month Card - Gladiolus

Did you know that Gladiolus is one of August’s birth flowers?  This is a wonderful flower comes in so many colors. I often will look at images of flowers on the internet before I color my stamped image, and for this one, I found out I could have used almost any color.  


However, I went with a peachy orange color.  This was my absolute favorite color when I was a little girl.  I colored the stamens of the flowers with a fine tipped marker in magenta, so they stood out a little more, and added just a touch of white gel pen.  


My stamp is the Jumbo Version of August Gladiolus, but if your prefer that your stamp not take up the entire card front, there is a smaller version available too.

Supplies: I Brake for Stamps August Gladiolus, Sentiment from Florals Sheet, Avery Elle Wonky Stitched Rectangles, American Crafts Twine, Spectrum Noir alcohol markers.  Save 10% on your order at I Brake for Stamps with my code SAVE10HEIDI.

Thank you for visiting!  Have a wonderful day!


Wednesday, July 17, 2019

Summer Floral Thank You

Hello!  I hope those of you in this heat wave can stay cool.  I tried to take a walk this morning before it was too hot, but honestly, I think there was no chance of it not being too hot!  I am cooled off now after lots of water.  Might as well spend the afternoon inside with my stamp supplies!

 I am sharing a pretty Thank You card made with some flowers from this great set called Florals Sheet.  I realize I should know what this flower is, but I can’t think of it.  Does anyone know?


I used the flowers as a two step stamp. I stamped the solid portion in pinks, and then used an old fashioned stamp positioner to get perfect placement of the outlines.  I added a couple accents using a marker and a white gel pen.  I trimmed these out and placed them over my die cut.  


I am entering this in the current Tuesday Morning Sketches Challenge.


I hope you have some time for stamping this summer!  

Heidi


Saturday, July 6, 2019

Tropical Card

Hello everyone!  This is my first post since I got back from vacation.  I have gone through the blog list and returned comments, but I was itching to actually get back in the craft room, so that is what I did!


I had these flowers already stamped and die cut out.  I did that one time at my craft group. I used Distress Oxide inks, but did not keep a record of what colors.  I paired this with a purple scrap from my scrap box, embossed with a new embossing folder, and then sanded down.  I celebrated my birthday fairly recently, so I added a sentiment that I could use for thank you cards.  

Supplies: Hero Arts Color Layering Hibiscus, Distress Oxide Inks, Versafine Black ink, Close to My Heart Wordfetti sentiment set, Gina Marie X stitched Circle dies, Darice Embossing folder.

I would love to enter some challenges!
Double D Challenge - Tropical
Inspirational Challenge - 3 or 5 of something (3 flowers)
Tuesday Throwdown - Anything Goes
WordArtWednesday - Anything Goes


Thank you for your kind comments!  It means so much to me that you take time to visit and encourage me!