Showing posts with label embossing folder. Show all posts

Friday, July 19, 2024

Tropical Flamingo Card

 Just stopping in to share this card. I really like it!


Spellbinders Embossing Folder

Taylored Expressions Sentiment

Gina Marie Stitched circle die

Creative Expressions Flamingos

Hero Arts Layering Stamp and Dies


Thanks for looking!

Wednesday, February 14, 2024

Happy Valentine’s Day!

 Happy Valentine’s Day to all!

I have a few cards to share that fit the theme a little.  What I have been doing when creating is making a card, and then kindof going with a variation on that theme for a few cards.  So I either make a card set, or just use some of the same supplies that are out, or the same colors, etc.  It has helped me to start rebuilding my card stash. 


The pinky red cardstock is lumiere shimmer cardstock.  
Hero Arts Protea Flowers
Hero Arts Eucalyptus Bold Prints background stamp
Technique Junkies Owls
Owl Sentiment is from a very old Club Scrap rubber stamp set, some Scandinavian themed one…

*The Owl Card is getting entered in the Cardz 4 Guys Challenge - Love 
That card went out to a boy!
*The Sympathy Card will be entered in the Blog Named Hero Do You Believe In  Love challenge
*And the first LOVE card with the Swiss Dots embossing
Will be entered into the Unicorn Challenge - Dots and Stripes

Hope you have a wonderful day!
Heidi

Thursday, February 8, 2024

Various Valentines

 Hello again!  I have been busy doing Valentines so that I can send them out on time. 

Here are a few that I made using mostly Spellbinders club items.  


This first card was easy.  I just embossed the pink cardstock and rubbed gold pigment ink over it.  The matting is also pretty gold paper. Simple but I like it! The sentiment is from Close to My Heart.


The second card was also fun!  It also uses the same 3D embossing folder (1 folder but two patterns) but then I used my old Pebbles Shimmery Chalks to go over the flower. I haven’t used them in a while but I know I will never get rid of them since they are so easy to use!  The stamp is from Power Poppy.


This last one is from a layering stencil.  This was really fun to do.  The sentiment is from Hero Arts. I have found that I have VERY few Valentines sentiments and so I will probably shop for some more before next year.  

I would love to enter SimonSaysStamp’s Wednesday Challenge: Love is In the Air!


Thursday, May 18, 2023

No Stamping!!!

  Hello!  Today I wanted to make another clean and simple card, but this time, using some patterned paper scraps and ephemera.

I punched out three 1.25 inch squares of patterned paper.  I then cut white cardstock at 4 x 5.25 and embossed it.  This is optional, but I then used my paper scoring tool to scores some lines to be my guide for adding the square patterned paper pieces in a straight line.  It also adds a decorative border.  

After that, I just chose something from the coordinating ephemera pack to finish off my card.  Not ever card needs to be difficult!  

The paper pack and Ephemera is from Pam Bray’s Masquerade Line.

You can also find more inspiration at the links below:

The Blank Page Muse- https://blankpagemuse.com/

FB Fan Page- https://www.facebook.com/groups/blankpagemuse/

Instagram Shop- https://www.instagram.com/blankpagemuse/

Instagram Blog- https://www.instagram.com/blankpagemuseblog/

Twitter- https://twitter.com/BlankPageMuse

Pintrest- https://www.pinterest.com/blankpagemuse/boards/

Saturday, April 30, 2022

Musical Penguin Quick Share!

 Hello everyone! I’d like to do a quick share of this card I made for the Split Coast Stampers Free for All Challenge this week, which is a music theme.  I used this super cute penguin from Pink and Main Freezin Season, and paired that with a music background from Blank Page Muse.  I think it turned out cute!


The backgrounds are a gelli print and then one made with an embossing folder (stamping on an inked background with water). Basically all this stuff was out on my desk still so I threw it together.  

Hope you are having a nice weekend!

Friday, March 18, 2022

Have a Purr-fect Day!

 Hello everyone! I was feeling chilly the day I made this card.  
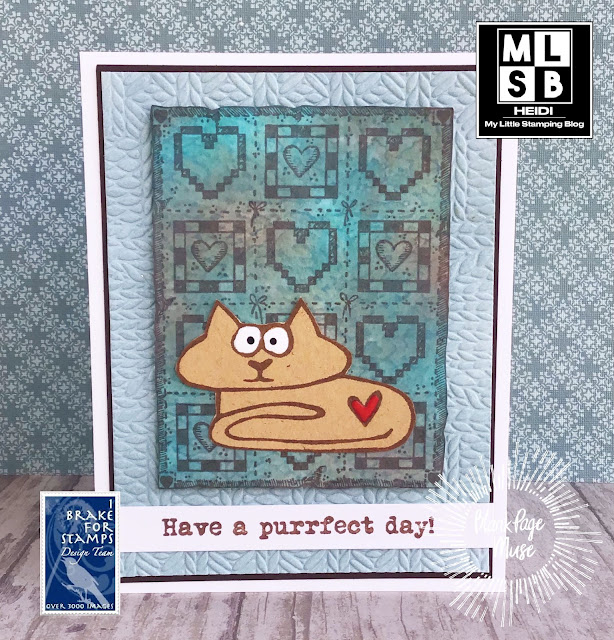

I first made a background with Distress Oxide inks, water and an embossing folder. I inked up my white cardstock with a brown and green inks.  I then spritzed the embossing folder with some water and closed it over the inked paper so the water would transfer to the paper. You don’t run it through your machine, just open it back up and let the water evaporate so you get the pattern on the paper.  It is a subtle pattern, but very pretty.  The same sweater embossing folder is the background of the card. You can find this old technique  explained in photos here. 

I stamped over the background with my quilt stamp and cut it out.  

Then, I stamped my cat on kraft cardstock.  I applied nail polish to parts of it with a metal tool.  I did two layers because the first layer sinks in a little.  I then fussy cut the cat out.  

I really like how this turned out!

Please consider using my affiliate coupon code BPMHeidi to save 15% off your order from either shop!  

Heart Quilt from the I Brake for Stamps shop

Edgar Cat set from the Blank Page Muse shop

Other supplies used:

Fun Stampers Journey Embossing folder

Versafine Sepia ink


Thanks so much for visiting today!


You can also find more inspiration at the links below:

The Blank Page Muse- https://blankpagemuse.com/

FB Fan Page- https://www.facebook.com/groups/blankpagemuse/

Instagram Shop- https://www.instagram.com/blankpagemuse/

Instagram Blog- https://www.instagram.com/blankpagemuseblog/

Twitter- https://twitter.com/BlankPageMuse

Pintrest- https://www.pinterest.com/blankpagemuse/boards/


Monday, November 23, 2020

Foil Mirror Paper - EASY Christmas Cards

Hello!  I made a bunch of cards over the weekend. I just photographed these so I could share them. 


I recently was at Michael’s and bought some of the foil mirror cardstock they had on sale.  This design was such an EASY way to make a flashy Christmas card.  I just glued a piece of the foil cardstock on a piece of white, and then embossed the whole thing.

The stamps were all a mix of old and new sets.  If you are interested in a particular stamp, let me know and I will label it.  I did decorate the insides but did not photograph them.  

Thanks for visiting. I will be back with more Christmas cards soon!

Friday, March 20, 2020

Texas Bluebonnet Card

Hello!  Yesterday I was able to make another card using things in my “half-done” projects pile.  Again I left the sentiment off as I am not sure what I will use this card for.  (It is a dreary day here, and this was the best photo I could get.)


The main image is an ATC (artist trading card) I made LONG ago.  The background for the ATC is all stamped images in different colors. (I recall a challenge where you were to make a “master board” and then cut it up like patterned paper.)  The floral image is from a Gina K set and it is colored with pencils. I actually think that my son might have colored it and I fussy cut it out.  

Then, the background piece is done with the letterpress technique.  I know I used a Cuttlebug embossing folder and some grey pigment ink that transferred when I put it through the die cutting machine.  Once I finally got this technique to work, I made a bunch of backgrounds. This might be the last one in my stash.  

A reader recently posted that they didn’t know what the technique I listed was.  I think the best thing to do if you don’t know a technique, is to search at Split Coast Stampers Tutorial section, or of course, you can search Pinterest.

I hope and pray you are all well.  Keep on creating!

Wednesday, February 12, 2020

Two for One - Handmade Valentine Cards

Hello! I would love to share two Valentine Cards I made using stamps that are not created for Valentines. 


First, I stamped the background in light pink.  I die cut out a heart in the center, and saved the heart for my second card.  I stamped, simply colored and fussy cut the snowdrops.  Here, I glued the base of the flowers down, but used dimensional foam tape to pop up the blooms over an embossed white background.  The entire panel was placed a light green card base, and I added a die cut sentiment.  


I could not just throw out the pretty heart, so I stamped the word LOVE on it, put three gems under and popped this up on an embossed background.  I think the simple detail of matting in black, and adding some sparkly silver ribbon, really makes this card pop.

Supplies: I Brake for Stamps  Huge Floral Background, snowdrop from Bubble Wrap, Lattice and Flower Sheet,  Love sentiment from Wedding Sheet. Gina K Innocent Pink ink, Darice and Cuttlebug embossing folders, generic Heart Dies, Close to My Heart gems and thread.
Save 10% on your entire order at I Brake for Stamps using my code SAVE10HEIDI.


I have already sent these cards out as Valentines, but I think they could also make a nice wedding card, or birthday card, if you just changed the color of the background stamp to suit your needs.

I hope that YOU have a wonderful Valentine’s Day!  Thanks for visiting as I love to share my love of stamping with you!

Saturday, February 8, 2020

Feliz Cumpleanos Card - Perfect Pearls - Faux Metal Technique

Hello again!  I have been noticing that Perfect Pearls seem to be making a comeback.  I think it might be because Ranger released some new colors this year at Creativation.  So it was timely that, in my online stamping group, one of the challenges was to play around with old and new Perfect Pearl techniques.  

I did play a lot, but the technique that I came to love is Jennifer McGuire’s Faux Metal Textured paper (from 4 years ago).  I still remember watching her videos on Perfect Pearls in the Thinking Inking videos, which must be at least 10 years old now. 


I used regular Distress inks in Picked Raspberry and Fossilized Amber and then used my regular Gold Perfect Pearls over top. I do have this new Embossing folder from Crafter’s Companion I have been itching to use and it really just turned out beautifully.  

The stamps are all from Hero Arts April 2018 kit, colored with pencils, which is one of the ones still available.  I was so pleased how this worked out and I truly wonder why I didn’t try this technique sooner!  It is a stunner.


I would love to enter A Blog Named Hero’s Anything Goes challenge and Cute Card Thursday’s Anything Goes Challenge.

Thank you so much for visiting today!  Have a wonderful weekend and hope to see you again soon!