Showing posts with label valentine. Show all posts

Wednesday, February 14, 2024

Happy Valentine’s Day!

 Happy Valentine’s Day to all!

I have a few cards to share that fit the theme a little.  What I have been doing when creating is making a card, and then kindof going with a variation on that theme for a few cards.  So I either make a card set, or just use some of the same supplies that are out, or the same colors, etc.  It has helped me to start rebuilding my card stash. 


The pinky red cardstock is lumiere shimmer cardstock.  
Hero Arts Protea Flowers
Hero Arts Eucalyptus Bold Prints background stamp
Technique Junkies Owls
Owl Sentiment is from a very old Club Scrap rubber stamp set, some Scandinavian themed one…

*The Owl Card is getting entered in the Cardz 4 Guys Challenge - Love 
That card went out to a boy!
*The Sympathy Card will be entered in the Blog Named Hero Do You Believe In  Love challenge
*And the first LOVE card with the Swiss Dots embossing
Will be entered into the Unicorn Challenge - Dots and Stripes

Hope you have a wonderful day!
Heidi

Thursday, February 8, 2024

Various Valentines

 Hello again!  I have been busy doing Valentines so that I can send them out on time. 

Here are a few that I made using mostly Spellbinders club items.  


This first card was easy.  I just embossed the pink cardstock and rubbed gold pigment ink over it.  The matting is also pretty gold paper. Simple but I like it! The sentiment is from Close to My Heart.


The second card was also fun!  It also uses the same 3D embossing folder (1 folder but two patterns) but then I used my old Pebbles Shimmery Chalks to go over the flower. I haven’t used them in a while but I know I will never get rid of them since they are so easy to use!  The stamp is from Power Poppy.


This last one is from a layering stencil.  This was really fun to do.  The sentiment is from Hero Arts. I have found that I have VERY few Valentines sentiments and so I will probably shop for some more before next year.  

I would love to enter SimonSaysStamp’s Wednesday Challenge: Love is In the Air!


Tuesday, February 6, 2024

Cute Critter Valentines

 Hello!  I took a long, needed break from blogging.  But I am going to try to be back on a limited basis.  I quit design teams, they weren’t worth the workload and time to be paid in supplies (if they remember to send you them… another story). 

I am interested who is still blogging and what challenges are inspiring and worth entering! Please leave me a comment!

I have these two cute Valentines to share with you today.  They are going to go to my nieces.  


I won’t always be posting a full supply list, nor will I usually post links.  Probably 90% of my stash now is retired. If I ever leave a product out that you are interested in, and I didn’t tell you, please leave a comment to let me know and I will figure it out and tell you! 

But here is a basic list:

Pink and Main Perfect Blend Stamps and Dies

Bo Bunny Early Bird 6x6 paper pad.

I will also mention the tiny silver sticker I added between the two patterned papers, which isn’t super visible in the photos but is super cute in person.  Those are from Starforms.  My goodness, I didn’t know they were so hard to find now. I purchased a few from an Etsy shop yesterday.  They were made in the Netherlands and I don’t know if they went out of business or just no  one is importing them anymore. They are a great finishing touch for a car though!

Thank you to anyone who is still reading! Have a good day!


Monday, February 27, 2023

Cleaning My Craft Desk: Owl Always Love You

 I have been working to clean off my craft desk again.  You know how this happens, you see something and have to work on it. In my case, a lot of what is on my desk is partially finished, even to the point of being 75% finished.  Or, you have stamps out on your desk you just have to work with.

So this is my new blog series, what I made when cleaning my craft desk…

This is a super cute and simple card.  

I cut the heart from the patterned paper and then just flipped it over to the other side to get the tree print.  I popped it up instead of inlaying it.  I LOVE this burrowing owl image!  They have so much personality.  I just used Versafine Ink cubes to ink them up in two colors and then added a touch more color with markers.

Technique Junkies Owl stamp

Echo Park Happy Camper 6x6 paper pad

Sunday, January 8, 2023

Easy Valentine LOVE Card Set

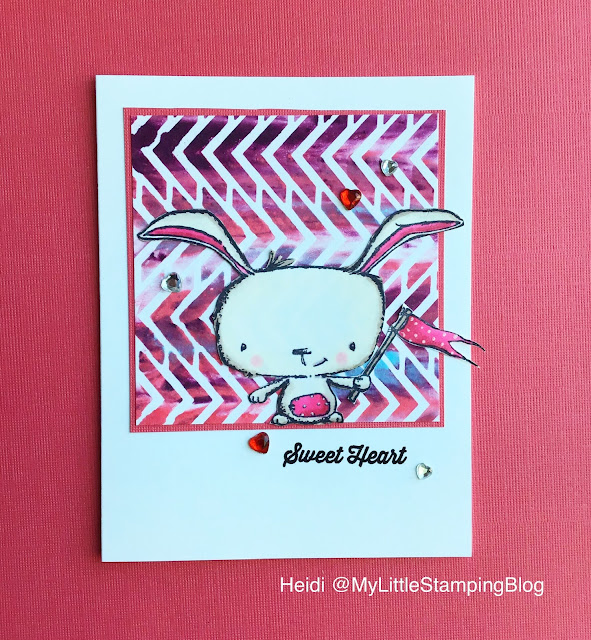
 Hello from design team member Heidi!

Today I want to share an idea to quickly make 4 elegant Valentines.  


First choose 5 patterned papers. I chose ones that have subtle patterns, but this would work with bolder patterns, as well.

Then stamp your LOVE stamp on 4 of these.  Cut the other patterned paper into 4 2.5 inch squares. (If you are using a bold patterned paper, you may wish to white or silver heat emboss the stamp instead.)

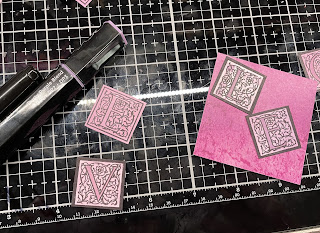
Cut out all the letters individually, leaving a slight border.  With a black alcohol marker, create a faux matte around each letter.  (This sounds fussy, but it really doesn’t take much time, especially compared to actually cutting and glueing a black mat.). Also use a colored marker to color in each letter.  I used a dusky purple marker.

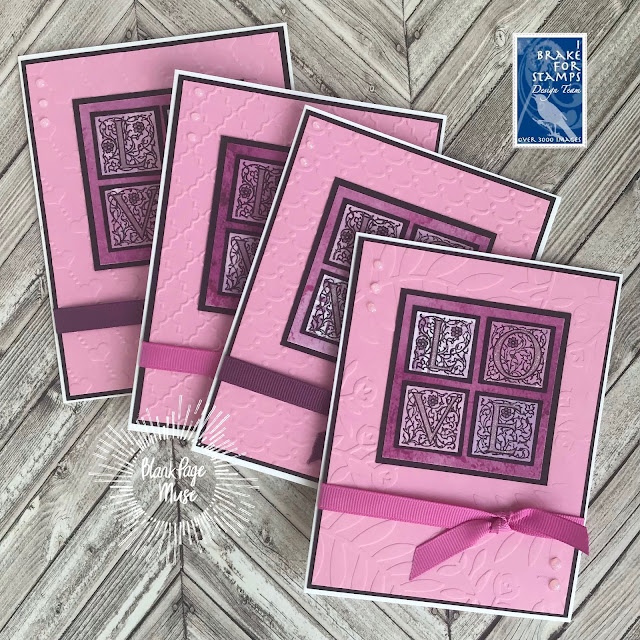
Mix up the patterns and arrange the letters on each 2.5 inch square of patterned paper. I highly recommend using liquid glue for this part so that you have time to move the letters around evenly!  Also, matte this on a 2 3/8 inch black cardstock. 

I decided to go over the letters with a sakura glitter pen to bring out the letters and make it look more valentiney.

Not just use this as the focal image of your card!  I just embossed some pink cardstock, added some ribbon and some glitter glue to finish this easy cards!  You could finish them in a simpler way or more ornate way, depending on how much time you have!

Here are my finished cards!


This stamp is part of a wedding stamp set in the I Brake for Stamps store:

Wedding Sheet stamp set

The papers are also in both the IBFS and BPM stores!

Pam Bray Designs Sweet Passion 6x6 paper pad

(use my affiliate code BPMHeidi to save 15% off your stamp order!)

If you would like another idea for this stamp, please see my card posted HERE.

You can also find more inspiration at the links below:

The Blank Page Muse- https://blankpagemuse.com/

FB Fan Page- https://www.facebook.com/groups/blankpagemuse/

Instagram Shop- https://www.instagram.com/blankpagemuse/

Instagram Blog- https://www.instagram.com/blankpagemuseblog/

Twitter- https://twitter.com/BlankPageMuse

Pintrest- https://www.pinterest.com/blankpagemuse/boards/

Monday, February 14, 2022

Happy Valentine’s Day!

 Happy Valentine’s Day!

I have a quick and easy card I created using a background I made previously.  I did the shaving cream technique but over a stencil.  I cut that out with a tag die and then stamped over top with my letter stamp.  I added just a little glitter glue to emphasize the heart.

Supplies:

Close to My Heart Scandinavian Folk Art Greetings

Honey Bee Stamps Quilted A2 Cover Plate

Gina Marie Designs tag die

Thank you for visiting! I hope you have a wonderful day!

Thursday, February 10, 2022

Tiny Roses Valentine

 Hello again! I have a pretty Valentine to share today using a bunch of NBUS items.  

I just got this quilt die from Honey Bee. I love it, it is so cute, and they also had some matching stencils, so I used the heart one here with some pink Oxide ink.


I had a bunch of circles cut from glossy card, so I decided to use my peg stamps on it.  I used all dye inks and although you have to be a little careful when you are stamping (that your stamps don’t slide around) it is really worth it because the way the dye ink dries, you get natural depth to the stamping. I think you can see how the leaves are darker in the centers.  

The products I used:

Rubber Stamp Tapestry Secret Garden peg stamp set

Honey Bee stamps Quilted A2 Cover plate

Honey Bee stamps Quilted Hearts stencil

Sentiment from a Close to My Heart set


Thanks for stopping by today!

Sunday, February 6, 2022

Gnome Valentine

 Hello everyone. I hope you are staying warm!  It has been a cold winter here!

Hey, I am wondering what challenges everyone is interested in nowadays. I have been doing so little crafting lately that I am out of the loop.  I am totally back now so please drop me a comment if you want to recommend a Cardmaking challenge!

Onto my card, I am trying to work through a number of NBUS items. I probably purchased more stuff during the pandemic than I used.  One of them was this SUPER cute gnomie image from Stampendous.  I decided to color it some sortof vintage shades, which I think works well for Gnomes.  


I fussy cut this image out and put it over the die cut and stenciled background. I just recently purchased these from Honey Bee.  I hadn’t ever used anything from them but I was really happy with my purchase and have more to share in the future.  

Supplies:

Stampendous Gnome Love, Honey Bee Stamps Quilted A2 Cover plate, Honey Bee Quilted Hearts Stencil, Distress Oxide ink, Spectrum Noir markers.

Thank you for visiting!

Wednesday, February 12, 2020

Two for One - Handmade Valentine Cards

Hello! I would love to share two Valentine Cards I made using stamps that are not created for Valentines. 


First, I stamped the background in light pink.  I die cut out a heart in the center, and saved the heart for my second card.  I stamped, simply colored and fussy cut the snowdrops.  Here, I glued the base of the flowers down, but used dimensional foam tape to pop up the blooms over an embossed white background.  The entire panel was placed a light green card base, and I added a die cut sentiment.  


I could not just throw out the pretty heart, so I stamped the word LOVE on it, put three gems under and popped this up on an embossed background.  I think the simple detail of matting in black, and adding some sparkly silver ribbon, really makes this card pop.

Supplies: I Brake for Stamps  Huge Floral Background, snowdrop from Bubble Wrap, Lattice and Flower Sheet,  Love sentiment from Wedding Sheet. Gina K Innocent Pink ink, Darice and Cuttlebug embossing folders, generic Heart Dies, Close to My Heart gems and thread.
Save 10% on your entire order at I Brake for Stamps using my code SAVE10HEIDI.


I have already sent these cards out as Valentines, but I think they could also make a nice wedding card, or birthday card, if you just changed the color of the background stamp to suit your needs.

I hope that YOU have a wonderful Valentine’s Day!  Thanks for visiting as I love to share my love of stamping with you!

Tuesday, February 11, 2020

Handmade Teacher Valentine - Gift Card Holder

Hello!  I thought that this little project would be a cute, very easy to make, Valentine for a teacher that holds a little gift card for coffee.  I got this idea from a video on YouTube.

Instructions:
Cut a sheet of cardstock to 8.5 x 3.5 inches.
Score at 2 inches and 6 inches.  
Fold, adding adhesive on the sides where the gift card will be held, and decorate.

I decorated mine with a cute coffee image from Art Impressions Sloth-some set over a die cut heart.  In the video, the gal uses a belly band to close it, which is a great idea, but I decided to just use temporary adhesive to close, since I will be putting this in an envelope.  

I added the matching thank you sentiment inside, as you should never miss an opportunity to thank a teacher for their hard work!


Thanks for visiting!

Wednesday, January 29, 2020

Who Loves You? - Owl Valentine

Hello all! I wanted to sneak in a post today to enter some challenges.  I had half of an idea on how to use this owl (which is actually from a Halloween set) with some other products in my stash to make a Valentine.  The rest of the idea came to me this morning.  


I die cut a heart in my pink cardstock and then embossed it with a woodgrain folder. I used a tan inkpad direct-to-paper to bring out the embossing.  I used some foiled pattered paper behind this, and then nestled my owl right in there.  


The inside of the card has a sentiment that I stamped out with an alphabet set.  

I think I know just the little girl to send this to.  

I’d love to enter Art Impressions Shades of Pink Challenge, ModSquad Challenge Animal Stamps, and SimonSaysStamp’s Wednesday Challenge - Anything Goes

Supplies:  Art Impressions SC0735 Fright Night stamp and die set, Hero Arts Log Letters and Numbers alphabet stamp set,  Sizzix Thinlets Sentiment words dies, Firefly Hearts die set, Darice Woodgrain Embossing folder, Hero Arts Soft Sand ink, Gina K Dark Chocolate ink

Wednesday, January 22, 2020

1920’s Fashion Valentine

Hello!  I am continuing to work on Valentines! One of the nicest things about making your own cards is that you can personalize each one.  This one is made with a teenage girl in mind — one who doesn’t care for hearts. 


Supplies: I Brake for Stamps 1920’s Fashion Ladies stamp set, Old and New stamp set, Versafine and Memento black inks, Gina Marie Loopy Rectangle dies, Spectrum Noir alcohol markers
Save 10% on your order at the I Brake for Stamps store using my code SAVE10HEIDI.

My background is the salted watercolor technique.  To get this texture, lay down a wash of watercolor paint on watercolor paper and, while it is still wet, throw some salt down on it.  After it dries, rub off the salt and it is ready to go. 

I added a few die cut butterflies as my embellishment.  I also added some glitter pen to the dress details and the little butterflies, but it didn’t show up in the photo.  I am happy with how this card turned out!

I’d love to enter Word Art Wednesday’s Anything Goes challenge.

Do you personalize your cards for each recipient?  Let me know in the comments.

Thanks for visiting today!

Friday, January 17, 2020

A Carrot Valentine Card

I have been having fun making some Valentines from non-Valentine sets.  This one will be going off to a nephew.  


I colored the image with colored pencils and die cut that panel.  I heat embossed the matching sentiment on dark orange cardstock. I also cut some hearts out and embossed them just to make it look a little more Valentine-y.  

There is an imperfection in this card (the bear is not quite level!), but it really is only noticeable in the photo, not as much when you have the card in hand.  So, I decided to still post it and I definitely am still going to send it!  Not every card has to be exact!  I hope no one out there in the blogosphere thinks so!

Supplies: Stamps MFT Rooting for You stamp set , Paper Echo Park Homegrown 6x6 pad, Gina Marie X Stitched circles, Gemini heart dies, Cuttlebug Swiss Dots embossing folder.

I’d love to enter this card into WordArtWednesday’s Anything Goes challenge.

Thanks for visiting today!  Have a crafty weekend!

Wednesday, January 15, 2020

Valentine’s Hugs and Kisses Card

Hello!  I have a very traditional looking Valentine to share today.  I thought that the grungy look of the sentiments in I Brake for Stamps Old and New stamp sheet would look good with the Chalkboard technique.  That was my starting point for this card.


I heat embossed the sentiment, then smudged white ink around the edge of the panel.  After framing this out with another red die cut, I used some neat foiled patterned paper for the background.  My embellishment, the stamped lips,  is also from the stamp set!  I thought this turned out nicely, and definitely, the photos don’t do this one justice.


Supplies: I Brake for Stamps Old and New stamp sheet, Recollections White Detail Embossing powder, Spellbinders Fancy Edge Rectangles dies, Hero Arts Red Royal dye ink, Versamark embossing ink, Avery Elle white pigment ink.
Save 10% on this stamp set, or anything you order at the I Brake for Stamps store using my code SAVE10HEIDI.

Thanks for visiting today!


Sunday, January 12, 2020

House Mouse “Cherries Jubilee” Valentine Card

Hello!  I hope you have been having a good weekend.  I was lucky enough to have dinner with friends last night, just us girls.  

Today, I have this sweet image to share with you.  I just love this cute mouse, and the cherries are so cheerful.  After I colored the cherries in this pinkish red with alcohol markers, I decided to make it into a Valentine.  


The card is cut a little smaller than A2 to accommodate the die shape.  On this inside I stamped some hearts and a Valentine sentiment.  This was really fun to create!

Supplies: House Mouse Designs Cherries Jubilee stamp, Gina K sentiment from Spring Blessings stamp set, Spellbinders Fancy Edge Rectangles dies

I would love to enter the House Mouse and Friends Challenge - Anything Goes/Optional Food or Drink.

Thanks for visiting!  If you are new to my blog, I would love it if you left a comment and chose to follow my blog.  You can find my facebook page on the right sidebar if that is an easier way for you.  Have a good day!

Friday, January 10, 2020

Sloth Valentine Card

ETA 1/17/20:  Thank You Art Impressions for choosing my card as Top Spot!


I enjoy puns, and animals can’t be beat!  Especially for Valentines, this saying is sure to make just about anyone smile!  


I colored this stamp from Art Impressions’ Sloth-some set with alcohol markers, die cut out the panel and then just used patterned paper and a embossed piece of cardstock to create the layout.  I had some enamel dots with some arrow shapes, so I decided to add one to the card.  (I agonized over that detail, lol. Got to find some way to make it take a long time to finish!)

Supplies: Stamps Art Impressions Sloth-some, Die Gina K Designs, Embossing folder Darice

I would love to enter Art Impressions Hugs & Kisses challenge and Word Art Wednesday’s Anything Goes challenge.

Are you making Valentines this year?

Thanks for visiting!

Wednesday, January 8, 2020

Woodsy Mouse Masculine Valentine

Hello!  I have a cute card to share today that I am probably going to use as a Masculine Valentine. 

 It is cute,
 it is woodsy,
 and I like it!


Card process:  First I stamped my mouse and mushroom image with Memento Black ink. I colored it in with alcohol markers.  Next, I masked around the mushroom cap with masking paper.  I used red ink to stamp the Bubble Wrap background onto the mushroom cap. After removing the mask, I used colored pencils to add just a little detail.  

The background is kraft paper with a Darice woodgrain embossing folder. I inked the raised portions with Gina K dark chocolate brown ink.  I then used the brown ink to stamp my sentiment, and embellished the card with Spellbinders die cuts, cut from paper scraps.


I combined 3 different stamp sets for this card.  

Mostly Mice Sheet


Save 10% on these, and your whole stamp order at the I Brake for Stamps store using my code SAVE10HEIDI.

Thank you for visiting today!

Wednesday, February 13, 2019

Heart Quilt Valentine Card

 Hello, stamping friends!  Today I am sharing with you a Valentine card that is my most favorite of this year!  


I stamped the quaint Heart Quilt stamp on some pink cardstock. I then used alcohol markers in a few shades of red to color it in, and added white gel pen and glitter pen for accents.  I mounted it with fun foam over some white, textured cardstock.  The Love sentiment is from the Wedding Sheet stamp set.


Supplies: I Brake for Stamps Heart Quilt and Wedding Sheet, Memento and Versafine Onyx Black inks, Spectrum Noir alcohol markers, Textured and Lumiere papers from my stash, Cardmaking and Papercraft Sewing stamp set, other items from my stash.
Use code SAVE10HEIDI to save 10% at the IBFS Store.

I finished off the inside of my card with this cute heart die cut and saying.  


Hope you all have a lovely Valentine’s Day!

Tuesday, February 12, 2019

Shaving Cream Stencil Technique - Valentine Card

A couple weeks ago, in my stamping group, we were challenged to use the Shaving Cream Stencil Technique by UnderstandBlue, blog and video is here. I made several backgrounds because it was really fun!


This background was made with Distress reinkers, I think in Tumbled Glass, Worn Lipstick and Dusty Concord. I was surprised how deep the colors were, I could have used less reinker!  I paired this with a cute bunny image.

I would love to enter this in Word Art Wednesday’s Anything Goes challenge.

Supplies: Purple Onion Poppy stamp, Jillibean Soup Sweet Treat stamp set, Memento and Versafine Onyx Black ink, Distress Reinkers Tumbled Glass, Worn Lipstick, Dusty concord, Balzer Designs Mini Chevron stencil, Spectrum Noir alcohol markers, other items from my stash

Thank you so much for visiting today!

Monday, February 11, 2019

Dinosaur Card - Non-traditional Valentine!

Hello!  I want to share a bit of a non-traditional Valentine today.  In fact, if you take off the hearts, I think you could use this card for a birthday card.

The background is an interesting technique I learned from my stamping friend, Stampwilly Designs.  Basically, you crinkle up your cardstock, then run different colors of Distress Oxide inks over it.  After each color, you can make a print of this onto a fresh sheet of cardstock, but what I am sharing today is the direct to paper part.


I then created a grassy part for my dinosaur to stand on by tearing a scrap of green cardstock.  The heart gems and that fun sentiment were added to make it a Valentine, and I think this is going to be great for a nephew of mine.

I would like to enter this in Word Art Wednesday’s Anything Goes Challenge.

Supplies: Hero Arts 1989 dinosaur, Memento and Versafine Black inks, Stampendous Changito Wild about You stamp set, Distress Oxide inks in Lucky Clover, Squeezed Lemonade and Blueprint Sketch, everything else from my stash.

Thank you for your visit!!!