Showing posts with label tutorial. Show all posts

Monday, July 6, 2020

Torn Paper Stencil Technique Tutorial

Hello!  I have been having fun using stencils and thought of trying a technique with torn paper.  I hadn’t seen this done before, although it is pretty simple, I thought I would do a little picture tutorial.


1) I first tore some paper to cover part of my card front.  

2) I then taped my stencil over top of this.  

3) I used two colors of green ink to sponge over the stencil. I think two colors adds depth.  

4) I then carefully removed my stencil.  I think this next step is really important.  I used a light touch with my sponge and applied ink to the top and bottom of my paper mask and to the edges of the cardstock.   

5) I removed the paper mask.  This leaves a great spot for stamping a message or image.  

I hope you enjoyed the tutorial.  I finished my card off very simply with a sentiment from I Brake for Stamps and the flower from Sparkle n Sprinkle. I may go back and add a few enamel dots to it.  

Thanks for visiting today!  Please let me know if you try this technique!

Friday, May 31, 2019

W Card Fold Tutorial - Get Well Soon Scandanavian Folk Art Card

Hello everyone! I have a card to share with a fancy fold called the W-Fold.  I saw this card fold, in landscape format, here.  I preferred to make it as a standard upright card, so I will share those measurements below.  The card front is kept super simple, as the fun is all in the fold.  


I used some cute Scandanavian stamps and simple stamping, but in a favorite color combo!  I feel this is bright and cheery, and good for a Get Well card.


Tutorial:

1) Decorate the card front of a standard A2 card, cut from colored cardstock (4.25 inches by 5.5 inches)

2) Line the inside of your card with white cardstock (4 inches by 5.25 inches)

3) Cut a strip of coordinating colored cardstock.  (8.5 inches by 1.5 inches) This can be a little thinner if you prefer, and are using a good, sturdy cardstock.

4) Score the strip at 2 1/8, 4 1/4, 6 3/8 inches.  Fold into a W shape.

5) Cut 4 squares of white cardstock with either a die or paper cutter.  My squares are 1 7/8 inches.  
(The absolute maximum would be 2 inches square, but you could go smaller).  

6) Apply your strip to the inside of card as pictured.  Apply glue, or heavy duty double-sided adhesive, only to the outer part of the fold.  
You may notice that I prefer not to place the strip all the edge of the card base, instead leaving a little gap.  I find this allows the card to stay folded more neatly.  

7) Add your decorated squares to the strip.  

Supplies: Club Scrap Scandinavia Jumbo Unmounted Stamp set, Scandinavia Greetings stamp set, Gina K Assorted Greetings Stamp set, Versafine Satin Red and Onyx Black inks, MFT Die Namics Pierced Squares dies.

I’d like to enter this card in SimonSaysStamp’s Wednesday Challenge - Anything Goes, and Word Art Wednesday - Anything Goes!

Thanks for stopping by! I hope you might try this card fold sometime!  Let me know if you have any questions!

Sunday, March 10, 2019

Dangler Card Fold Tutorial - Heard you Caught a Bug!

Hello!  Just for Fun’s Monthly challenge for March is a really fun one!  You are to incorporate some feature in your card that has movement.  Lots of fun inspiration from the design team this month.

https://justforfunrubberstamps.blogspot.com/2019/03/jff-march-2019-theme-challenge-marie.html

For my card, I decided to do a fancy card fold called the Dangler.  It is not very well known at all, but it is very easy! (Now, that’s my kind of fancy fold!!!)  I included a short picture tutorial for you. First here is my card.


Cute, right?  Let me show you how easy it is.

You can click on any of the photos to take a closer look.

First you need a strip of cardstock that is 8.5 inches long.  The one I have shown is 1.5 inches wide, but that can vary according to your preferences.  I just wouldn’t make it too thin, as it will be holding your dangled items.


Score at 2 1/8 inch, 4 1/4 inch and 6 3/8 inches.  I marked mine with pencil to be sure they photographed well, but of course you will just score.

Fold your strip like the shape of the letter W. 


At this point, create your danglers.  You need to stamp two small images, and then sandwhich them around some twine.  You can cut them out with scissors, or use a little circle die. I like to use liquid glue and then set an acrylic block on top as it dries.  (But use whatever strong adhesive you like.)


Use scotch tape to hang the dangler anywhere you choose on the inside two rectangles of your cardstock. Use your bone folder or fingernail to press the tape down firmly.   This is optional, but you could add another piece of cardstock over top of this section to make it look very neat. But this part will be mostly hidden.


Then, you just apply this to the inside of your completed A2 size card, as shown, at the top edge of the card.  Apply glue just to the outside of the W, where it is to make contact with the card base.


This is what the card looks like from the top.  It does fold flat enough for mailing.


Decorate the inside of your card however you like.


I would love to play in these challenges:
Word Art Wednesday Anything Goes
Tuesday Throwdown Interactive Cards

I hope you enjoyed this tutorial and that you will give it a try. I truly get confused with many of the fancy card folds, but this one was easy for me.  


Thanks for coming by!  Please consider following my blog, if you don’t already do so!


Tuesday, July 17, 2018

Fish Cards with Paint Bubble Backgrounds Tutorial

I recently made a bunch of cards using a painted bubble background.  It was loads of fun, and I haven’t seen it done often in cardmaking, so I thought I would share a simple tutorial.

(This card is also is being entered into Tuesday Throwdown’s Stitching Challenge)

You will need acrylic paint, dish soap, water, a container to mix in, and a straw.  I used this pie dish, but you might want to try a disposable cup or bowl, or maybe a take-out container.


I mixed about 1 part paint to 5 parts water. I added a few drops of dish soap.  I didn’t measure, I just eyeballed it.  Your mileage will vary here depending on how pigmented your paint is.


Mix it together with the straw and then blow the bubbles till you have tons of bubbles.  I didn’t want to waste too much paint, so I tipped the pie pan to the side and pool the liquid in one spot before blowing the bubbles.


Place your cardstock right down into the bubbles.  Some have found that scooping the bubbles up with the paper, and popping them yourself, is another way to do it.


Here is one of my backgrounds!  Let me know if you give it a try!


For this background, I had tried using a disposable cup.  I got an outline of the cup, too, which is a fun look.

Tips:
1)  Don’t have acrylic paints, try any of your reinkers.  
2) Want a lighter color, add water.  Want a darker color, add more paint.  
3) This can be messy!  Don’t work around your beautiful, completed card projects!  Don’t wear your favorite shirt!  I worked in the kitchen.  
4) Be sure to only blow through the straw, resist sucking in at all costs!
5) These don’t just have to be blue water, I am going to be doing black for Halloween cards.  Layer different colors, too.

Supplies:  Inkadinkado Fish and Bizzaro Stamps fish, Hero Arts (with Basic Grey) Awesome sentiment stamps, Versafine Black ink, K&Co patterned papers, DCWV Citrus Stack, Avery Elle Wonky Stitched rectangles, Spellbinders Fancy Edged Rectangles dies


I always appreciate your visits and comments! Please consider following my blog using the Blogger tool on the side bar, or on facebook or pinterest, too.

Thursday, February 23, 2017

Tutorial - Faux Bleaching (or Watercolor Stamping) with Distress Oxide Inks

My craft area is a disaster -- and that is a good thing. I have been having so much fun playing with a technique I think I discovered (I certainly haven't seen anyone else posting it) for my new Distress Oxide inks.  I am not one to jump on the bandwagon, but this is SO. MUCH. FUN. I just have to share it.


Watercolor stamping is an awesome technique and I am using the same steps with the Distress Oxides to get a Faux Bleached look, or a Ghost-Stamping look -- you decide.

For this I used my ink, a mini mister, a chunky or silhouette style stamp and some darker colored cardstock.  Lots of combos to play with there.  (Please click on the photos to enlarge them for detail.)

Ink up the stamp with Distress Oxide ink.

Using a spray bottle that applies a mist, spray with water 3-4 times, until the stamp looks like this.  This step is variable, you can decide to add more or less to get a more of less flowing image.

Stamp onto your cardstock.

This is the result right after you stamp.  You will be able to see the color of the dye part of the ink prominently -- but that will not last as it dries.

Here is the result when it is almost dry.  Most of that dark halo of dye ink will eventually completely disappear, depending on how much water you added.

Every time I did this, I said, "ooOOOoo!"  Lol.

Now, I found this worked with nearly every color of the inks BUT I did have trouble with the blues.  I also found that you get a better result on darker cardstocks, so it if doesn't look right, see if you can go darker with your cardstock color.  

Tim Holtz did show in a CHA Demo video that you can stamp your image and then spray the whole cardstock with water to get other effects, however, this Faux Bleaching look with Distress Oxides really is much much cleaner looking AND the water you stamped with moves in a controlled manner  after you stamp to give that lovely watercolory image that I find really awesome.

Here are two projects I made with the technique.

This was Worn Lipstick Distress Oxide Ink on Gina K Passionate Pink cardstock.


And this is one of the FUN surprises - Fossilized Amber on Gina K Wild Dandelion Cardstock.  The yellow ink turned a lovely pink!  I have no idea how, but that is so cool!


Supplies:  Distress Oxide Inks by Ranger/Tim Holtz, Just for Fun Rubber Stamps Flora and Fauna sheet, Just a Note sentiment, Crate Paper DIY Shop patterned paper, KI Doilies patterned paper, Versafine Smokey Grey ink (for sentiment), Spellbinders Oval and Scalloped Oval dies, Avery Elle Wonky Rectangles Dies, Vellum and Embellishments from my stash.

I have a few other cards I have already made with this technique I will probably share tomorrow, along with my experiments for this technique on all colors of cardstock.

Thank you SO MUCH for stopping by! I hope you will leave a comment so I know you were here.

I would love to enter these cards into the following challenges:
Cute Card Thursday - Florals
SimonSaysStamp Wednesday Challenge - Anything Goes

Thursday, February 11, 2016

Watercolor "Stencil Stamping" Technique Tutorial

Welcome! I would like to share a background technique I call Watercolor "Stencil Stamping."  It is a good way to get more mileage out of your stencils.  It is easy to do and because it is watercolor, you get a little bit different result each time.

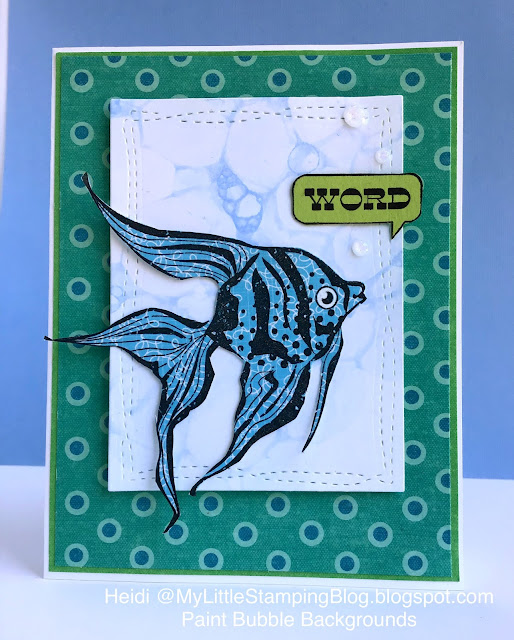
Here is my completed card and a close up of the focal point.


(Click on photos to enlarge.)


Materials Needed:
You will need a dye ink, stencil, water spritzer and paper towels.  Distress inks work really well with this technique!  It is important to have everything out ahead of time.  I am showing watercolor paper here, but you can use regular cardstock if you want.  If you want a pearlized look, you can add a little perfect pearls into your water.


Directions:
Press your inkpad directly on the stencil to get a fairly even coverage. You can use more than one color if you wish.


Spritz the stencil with water as evenly as you can. You will want to experiment a little with how much works for you.  Have your piece of cardstock ready in a clean, dry area nearby.


This is where you want to be ready to work quickly.  You will now pick up the stencil, turn it over onto your cardstock (remember, this cardstock is already set out in a dry spot). Take a clean paper towel and immediately place over the entire work and press the watery ink in evenly.  Some of the extra ink will soak into the paper towel.


After a moment or two, pick up your paper towel and stencil to reveal the pattern. Let dry completely.  


Like I said earlier, you may need to practice just a little bit to see how much water to use and how to move the wet, inky stencil over to your cardstock.   You may prefer a really watery look.  There is no correct look, it depends on what you like. If you get a very, very blotchy result that does not look even, you probably needed to add a touch more water to the stencil.  Don't worry, you will get the hang of it!  And if the entire thing doesn't look how you want, cut half off and use it anyhow as patterned paper.

Here is a photo of some that I did on regular white cardstock.  It really looks good on either type of paper, but watercolor paper is just a bit more forgiving.  


I hope that you found this tutorial helpful and might want to try this technique out!  

Cleaning tips and variations:
When using a dark ink color, you could stain your stencil.  I had this happen with a deep pink and was easily able to remove the ink from the stencil with alcohol from the medicine cabinet.  

Yes, you could also do the same technique with some spray stains and skip the inkpad altogether!  Try whatever you have on hand.  

Supplies I used in this project: 
Colorbox Art Screens stencil - Lovely
Gina K Designs Ink - Applemint and Innocent pink
Gina K Designs Better With You stamp set
Versamark Ink and White detail powder
GKD AppleMint cardstock
Watercolor cardstock
Vellum paper
Spellbinders scalloped Labels One
GKD Patterned paper
Perfect pearls in water brushed over the flower

Thanks for stopping by and I appreciate your comments!

Thursday, March 20, 2014

Watercolor stamping with butterflies


Supplies:
Stamp: Gina K Wildflowers
Ink: Distress Ink Mowed Lawn
Paper: Canson Cold Press Watercolor 140 lb
Embossing folder: Cuttlebug Swiss Dots

Watercolor is such a fun look for cards and is easy to do.  All you need is paper (I like watercolor best for this, but use what you have), dye ink, a stamp and a spray bottle.


Just ink up your stamp and spray some water on it.  Alternatively, you can spray the water out into the air and waft your stamp through the resulting mist.  


Use a little, or a lot.  Your results will be different depending on your ink, paper and amount of water, but they likely all will be pretty.  I say, "embrace the results!" For another look, use multiple colors of ink on the same stamp.


This card was submitted to the following challenge:  StampTV MixItUpMonday - Going Green