Wednesday, January 30, 2019

Ornate Floral Valentine Card

Hello! Thanks for coming by today.  I am working away on Valentines to send to family.  I try to send to my parents, grandparents and all my nieces and nephews, and of course DH and my own kids. For this card, I combined two different stamps sets and some pretty patterned papers.

I heat embossed the word LOVE and several of the flower stamps with Gold Detail Embossing powder over some patterned paper. I then used water-based markers to color some of the details in the LOVE stamp.  I trimmed all the pieces out.


Then, I used a coordinating piece of patterned paper for my background, and arranged the stamps over top.  The LOVE and two of the little flowers are popped up on foam tape.  I then finished the card by adding some clear glitter Nuvo drops around the card, for embellishment.

I also used the scrap of patterned paper, and some more stamped flowers to finish the inside of the card.  


Supplies: I Brake for Stamps Floral Love -single stamp, Wedding Sheet stamp set, Floral Half Sheet stamp set, Love Nicole Aquarelle 6x6 paper pad, Recollections Gold Detail Embossing powder, Nuvo Crystal Drops Blizzard, purple cardstock from my stash.
(Save 10% on your order at I Brake for Stamps with my code SAVE10HEIDI)

Thank you for all your kind comments. They make my day!

Heidi


Sunday, January 27, 2019

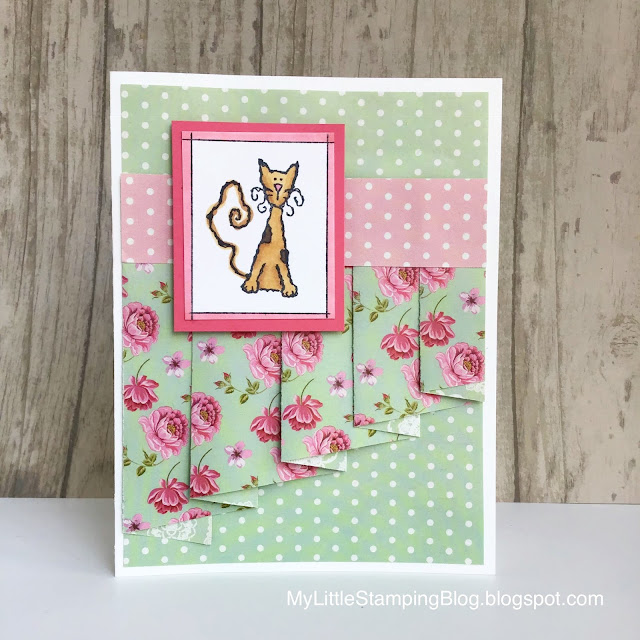
Valentines with the Drapery Fold

Hello cardmakers!  I am just getting started on my Valentines.  I hope that I will have enough time to make them all.  For these cards, I decided to use some of my free magazine papers and do drapery folds.  

There are so many various instructions available online for these folds. I will just list a couple links below.  It is also called the Pleated Skirt Fold.  I did one that was a horizontal and one that is vertical.  


Drapery card instructions found at these site:


I’d love to enter these cards in Cards in Envy’s Love Me or My Pet challenge.

Thanks for your visit today!

Friday, January 25, 2019

Credit Card Swipe Technique with Distress Oxides

Hello! In my craft group, we were challenge to use the Credit Card Swipe Technique to make some backgrounds and then make a card to swap.  

I used three colors of Distress Oxide ink for my background - Squeezed Lemonade, Faded Jeans and Cracked Pistachio.  I smooshed them onto the craft sheet, then spritzed with a touch of water.  You try to scrape up some of the color onto an old credit card and then swipe it over the paper again and again.  I used regular cardstock.  


I do wish I got some wider areas of color, but this one turned out well enough, especially after you stamp a silhouette stamp over it.  This stamp is all in one, although it looks like it could be several stamps.  

Supplies: Just for Fun Rubber Stamps Sea Turtle Seascape, Technique Tuesday Outdoors Planner Stamp set (sentiment), Distress Oxide Black Soot (for Stamping) Squeezed Lemonade, Faded Jeans and Cracked Pistachio (for background), Avery Elle tag die from Wonky Stitched Rectangles set, other items from my stash.

I’d love to enter these challenge:
Lost Coast Design - Silhouettes
Cute Card Thursday - Critters
Word Art Wednesday - Anything Goes

Have a great day!

Wednesday, January 23, 2019

Season’s Greetings Penguins

I hope you are safe and warm after the weekend storm.  It ended up being mostly rain for us, and then the big freeze.

I found this image, already colored, on my craft desk when I was cleaning up, so in this frigid weather, it just seemed like the right time to make it into a card.


The image was colored with alcohol markers, and then I die cut it out.  I also use the same die cut for the red cardstock.  I added some punched little banners that were cut from red lumiere paper.  It adds a subtle shine.

I have really started to appreciate stamps that have the sentiment included.  That really cuts down on time, especially when you might be using it to mass produce your Christmas cards.  Never too early to start thinking about it!

Supplies: I Brake for Stamps Season’s Greetings Penguins, Memento Black ink, Spectrum Noir alcohol markers, Gina Marie X Stitched Rectangle dies, American Crafts Let It Snow 6x6 patterned paper, EK Success banner punch.
(Save 10% on your order at I Brake for Stamps with code SAVE10HEIDI)
Have a wonderful day!

Sunday, January 20, 2019

Together We Can Do So Much

Hello, I hope you are doing well!  Just for Fun’s monthly challenge for January is a color challenge - Blue and Silver!  I made a card today for the challenge.  


I stamped the HUGE World Background stamp with silver Brilliance ink onto Navy cardstock. It gives a nice understated shine.  I liked the different images of world landmarks in the stamp, so I thought of the quote by Helen Keller.  I also stamped some little snowflakes in light blue over the quote before framing everything out with silver glitter paper. 

I hope you will play along with our challenge.  Check out this post for all the details!


Have a great day!


Thursday, January 17, 2019

Hokey Pokey

Hello, stamping friends!  I hope you are doing well.  We are in for some weather in the next few days with the approaching storms, we shall see how much snow we get!  The weather forecasters present so many different scenarios nowadays, it is hard to know what to expect!

Anyhow, I have had the idea to pair this funny sentiment with this cute dancing monster, and finally had time to put the card together. 


I first colored the monster using alcohol markers and some glitter gel pen and even a white gel pen for the tooth.  I trimmed it out with scissors.  Then I stamped the sentiment on my white panel and die cut out a pattern in the corner using a Tim Holtz die.  The panel was placed over a Distress Oxide background and the monster popped up on foam adhesive.


Supplies: I Brake for Stamps Hokey Pokey, Monster Mash, Memento and Versafine black inks, Spectrum Noir alcohol markers, Sizzix Tim Holtz Mixed Media die, Distress Oxide blue ink.
(Save 10% at IBFS with code SAVE10HEIDI)

I would love to play along with these challenges:
Cute Card Thursday - Banish the Blues
Dies R Us - Anything NEW (my die is new!)
SimonSaysStamp Wednesday - Clean and Simple
City Crafter - Cute and Simple

Monday, January 14, 2019

Pastel Chris-mouse Card

Hello!  I hope you are well. It is very cold with just a touch of snow on the ground here.  It definitely feels like winter.  I have my first Christmas card of the year to share with you.  My regular readers know that I make Christmas cards year-round, however, I definitely didn’t intend to start making them this early.  However, I have been mulling over a few blog challenges, and this is just the card that evolved with the inspiration.


I paper pieced the mouse’s pj’s with some scrap patterned paper from a Christmas pack, then colored her with pencils.  I matted the image with some glitter cardstock that looked white until I used it on this project, and now it looks pink!  

The background stamp was inked up in Distress Oxide ink.  I then stamped the saying and used loose glitter around the edge of this.  My snowflake punch seemed to be the right embellishment for this.  

Supplies:  Art Impressions Chris-Mouse Mini Shaker stamp set, Hero Arts Berry Background stamp, Versafine Black ink, Distress Oxide Tattered Rose Ink, Crate Paper Peppermint paper pad, LoveNicole glitter cardstock, EK Success Snowflake and Square punch, other items from my stash

I would love to play in Art Impressions Pretty Pastel challenge, Pixie’s Snippets Playground Anything Goes with scraps challenge,  and Tuesday Throwdowns Winter Sparkle challenge.

Thank you for your kind visit!  I truly love reading every comment!

Wednesday, January 9, 2019

Freddie the Frog with a Bad Memory

Hello! I hope you are well today!  I have a fun card to share that is actually a mix of a digi image and a rubber stamp. I have a certain friend in mind for this card, I will use it for his birthday.


I used the digital version of the Trampoline Freddie stamp (but it is available in rubber, too) and colored it with markers.  I then die cut it out and framed it with navy cardstock.  The background was made by scribbling water-based markers onto watercolor paper, spritzing liberally with water, then adding chunky pretzel salt onto the piece and letting it dry.  It created this cool pattern! 

 Here is a photo of the entire panel. I actually made this months ago but couldn’t bring myself to use it for a while since I liked it so well!


Supplies: I Brake for Stamps Trampoline Freddie (digi) (Also available as rubber Trampoline Freddie (rubber) and in a stamp set Freddie, Mice and More rubber sheet), Bad Memory Sentiment stamp, Spectrum Noir alcohol markers, Versafine Majestic Blue ink, Background uses watercolor paper and Tombow water-based markers, Love Nicole brand sugar dots. Gina k/Thermoweb Double Stitched Rectangle die set.
(Use my coupon code SAVE10HEIDI to save 10% off your order at the IBFS Store.)

Thanks for visiting my blog today! And double thanks if you take the time to comment or follow my blog.


Sunday, January 6, 2019

Beach Cards - One Image/Two Occasions

Hello! I’d like to share a couple beach themed cards.  When the weather gets cold, I tend to use a lot of seasonal stamps, but it is fun to change it up and warm up by using summer stamps in winter weather.


The first card was has the beach scene stamped over patterned paper.  I added a cute pineapple charm to this card. That sentiment is the BEST!  I have been trying to be mindful to create some real vacations in my life, and not just trips that are more work than staying home.  We did a staycation last summer and I highly recommend them!

 I had decided to use this same image as an atypical Sympathy card.  I stamped over a watercolor wash ombré background. I paper pieced a yellow sun/moon (whichever one you are seeing is what it is!) and simply framed it and added a sentiment.  This was a card especially made for my mom, who lost a friend recently.  They had good memories of girls weekend beach vacations, so I thought this image was just the right thing.


Supplies: Just for Fun Rubber Stamps Pier Silhouette stamp, A Vacation is... sentiment stamp, ODBD Carried to Heaven sympathy stamp set, Versafine black ink,  Love Nicole Aquarelle 6x6 paper pad, other items from my stash.

Thanks for visiting today!!

Friday, January 4, 2019

Recycling Christmas cards into Tags

Happy Friday!  Today I have a quick project idea for recycling Christmas cards that you may have received.  In addition to some lovely handmade cards and store-bought cards from family, I tend to get some generic ones from charities and also extras that have a gift card inside and no message.  


So I made a tag!  The tag base is die cut from the card front, and the poinsettia is also part of that same card.  I added a punched snowflake, decorative brad, stickles and twine.  The tag sentiment is stamped on the back.

I know that I will be happy to have these already made next year when I get out my wrapping supplies!  

Thanks for stopping by today!  And head on over to the Free for All challenge at Splitcoaststampers to see the Recycle a Christmas card challenge.

Have a great day!!

Thursday, January 3, 2019

First card of the year! Fuchsia Flowers!

Happy New Year!  I hope you had a great holiday season!  This is my first card of the year.  The holidays were busy, and I was only perusing blogs every now and then.  Unfortunately, I am again having trouble commenting on certain blogger blogs - the ones where the comment box is embedded in the post instead of opening a new window.  It always makes me sad when I can’t comment.  

Anyhow, here is my first design team post for IBFS this year.  I wanted to thank the owner, Della, for giving us a large portion of December off.  Not every DT does that and I appreciated the thoughtfulness!


I stamped twice, then colored the fuchsia stamp from this Floral Half Sheet stamp set. I then fussy cut with scissors and a craft knife.  I added some glitter glue to the flower to add shine and dimension.

Next, I stamped the Iron Work Background stamp with navy ink on light blue cardstock.  I decided to make a frame out of this by using a circle die (stay tuned for how I will use this part of the image, it is too pretty to toss). 

 I found a scrap of embossed cardstock to put behind the frame, then arranged my flowers.  


Supplies: I Brake for Stamps Floral Half Sheet, Iron Work Background, Memento black ink, Hero Arts Navy Shadow ink, Cuttlebug embossing folder, Spectrum Noir alcohol markers, Nuvo drops Blizzard glitter glue, cardstock from my stash.
(Use my coupon code SAVE10HEIDI to save 10% on your order at the IBFS store.)


Thanks for stopping by today!